The Ravemen FR500
The Ravemen FR500 is the big brother to the FR160 that I reviewed in early 2023. The FR500 took a lot of the same ideas, the mounting and wrap-around LEDs, but added power-bank capabilities and two additional LEDs for night illumination.
Ever since Ravemen released this style of light and mounting system, quite a few other companies have followed suit, and made their own version. I really have enjoyed the dual mounting capabilities, so depending on what I am carrying, or what gadgets I am using, there is a way to mount the light.
Unboxing
In the box of the Ravemen FR500 is the main light body, a tether, a short USB-C to USB-C, a short USB-C to Micro USB cable, adapter for Wahoo (top and bottom), and a manual/warranty card. On the Ravemen site there are two additional options: one with Bryton Adapters, and another with a GoPro to Garmin quarter-turn to mount underneath.


Warranty
Ravemen provides a 2-year warranty from the day of purchase for material defects and workmanship. Then there is a limited lifetime warranty after the 2nd year. The limited lifetime warranty seems a bit vague and I’m not entirely sure what it covers.
Price
The light typically goes for $64.95 USD, but it is currently at $54.95. Make sure to use my code JAYLO10 to get an additional 10% off.
This works out to about $0.13/lumen (or $0.11/lumen with the sale).
The Light
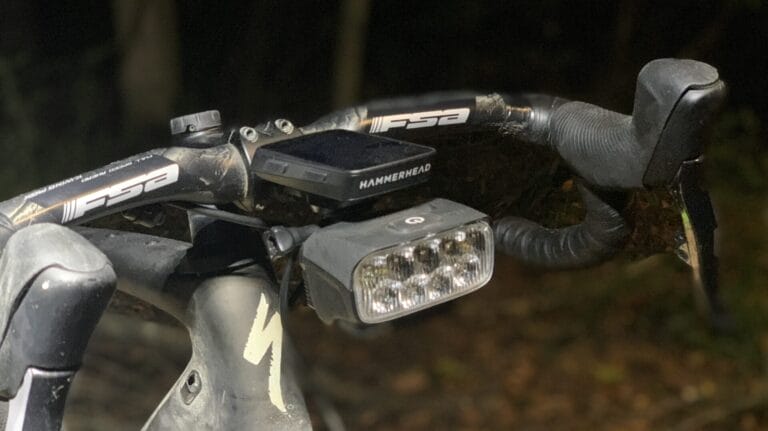
The Ravemen FR500 is the integrated bike computer stacking design. The relatively thin design only raises the computer slightly and doesn’t take up space on your handlebars. It also allows for the installation of an action camera underneath the mount.
The light has an Auto on/off function that will automatically shut off after two minutes of inactivity and will turn back on when vibrations are detected.
The body is constructed from plastic, including the quarter-turn mounts. Underneath the light there is an aluminum alloy heat dissipation block with grooves to allow airflow to cool the device.
Specs
- Max Output: 500 Lumens
- Light Source: 2 LEDs
- Runtime: 2.5-36 hours
- Charge time: 2 hours (5 V 1 A)
- Battery: 3.7 V 2000 mAh Li-polymer
- Charge Port: USB-C
- Water Penetration: IPX6
- Weight (mass): 3.56 oz (101 g)
- Size: 82x60x25 mm

Light Modes
The Ravemen FR500 has 6 light modes. High, Mid, Low, Warning Flash, Rapid Flash, and Slow Flash. See the following table for all the brightness and runtime details.
On the side of the light located on the power button is the battery indicator. The battery level has 3 levels of indication: Green (100%-40%), Red (40%-5%), and Flashing Red (<5%). Like other lights I’ve tested, I find this large gradation frustrating. I want more granularity to better estimate the battery level before going out on a ride.
Charging/Discharging
The Ravemen FR500 has a USB-C charge port and take roughly 2 hours to charge using a 5V1A source. The USB-C is in the rear of the light and is covered with a rubber panel to prevent water intrusion. With the charge port located on the rear of the light, using the power bank function could be difficult for some tight setups.
A new feature now offered on the Ravemen FR500 is the power bank function. This allows you to charge a small device from your light. Below you can see the results of using the light as a power bank.
Light Interface
The light has a single button to control the device. The power button turns the device on and scrolls through the different light modes. The button also serves as the battery level indicator, using the same levels mentioned above.


Mounting
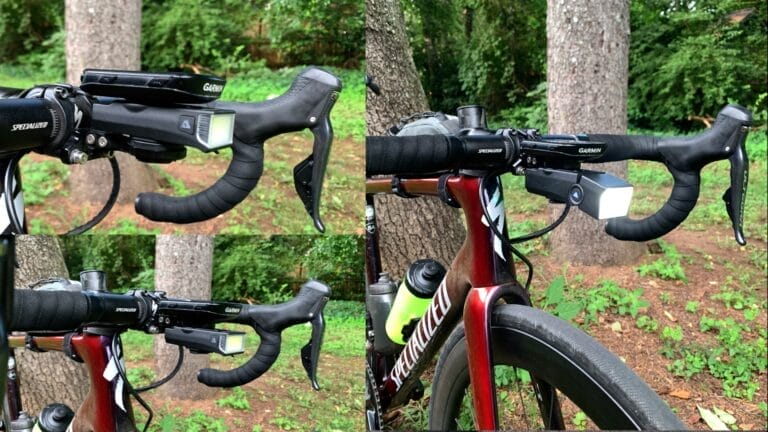
Mounting the Ravemen FR500 is very simple and, with an already installed out-front mount, it is very quick. Just place the light at a 90-degree angle from forward and rotate towards the front. The cleverness about this light is that the quarter-turn is located on the top and the bottom of the light. If you have a Garmin or KOM Cycling mount, the light can be installed from underneath without an adapter.
If the out-front mount is installed relatively flat on the bike, then it is possible that no adapter will be needed. If the mount is skewed up or down, then an adapter will be needed to get the most visibility out of the light and not blind oncoming traffic.


Initial Thoughts
I am a big fan of the FR160 so in theory I like this light too. The Ravemen FR500 though is noticeably thicker than FR160 and understandably so since it has a bigger battery and two dedicated LED bulbs. I have been using this style of mounting system for a few years now, so the novelty has worn off, but it is my preferred mounting system for smaller lights.
I’m eager to test it out and see how it performs, I’m expecting it to not be very useful in very dark areas, and I think it will be for riding in areas with ambient/partial lit areas like within a city with streetlights. 500 lumens these days is very bright and most of my night riding is down with at least 1000 lumens or more.
The FR500 has power bank capabilities, which I will assume is for emergency use only. I expect it to eat up most of the battery when charging a phone or cycling computer. The power bank will get you that little bit of charge to get you home.


Light Performance
Procedure/Setup
The light intensity is being measured with an Extech SDL400 light meter and datalogger. The lights and the light sensor are attached to various tripods that I already own and are held 1 m apart from each other. The datalogger is started, and the light is turned on and shone directly onto the sensor.
The test is conducted in a completely dark room with a fan running to ensure air is circulating over the light. The test runs continuously until the battery dies. The light is then recharged and retested for each steady light mode. For the flash mode, testing lasts about 1-2 hours.
Typically, flash modes are only for user visibility, so I’m not very concerned with the light intensity reduction over time as much as the steady mode.
For the full test setup and the benefits for this test setup, check out Light Intensity Test Setup with Extech SDL400.
Testing
I tested each constant Light mode on the Ravemen FR500 for intensity and duration. I also tested a Night Flash mode for about 2 hours to see how the light performs over a short period of time. Then the FR500 is compared to a few other lights with similar claimed lumen ratings.
Also, I am plotting the data as perceived light as a percentage and is:
Perceived Light (%) = 100 x sqrt(Measured Light (%)/100)
where Measured Light (%) is the Current Lux/Maximum Lux x 100. For the perceived light calculation, the max lux is used for all light modes. For comparing multiple lights, the max lux from the lights being compared is used. In other words, the perceived light comparison is relative to the brightest light being compared.

Test Results
The Ravemen FR500 hit all the claimed runtime targets. For High and Mid it exceeded runtime by 26.7% and 29.8% respectively. This is a good sign that Ravemen is testing their lights and properly reporting the values.
The lux testing tells a slightly different story. The High mode had two large drops of light intensity within the first 30 mins (nearly 300 lux), then steadily declining. By cutoff the light had dropped almost to 300 lux.
The Mid and Low modes had relatively steadily, besides from one small step in the Mid mode. Mid mode dropped roughly 300 lux and Low about 50 lux.

The lux testing can look harsh, but the perceived light gives a better sense on performance based on the human eye. The High mode dropped twice sharply in the first 30 mins, then declined steadily, putting it at about 85% perceived output and at about 65% perceived output near shutoff.
At cutoff, the High retained 57% of max candela, Mid 62%, and Low 72%. This shows that the light is dissipating heat well and the drivers regulate the light output decently. The Mid and Low performed especially well, with only about a 20% and 15% drop in perceived light output, respectively.
The following table has calculated statistics from each light mode test. Since the test setup had the lux meter sensor 1 m away from the light, it made the math quite easy. For Candela (cd):
Candela (cd) = Lux (lx) x (Distance)^2
where Distance is the distance between the light source and the Lux sensor.
The 10% cutoff value comes from the ANSI/PLATO FL-1 testing standard. It is used to determine the total runtime of a flashlight. When the light output hits 10% output of the light output measured 30 seconds after the light is turned on. The 30 second wait time allows for the LED and drivers to thermally stabilize.
The retention is the average output divided by the peak value. This tells how much of the peak value is retained over the average output of each test. Thus, a higher retention will give a steadier output with smaller drops over the test. Low retention value means a company is likely seeking to get a high lumen rating and isn’t worried about light performance.
From the table, significant differences can be seen in peak intensities and total light delivery (lux*hr) when comparing High, Mid, and Low modes ranging from 1522 to 801 lux*hr. The High mode has the highest amount of accumulated exposure, indicating the Mid and Low modes perform not so well even though delivering steady light output.
| Ligh Mode | ANSI 30s (lx) | 10% Cutoff Threshold (lx) | Lux at Cutoff (lx) | Avg Output (lx) | Retention (%) | Exposure (lx·h) | Cd/Lm | Throw (m) |
|---|---|---|---|---|---|---|---|---|
| High | 841 | 84 | 205 | 481 | 57% | 1522 | 1.69 | 58.2 |
| Mid | 297 | 30 | 79 | 190 | 62% | 789 | 0.61 | 34.9 |
| Low | 170 | 17 | 51 | 123 | 72% | 801 | 0.34 | 26.2 |
Interestingly, since most companies have adopted to use ANSI/PLATO FL-1, expectations for light output and runtimes need to be tapered. But I think if a company is reporting a runtime for a light, it should be easily validated and achieved. Anything less than what is reported is unacceptable.
The Ravemen FR500 hit all expected runtimes and surpassed them by at least 25%.
| Light Mode | Expected Runtime | Recorded Runtime | % Difference |
|---|---|---|---|
| High | 2:30:00 | 3:10:03 | 26.70% |
| Mid | 3:12:00 | 4:09:17 | 29.80% |
| Low | 6:30:00 | 6:30:42 | 0.20% |
To test the power bank capabilities, I charged my Garmin Edge 840 Solar that was completely dead to full charge. Then I tested the runtime remaining on Low mode. After charging the device the Ravemen FR500 ran almost 2-hours. The Lux output matches the last 2 hours from the full Low mode test.

Limitations of this Test
The lux meter test doesn’t consider the beam spread or throw of the light. Thus, a light with a compact beam could perform very well in the light intensity testing, but not be very useful for cycling. Fortunately, this light has been designed for cycling and provides good lighting for cycling.
Beam Spread and Throw
Measuring the theoretical spread and throw from the table above or the values given from the manufacturer is a bit tricky, but I have set up three locations that I feel give a good feel for how the beam spread and throw for light I test are. First, is about 10 ft away from a wall, then in a tunnel, and lastly, in a field.
Projecting the light at a wall this close is a good way to see the actual beam pattern. This also shows any hot spots. The Ravemen FR500 has no real discernible light pattern. There is a bit of a bright area right in front of the bike, but the pattern just spreads wide. And out in the field the spread is quite clear with no main hotspot of light.
This light doesn’t have a very far throw, which is especially noticeable in Mid mode. The spread is quite good and really lights up the area right in front of the bike. In the tunnel, the light performs good lighting up most of the tunnel.


Adapters
Magicshine included a GoPro-to-quarter-turn adapter—crucial for underside mounting when your computer's angle might skew the beam. Some people often set up their out-front mounts to tilt the screens, so direct attachment can throw off that cut-off line. Undermounting is really the only option for this case and the provided mount seems a bit cheap.
Garmin or KOM outfront mounts have male quarter-turn underneath, which will require a slightly different adapter configuration. Options abound—male-to-male, female-to-male, whatever fits your need.


Pros
- Clean stackable design for Garmin/Wahoo
- Good side visibility (wrap-around LEDs)
- Strong runtime (exceeded claims)
- Auto on/off + power-bank function
- Compact and relatively affordable
Cons
- Limited throw for high-speed night riding
- Noticeably thicker than the FR160
- Output drops in High mode
- Coarse battery indicator
- Needs use of adapter for best beam angle


Final Thoughts
This little Ravemen FR500 light packs quite the punch. For such a compact light with a relatively modest lumen rating, it really lights up the path ahead. Ravemen markets the FR500 for night illumination and for night riding, and I would agree it can serve those purposes, but with an important caveat.
For high-speed solo road riding, this would not be my first choice. The beam throw of this light just isn’t far enough. While the spread is good, the limited distance won’t give adequate reaction time. In a large group, however, it works well. The light is bright enough to be useful without being so intense that it blinds other riders.
At 2 hours and 45 minutes of useable light, it not only hits the claimed runtime target but also only drops to about 65% of its initial perceived output. I hesitate to call that impressive, but it is typical of many lights on the market. Ideally, better drivers would keep the drop closer to zero (see Outbound Lighting).
When I first reviewed the FR160, and when this style of light first came out, it was impressive and quickly became one of my favorites for daytime riding. The Ravemen FR500’s larger battery and brighter LEDs mean it now need more careful alignment than a pure visibility light.
This isn’t a big deal with the use of adapters, but the FR500 isn’t quite a slim as the original.
One of the nicest things about the Ravemen FR500 is how sleek and slim it is. Its compact size makes it ideal for riders who want a low-profile light with minimal wind resistance. The wrap-around LEDs also give about 180 degrees of visibility.
If you mainly need strong visibility to other road users and only minimal path illumination at night, the Ravemen FR500 is a good choice. If you are doing a lot of night riding and want better throw to light up the path ahead, I would look at the FR1100, the FR1500 Bike Front Light, or the UR1700.


Author Conflicts
I purchased the Ravemen FR500 on my own. There was no compensation from Ravemen or communication from Ravemen about this review—just my honest take to help you decide if it’s your next light.
SUPPORT JAYLO CYCLING
Did you find this post useful? Drop a comment with questions or future review ideas—my dives take time, but they’re worth it. Hit up my Instagram, YouTube, and Facebook for more. Feeling generous? Buy me a coffee to fuel the site. Thanks for reading—subscribe to the newsletter and keep rolling!