


Magicshine EVO 1700 Headlight
Get 15% off the Magishine EVO 1700 and SEEME DV Camera Taillight on Amazon (these are not affiliate links) use code 15OF38SS (Valid for 30 days). Or head over to their website and get 15% off the Magicshine EVO 1700 and SEEME DV using code Jason15.
Tis the season for night riding.
If you are reading this review, it is more than likely you are in the market for a new light. And the Magicshine EVO 1700 is here to light up your night.
The newly released Magicshine EVO 1700 boasts an impressive 1700 lumens (lumens is the total amount of visible light, thus more lumens the brighter the light). This light also has a good-sized battery to power the light for long evening rides.
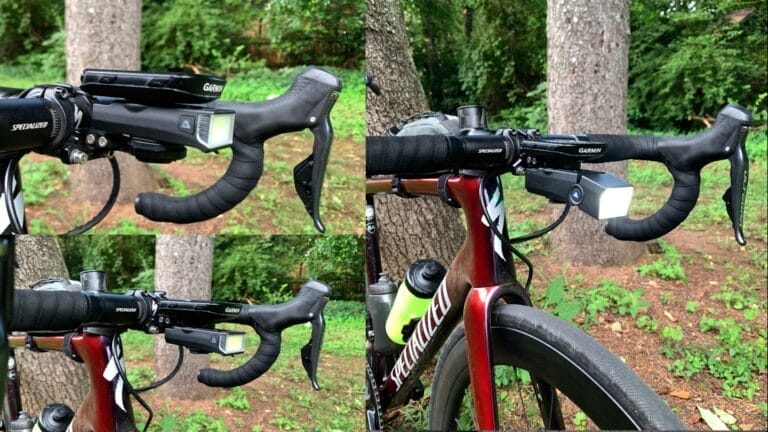
The Magicshine EVO 1700 is Magicshine’s first underneath mount bike light. Making it a welcomed edition to their already extensive lineup of lights. For those of you not wanting to mount a light to your bars, or looking to add an additional light, this could be a good option for you.
Check out my review of the Magicshine SEEMEDV Camera Taillight.

Unboxing
The Magicshine EVO 1700 comes with everything you need to get riding at night. Don’t worry if you don’t have out-front mount, it has one included. The out-front mount comes with three different shims, allowing you to attach the mount to most round handlebars (28 mm, 32mm, and a 35 mm).
Also included, are Allen/hex keys (2 mm and 3 mm), a USB-A to USB-C charging cable, a bolt and nut to mount the light to the out-front mount, a remote control to change between light settings, and a user manual.


Pricing as of Late 2023
Regular price is $89.99 USD, but with the current Christmas promotion the light is only $71.99.
Magicshine has specialized in providing affordable lights and the Magicshine EVO 1700 hits the mark when it comes to cost.
That is about $0.05/lumen! Which seems like a good price.


The Light
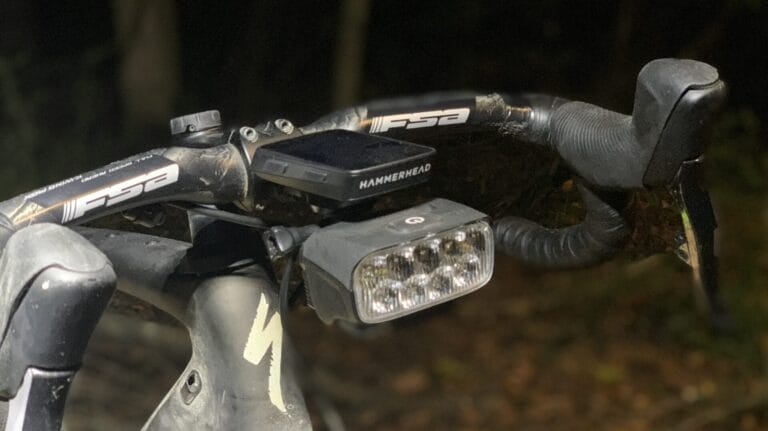
The Magicshine EVO 1700 is definitely like no other light I have seen before. It doesn’t have a long slender cylindrical shape that typical bar mount lights with integrated batteries have. This light is shaped like a cube.
Its measurements are 42 mm wide x 52 mm deep x 58 mm (1.65 in wide x 2.05 in deep x 2.28 in tall) not including the GoPro adaptor on top. And it weighs about 5.5 oz and its mass is about 156 g not including the adaptor or out-front mount.
The frontal area of the light is relatively large, but this is due to the aspherical lens. The curved optical lens refracts the light into the distinctive light pattern given off by the Magicshine EVO 1700.
The body of the light is mainly made from aluminum, and the back portion is made from plastic. I assume that aluminum was chosen for durability and heat dissipation. This light is black with gray writing on it, but it is also available in white too.
Charging time is 5 hours at 5V 1A and the battery capacity is a 3.6 V at 4000 mAH. When on the low beam low setting, the Magicshine EVO 1700 has a runtime of 11 hours. It has a 6-hour runtime on the low setting of the high beam.
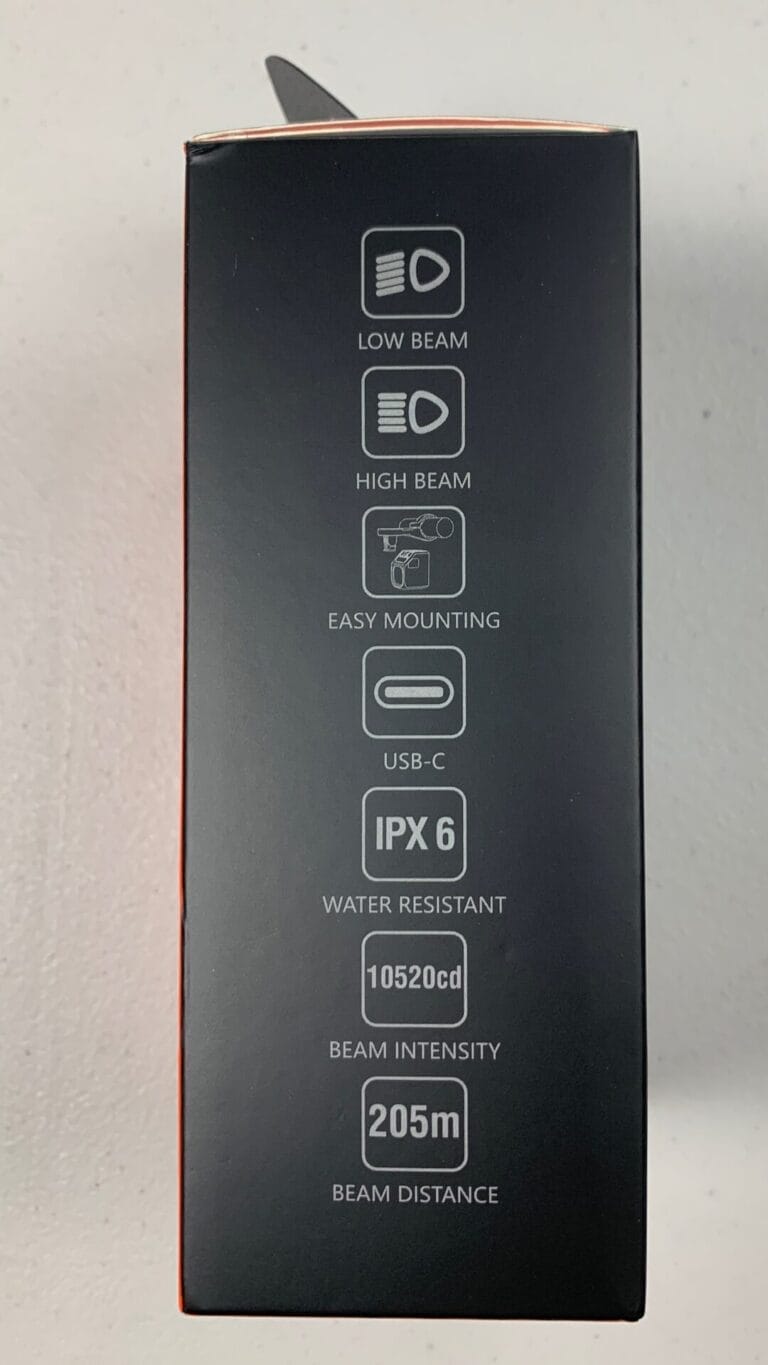
The light uses a high-efficiency LED. It has a max throw 205 m (673 ft) and a beam intensity of 10520 cd.
The Magicshine EVO 1700 has an ingression protection of IPX6, which means it has protection from powerful water jets and it is not intended to be submerged. Thus, this light will have not problems standing up to sideways rain or tire spray.
If power washing the bike though, I would recommend removing the light from the bike first, since high pressure water would fall outside of the intended design water resistance.


Light Interface and Settings and Magicshine App
The light as three Light Modes: Flash, Low Beam, and High beam. For Low/High Beam there are three settings: Low, Medium, and High. And within the Flash more there is Day Flash and Night Flash.
Interestingly, and slightly a downfall of the light, you can’t access all the light modes from the button on the light. You need the remote or the app to access the Flash mode.
When using the button on the light to operate the light you will press and hold for one second to turn it on. Once powered on, double click to switch between high/low beam and single press to scroll between low, medium, and high. The light indicator on the power button lets you know the battery level, Green is 100-21%, Red is 20-11%, and Flashing Red is 10-1%.
The battery level can be accessed while the light is off too by clicking the power button.
If you want ultimate control of the Magicshine EVO 1700, you will want to use the Magicshine App. Connecting to the app is very easy and once connected you can adjust the brightness by 1% increments. You can switch between light modes and save custom settings.

I don’t expect a lot of people to use the app, so I won’t delve too deep into it. But it is still worth mentioning, because you will need the app to access the SOS feature and to upgrade the firmware.
Full details on downloading and connecting to the device and more can be found on the Magicshine App User Manual.
The last and possibly the best/most efficient way to use the light is with the wireless remote. The remote has two buttons, one marked with a square and the other with a circle. The remote allows you to quickly change between modes and brightness levels, power on and off, and go into flash mode.
For full details, check out the Magicshine EVO 1700 User Manual.


Mounting The Light
I won’t go over how to mount the light or how to mount the out-front mount. Read the User Manual above for all those details. The light does come with an out-front mount that has a quarter-turn mount for Garmin on the top side and a GoPro mount on the bottom.
The light adaptor mounts easily to the GoPro mount (both the provided one and 3rd party mounts). I would recommend removing the adaptor when attaching it to the mount to make installing it easier.
Once the adaptor is connected (don’t fully tighten initially), you can adjust the light angle. This will need to be done at night most likely. Most lights you can just slap onto your bike and go, but this one needs to be position while in Low-Beam mode, so the cut-off line is properly aligned.
To do this, place the bike on a level surface and the bike placed about 10 ft (about 9 m) away from a wall. Then measure from the ground to the top edge of the light, take that measurement and mark a line on the wall. Adjust the light so that cut-off line is at that mark and tighten the light.
This will give you a good starting point and you can make a slight adjustment either up or down depending on your bike setup or visual needs.

Initial Thoughts
I expected to the light to be smaller (not in a bad way), from the pictures it looks like it is going to be really small. Once I opened it up and had it in hand, I was pleasantly surprised. It is a solid light that feels light it will be very durable. The light doesn’t feel heavy.
Removing the light is from the quick release is very easy even with gloves on. Though it is very easy to remove, it feels very secure.
The light is quite different looking than other lights and I think it will be an attention grabber when other people see it.
This light uses a USB-C charging port. This is good to see, because this is the type of port that most devices are using now.

Light Performance
The fine people at Magicshine provide all the technical details of the light, but unless you are an electrical or lighting engineer (which I am not) you may not know what they mean or even care to understand.
After falling into the rabbit hole of trying to understand luminous flux, throw, useful lumens, candela, steradians, etc., I have come to realize these values don’t really mean too much. This is especially true about bike lights since there isn’t (that I am aware of) a standardize testing procedure for bike lights.
Magicshine uses the ANSI/NEMA FL 1-2009 for obtaining their data which is the Flashlight Basic Performance Standard, which is definitely a good start, but if other bike light companies aren’t using this standard, it is tough to make direct comparisons based on published numbers.
In the end, all most people care about, including myself, what matters most is once the light is on the bike, how well does it illuminate what is in front. Though, the more lumens a light has the more intensity of light comes out of it, brightness will depend on the spread of the light beam (anyways, enough technical nonsense).
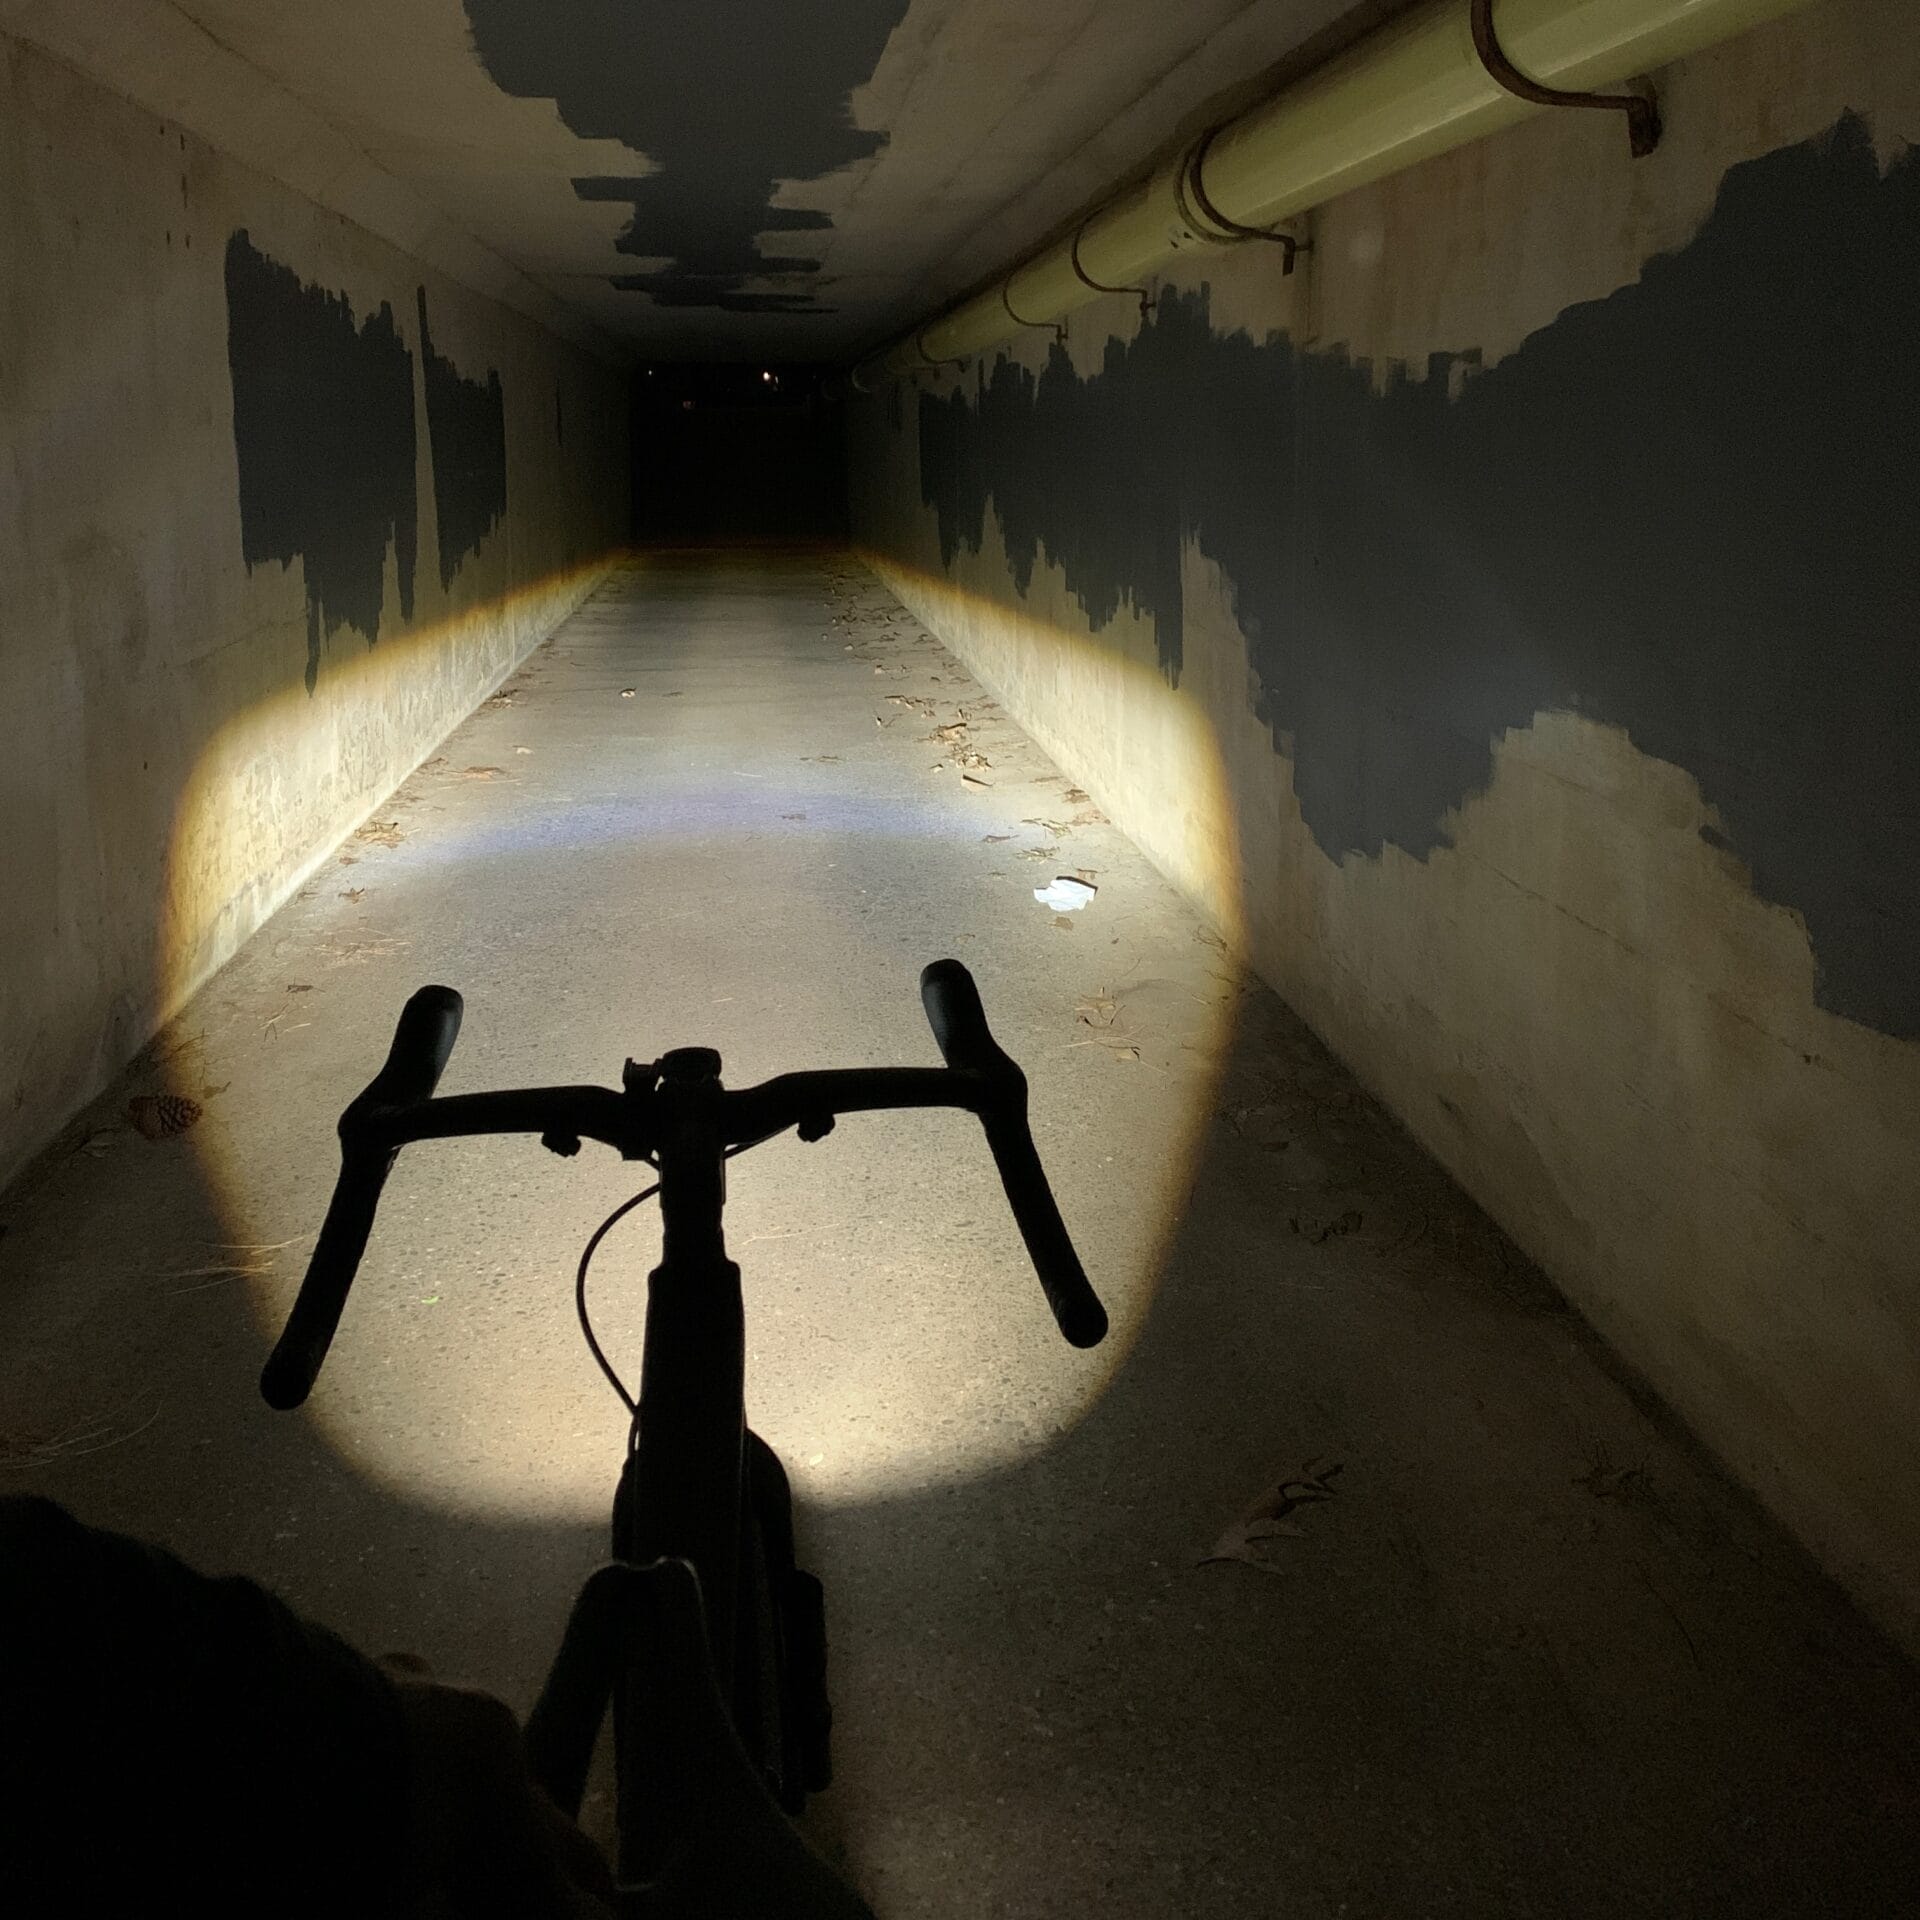
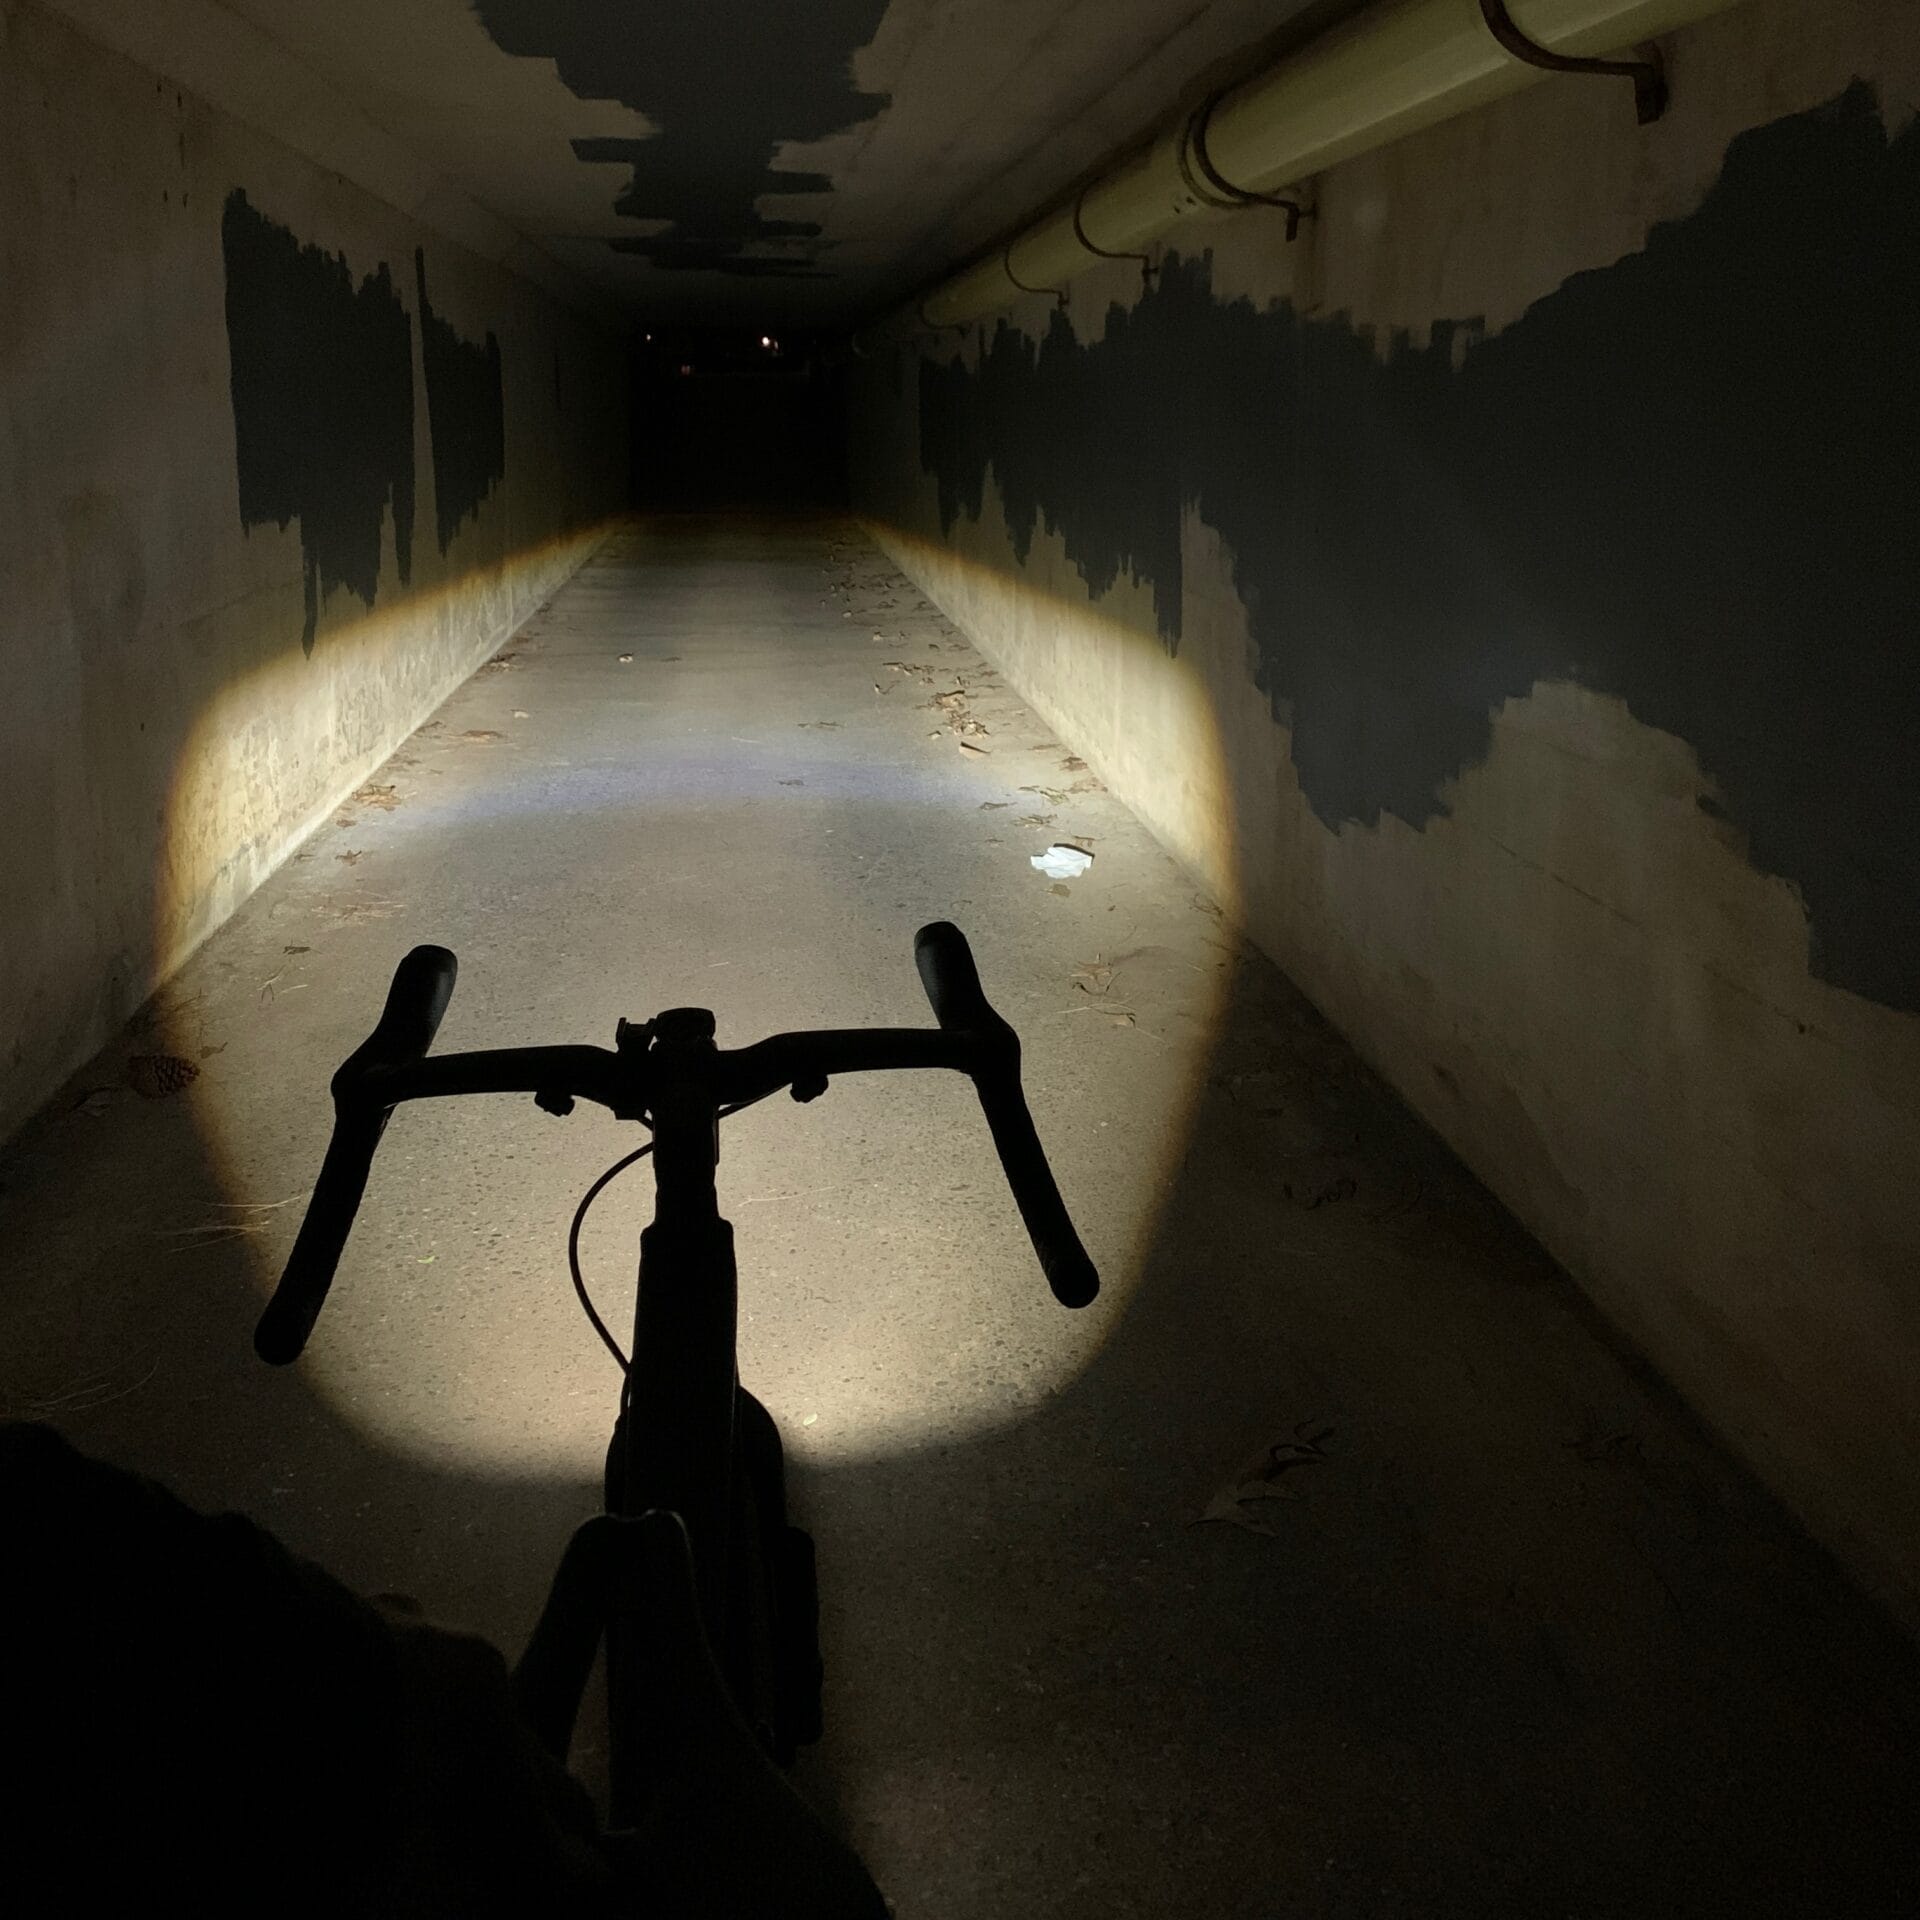
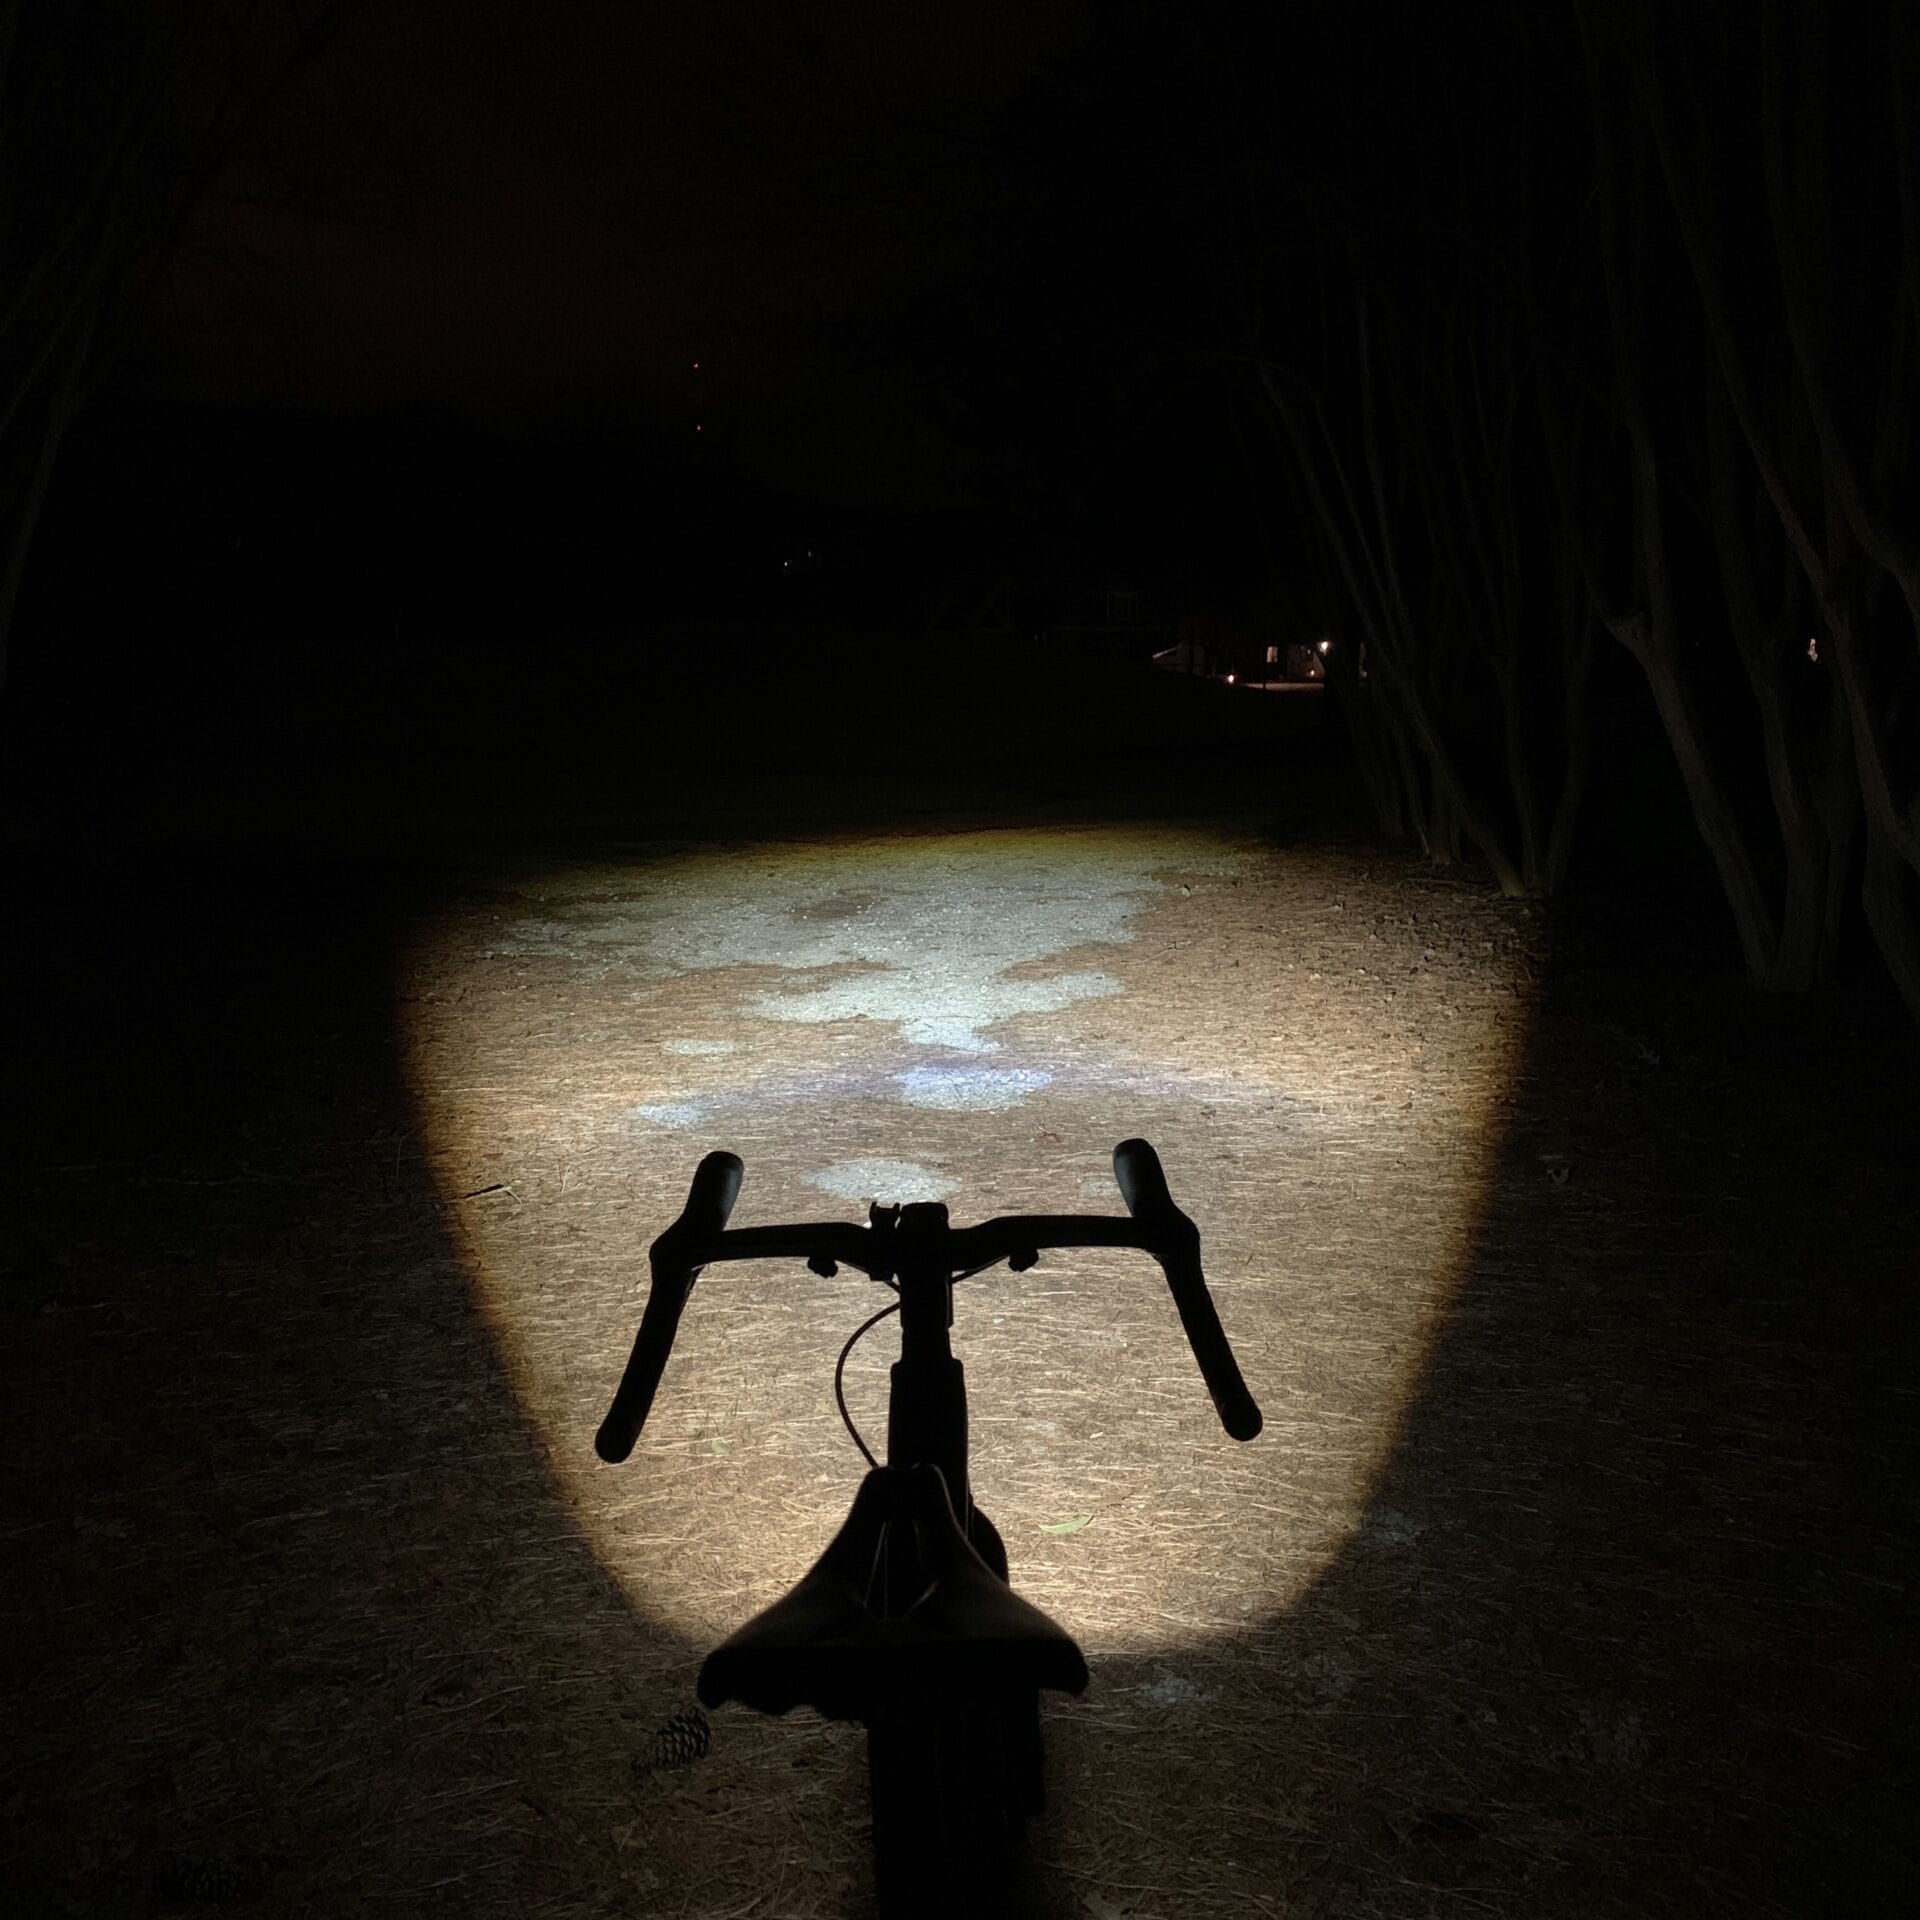
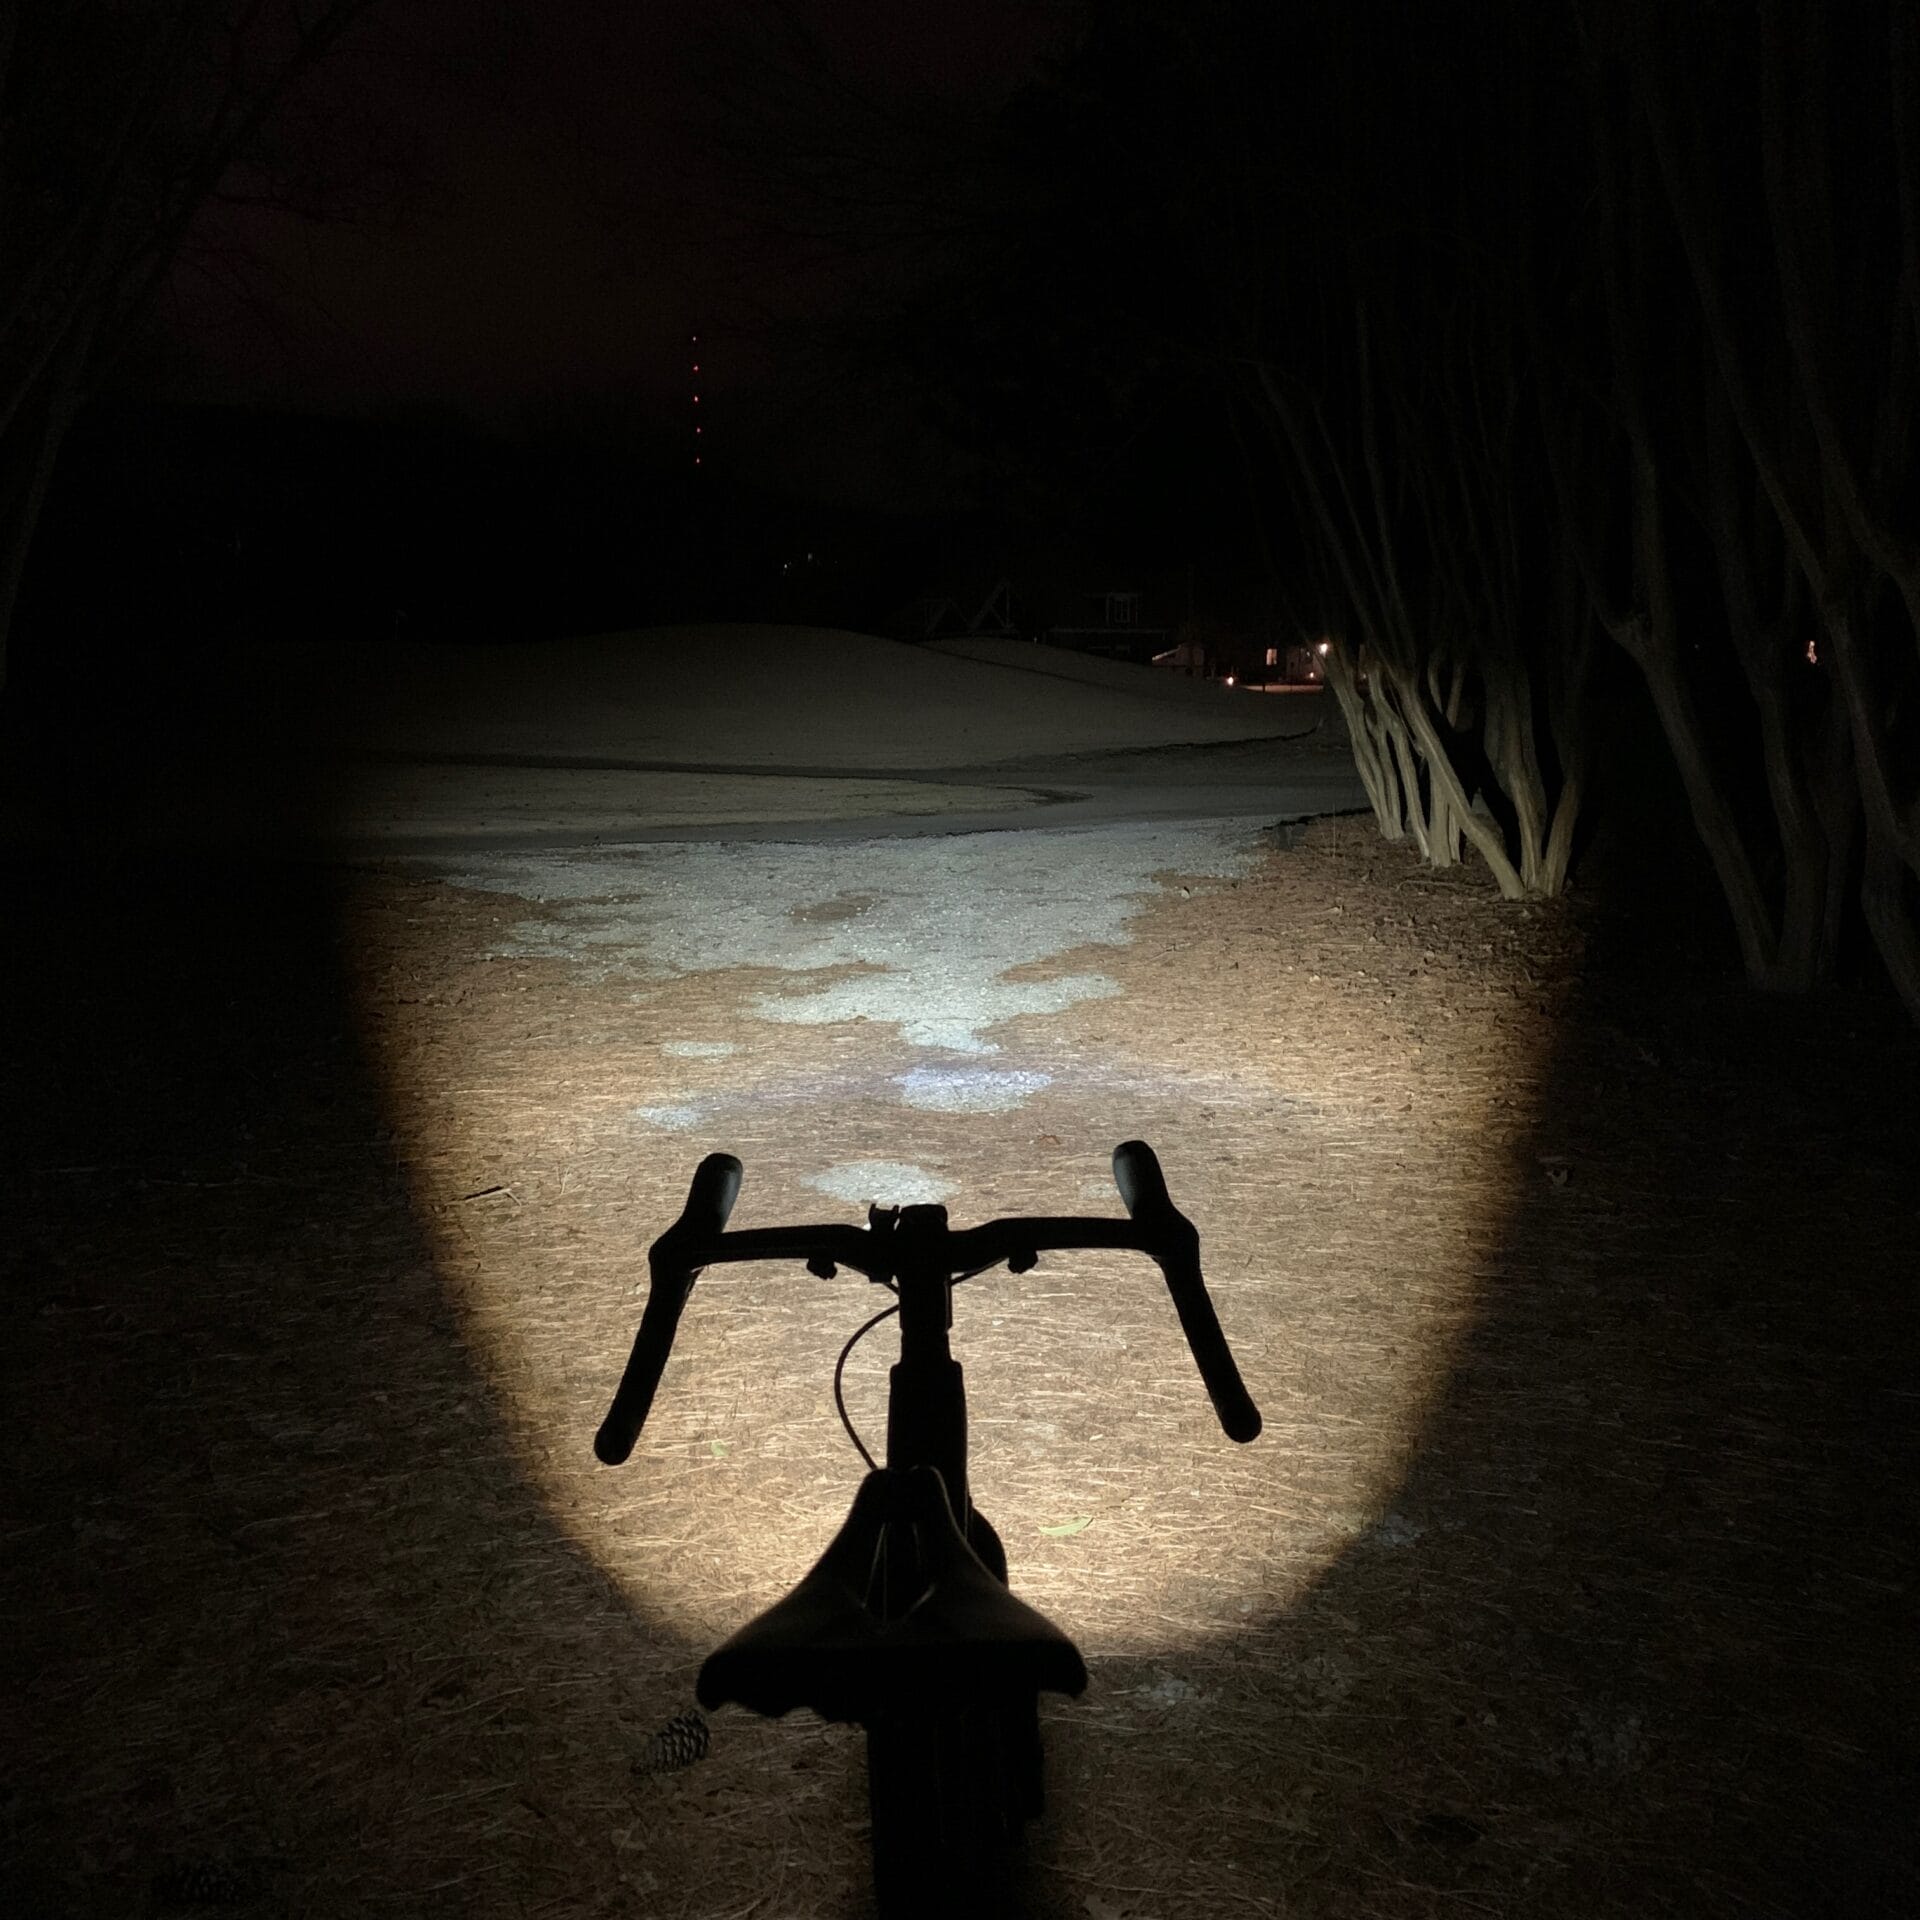
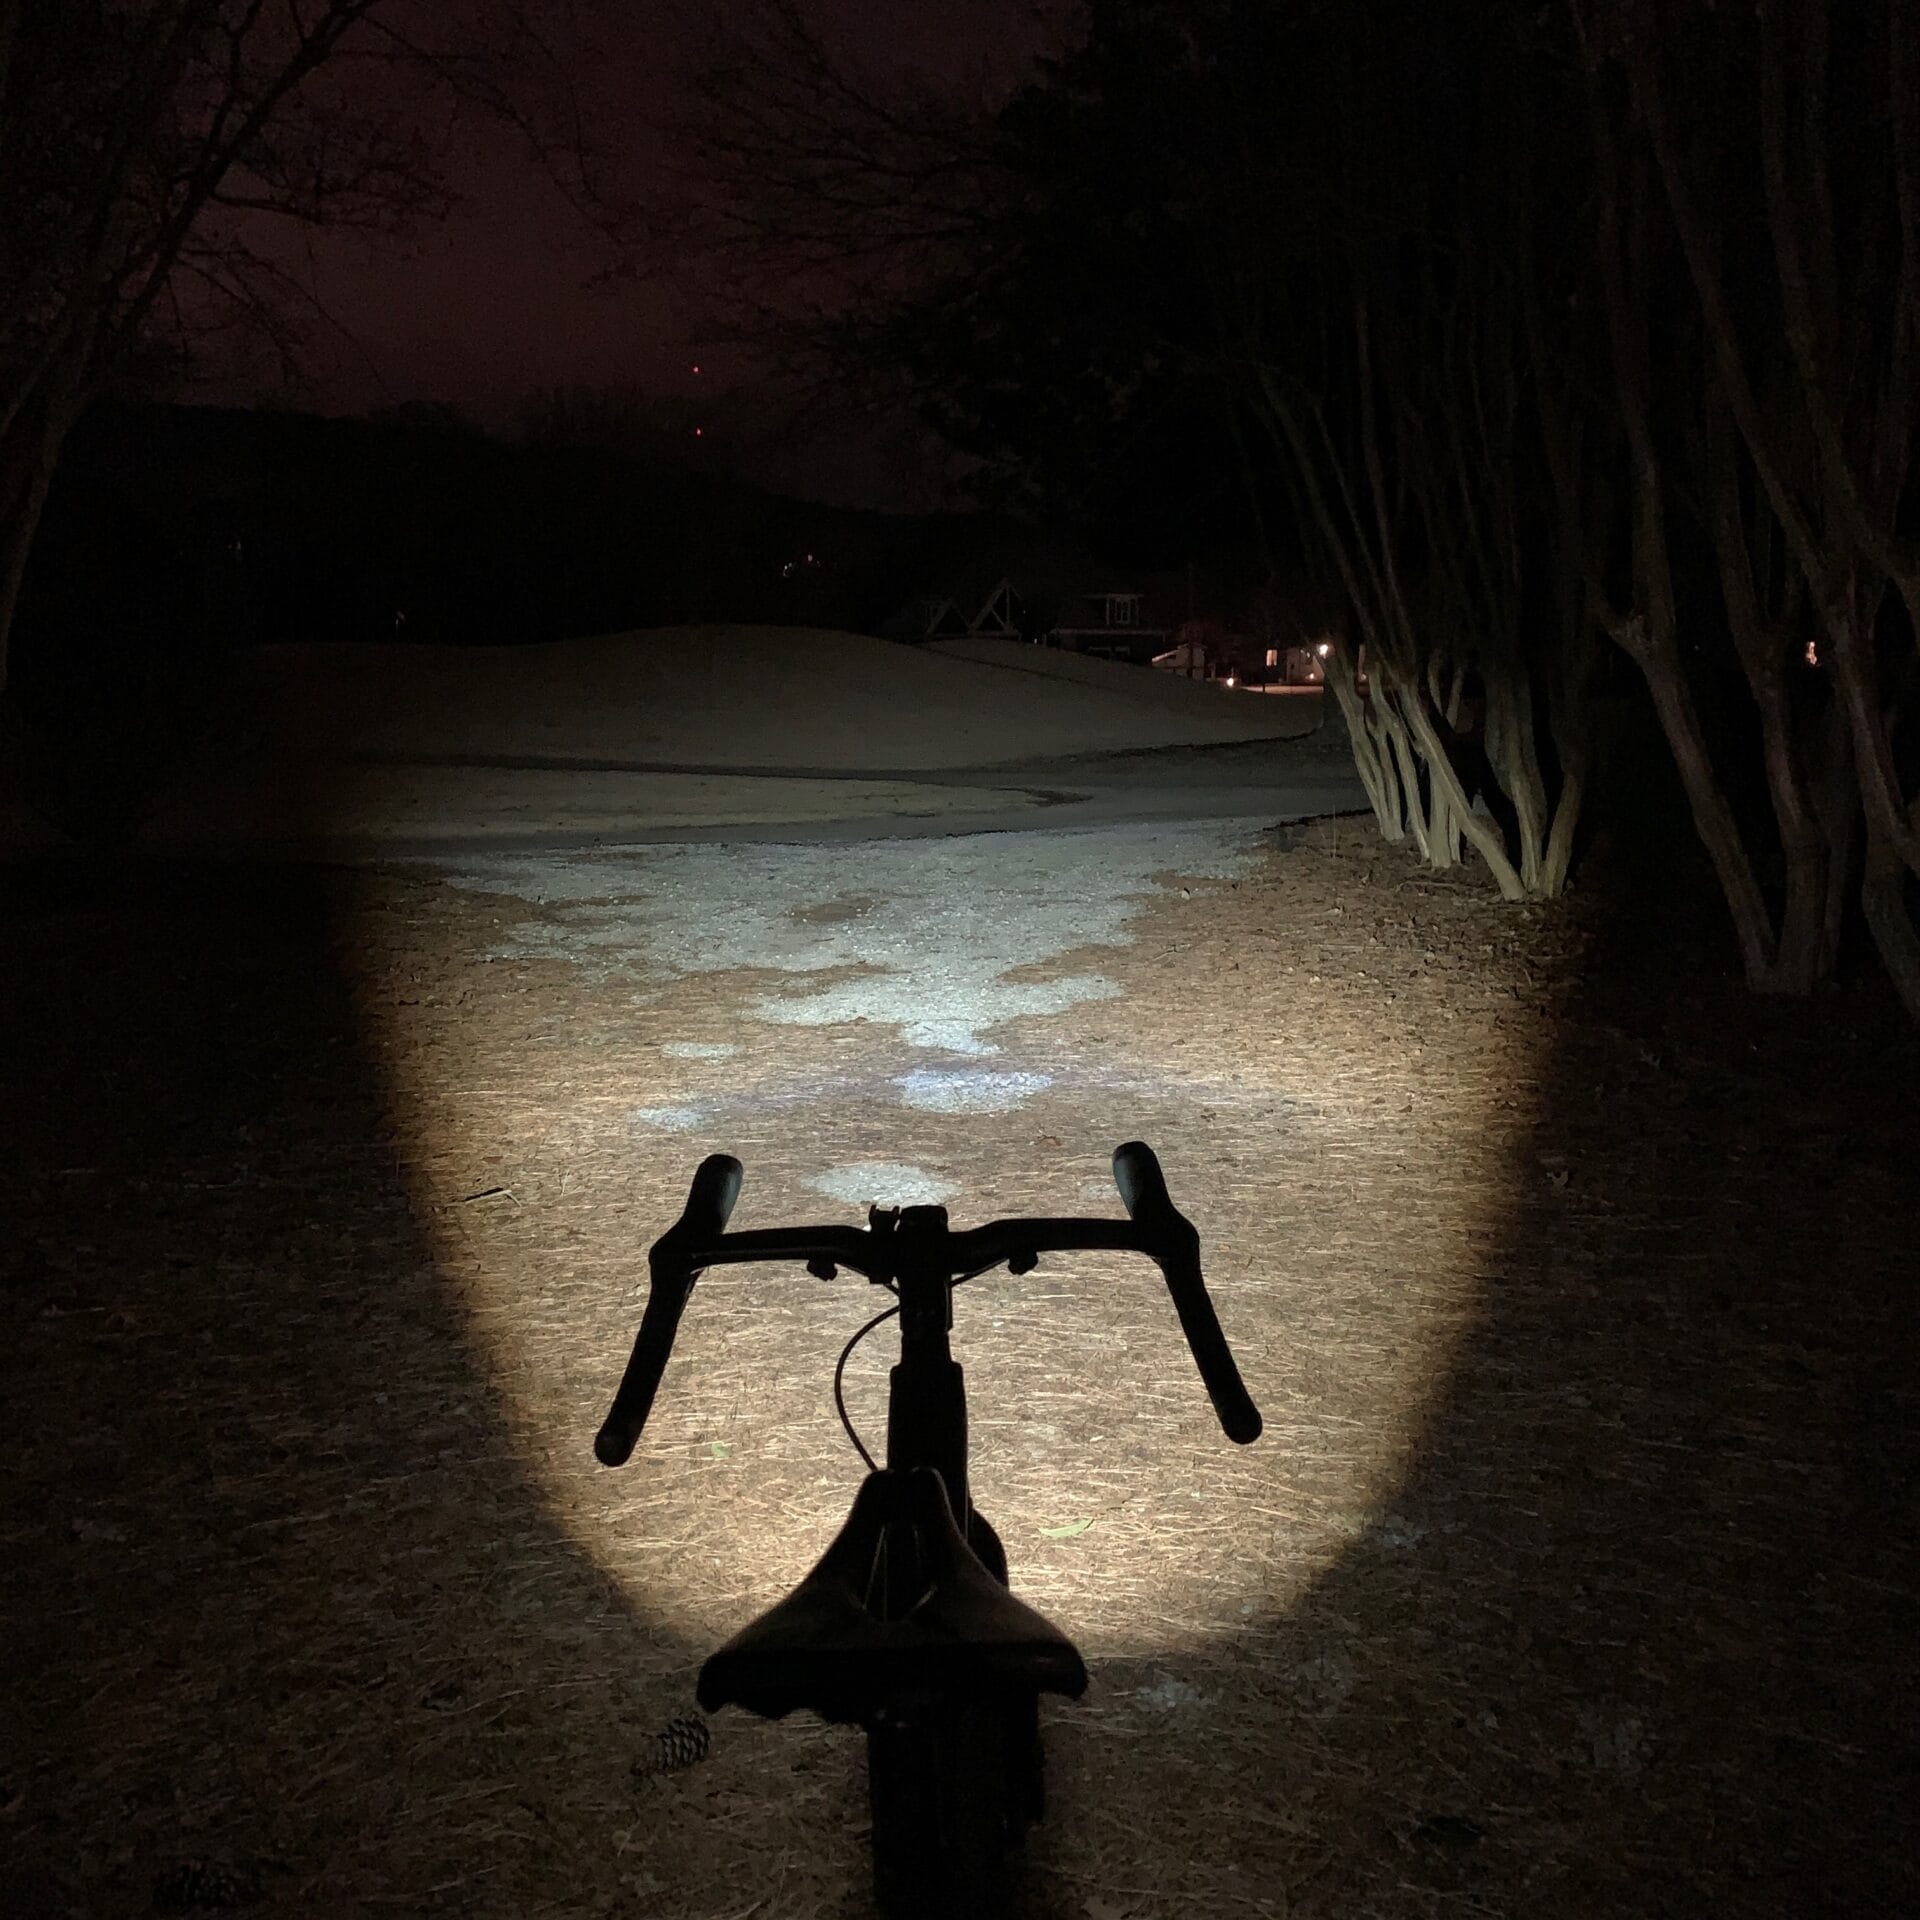
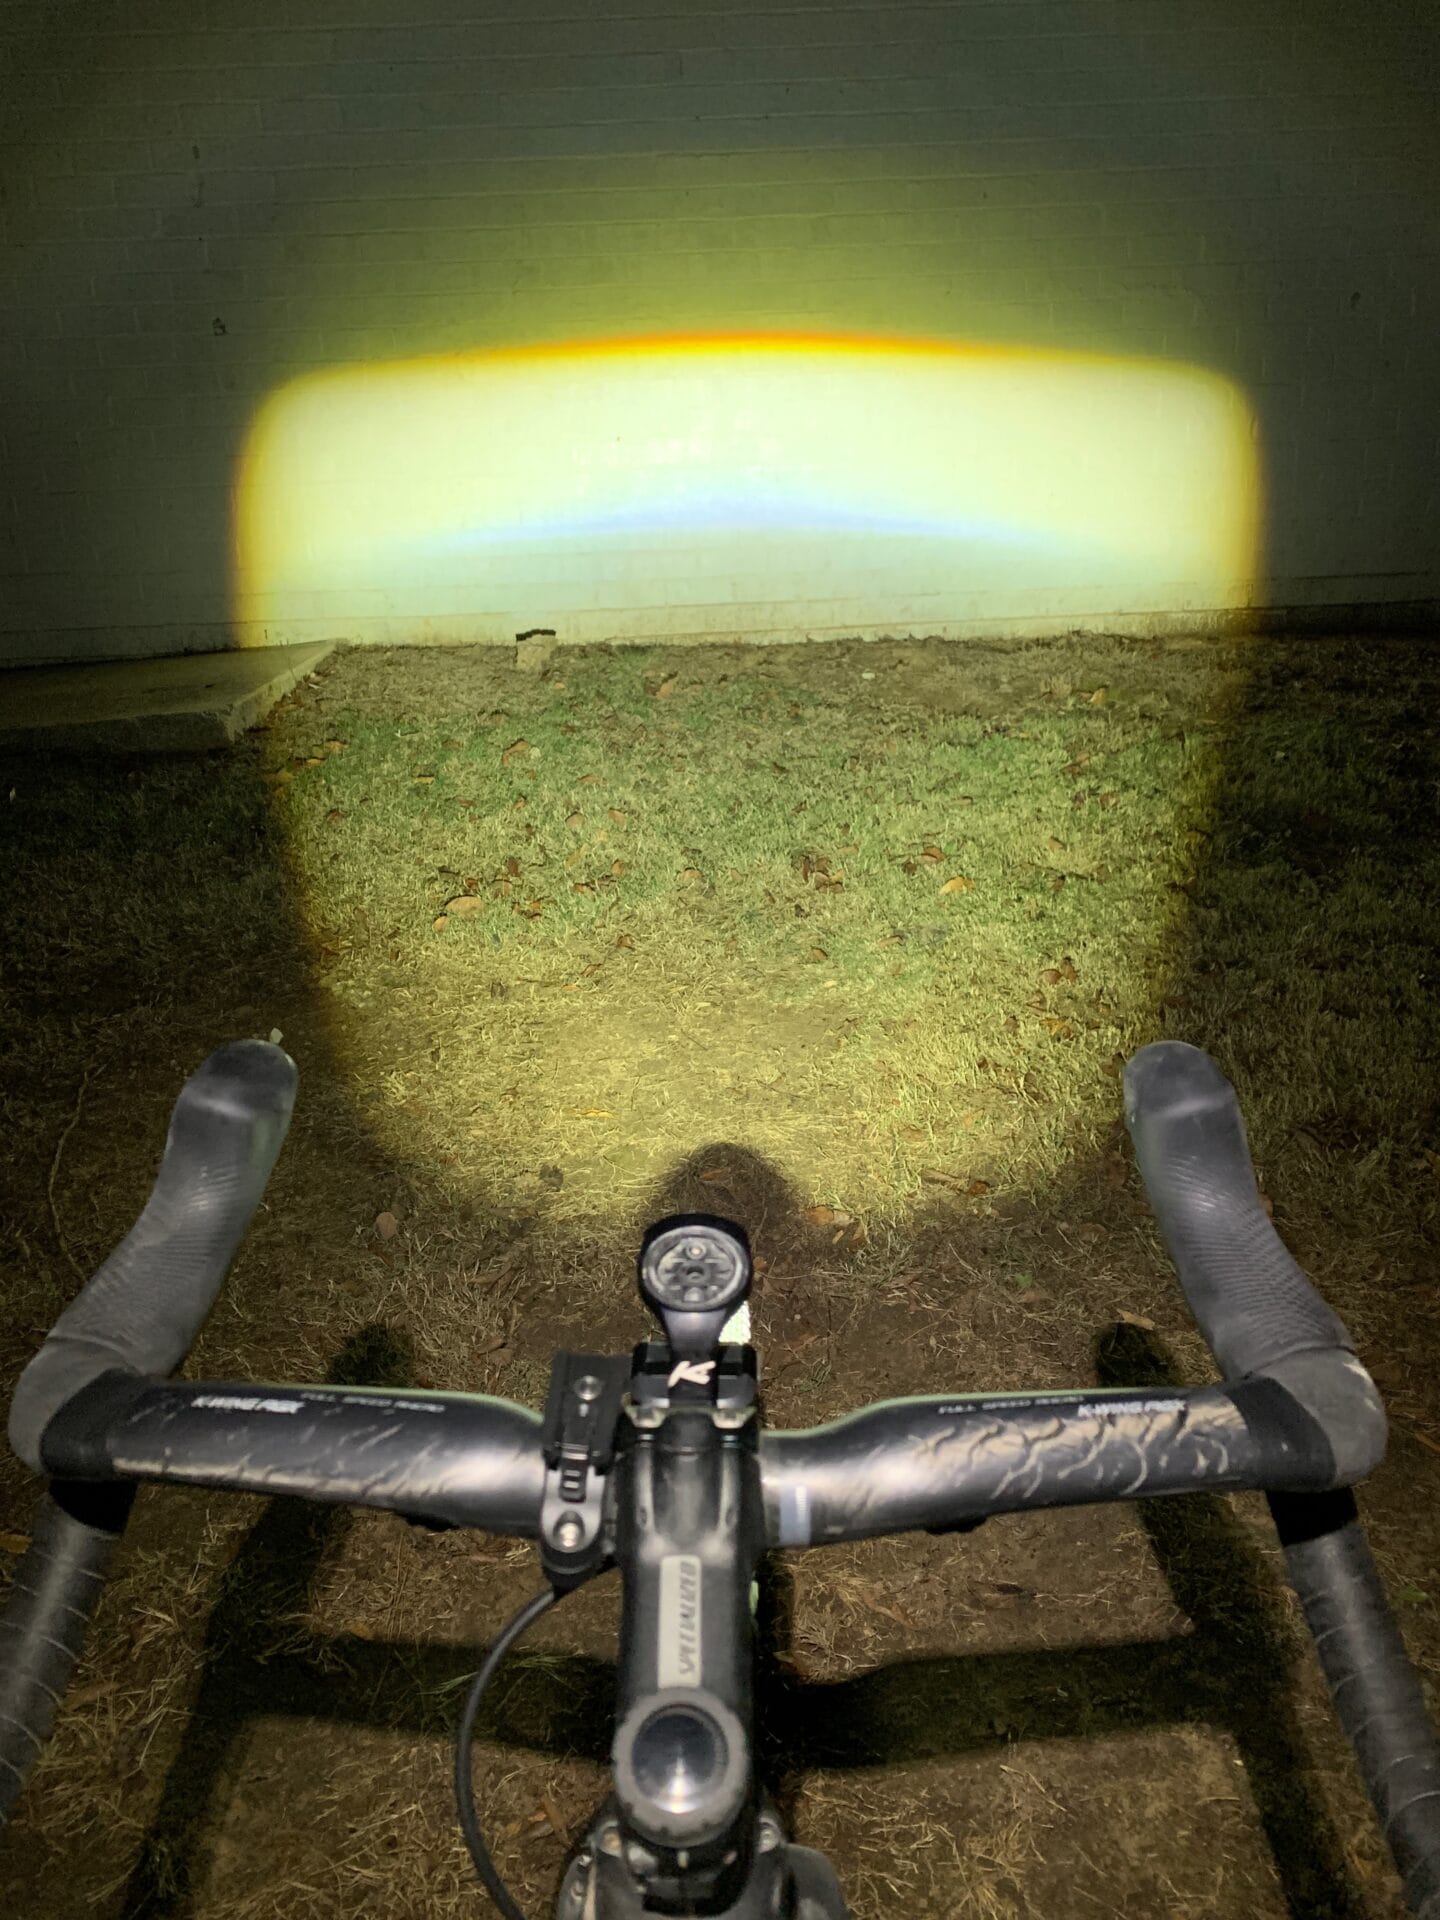
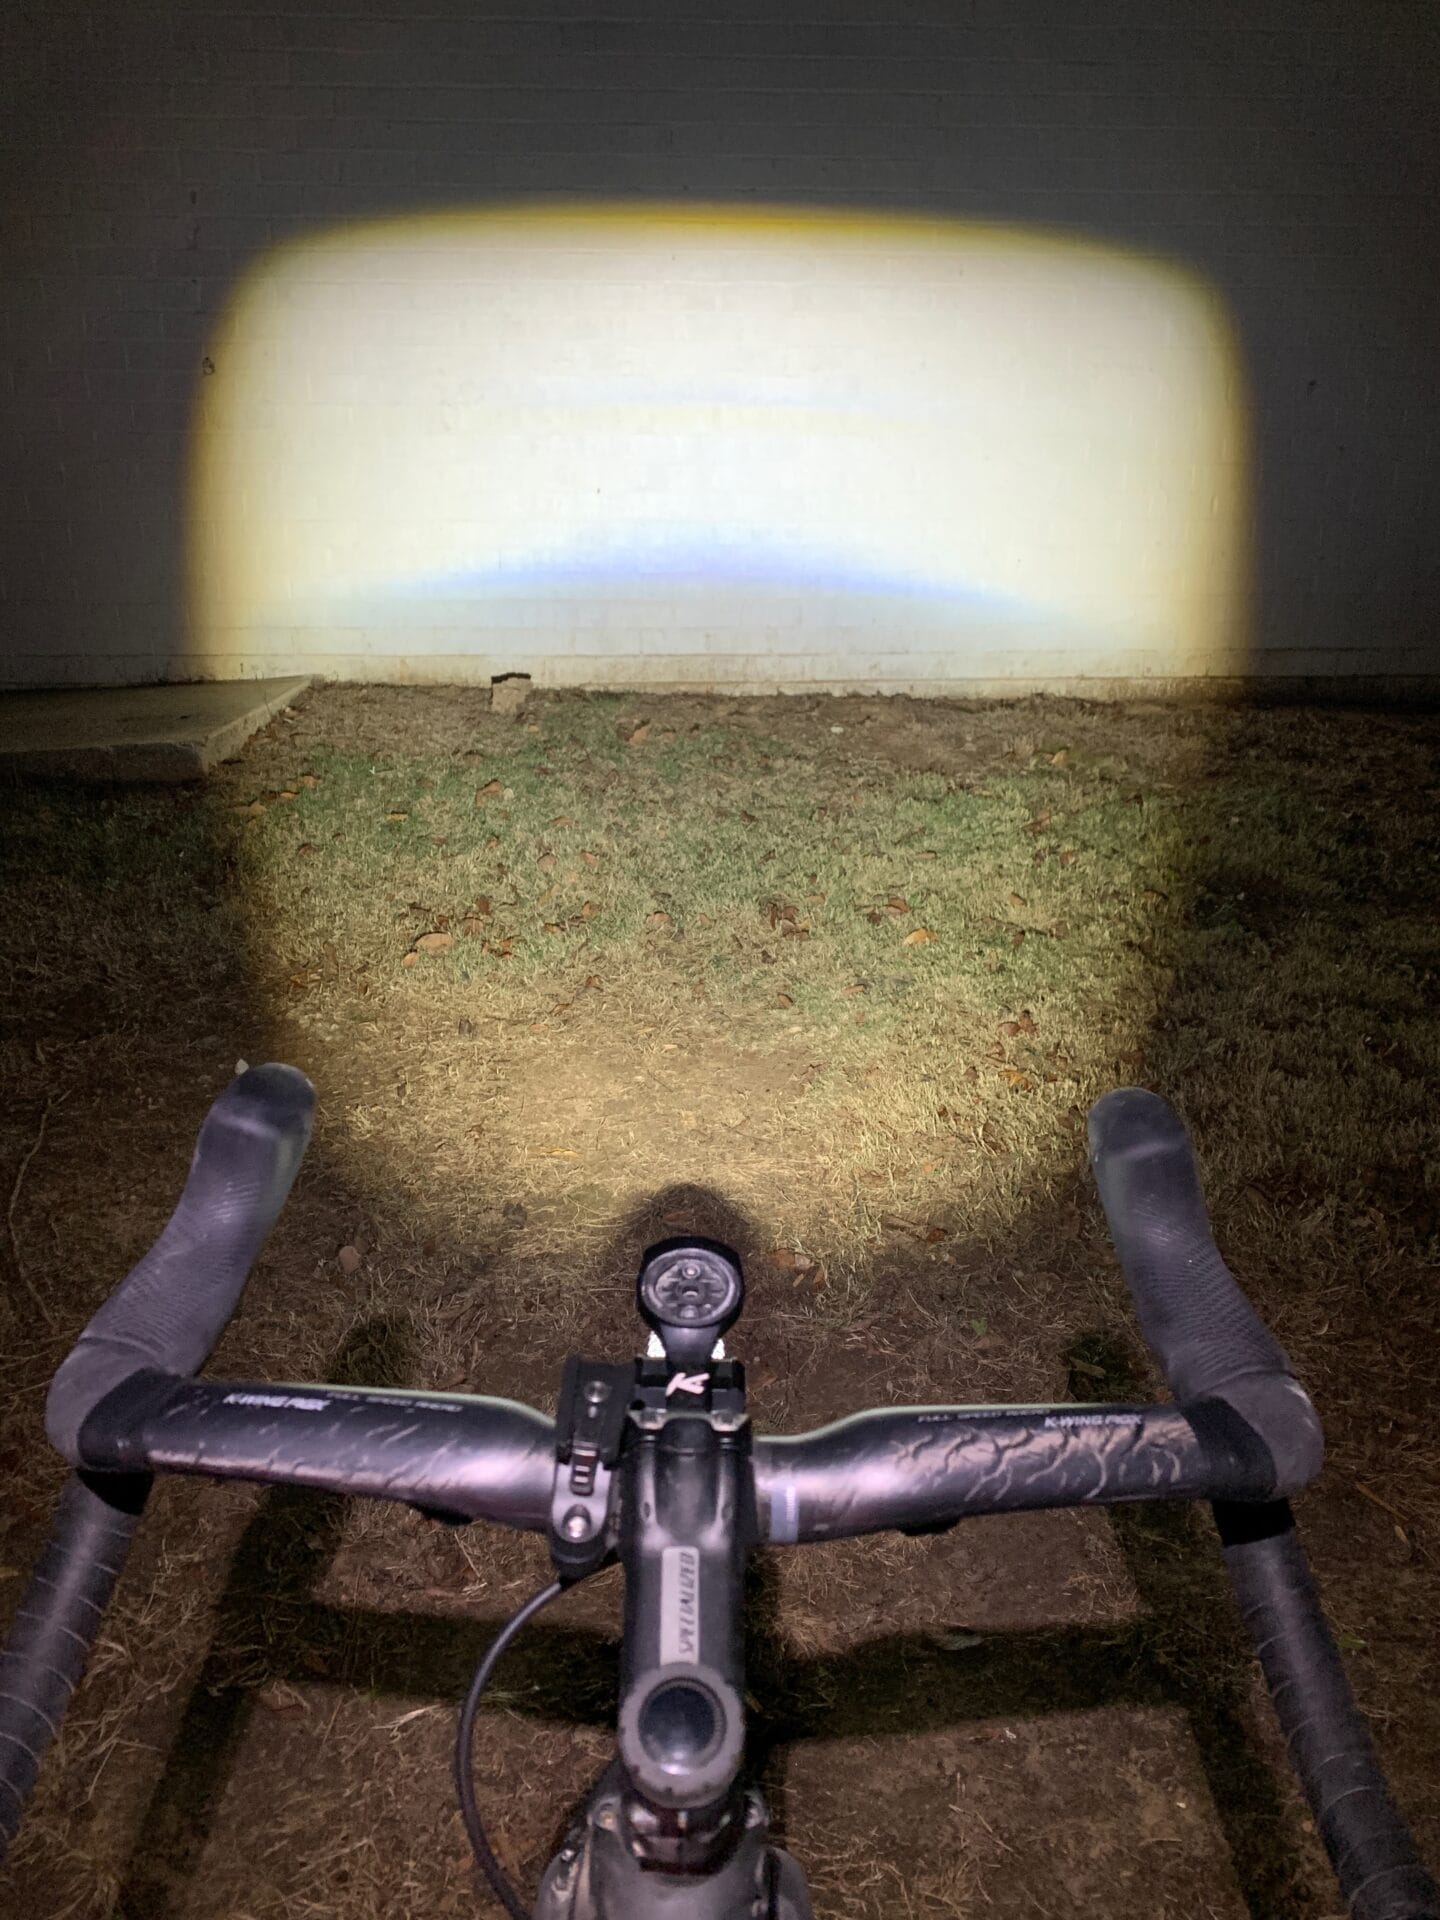
As mentioned above, the Magicshine EVO 1700 has a very distinctive light pattern. The pattern is essentially an isosceles trapezoid. The non-parallel sides flare outwards to spread the light wider further away from you.


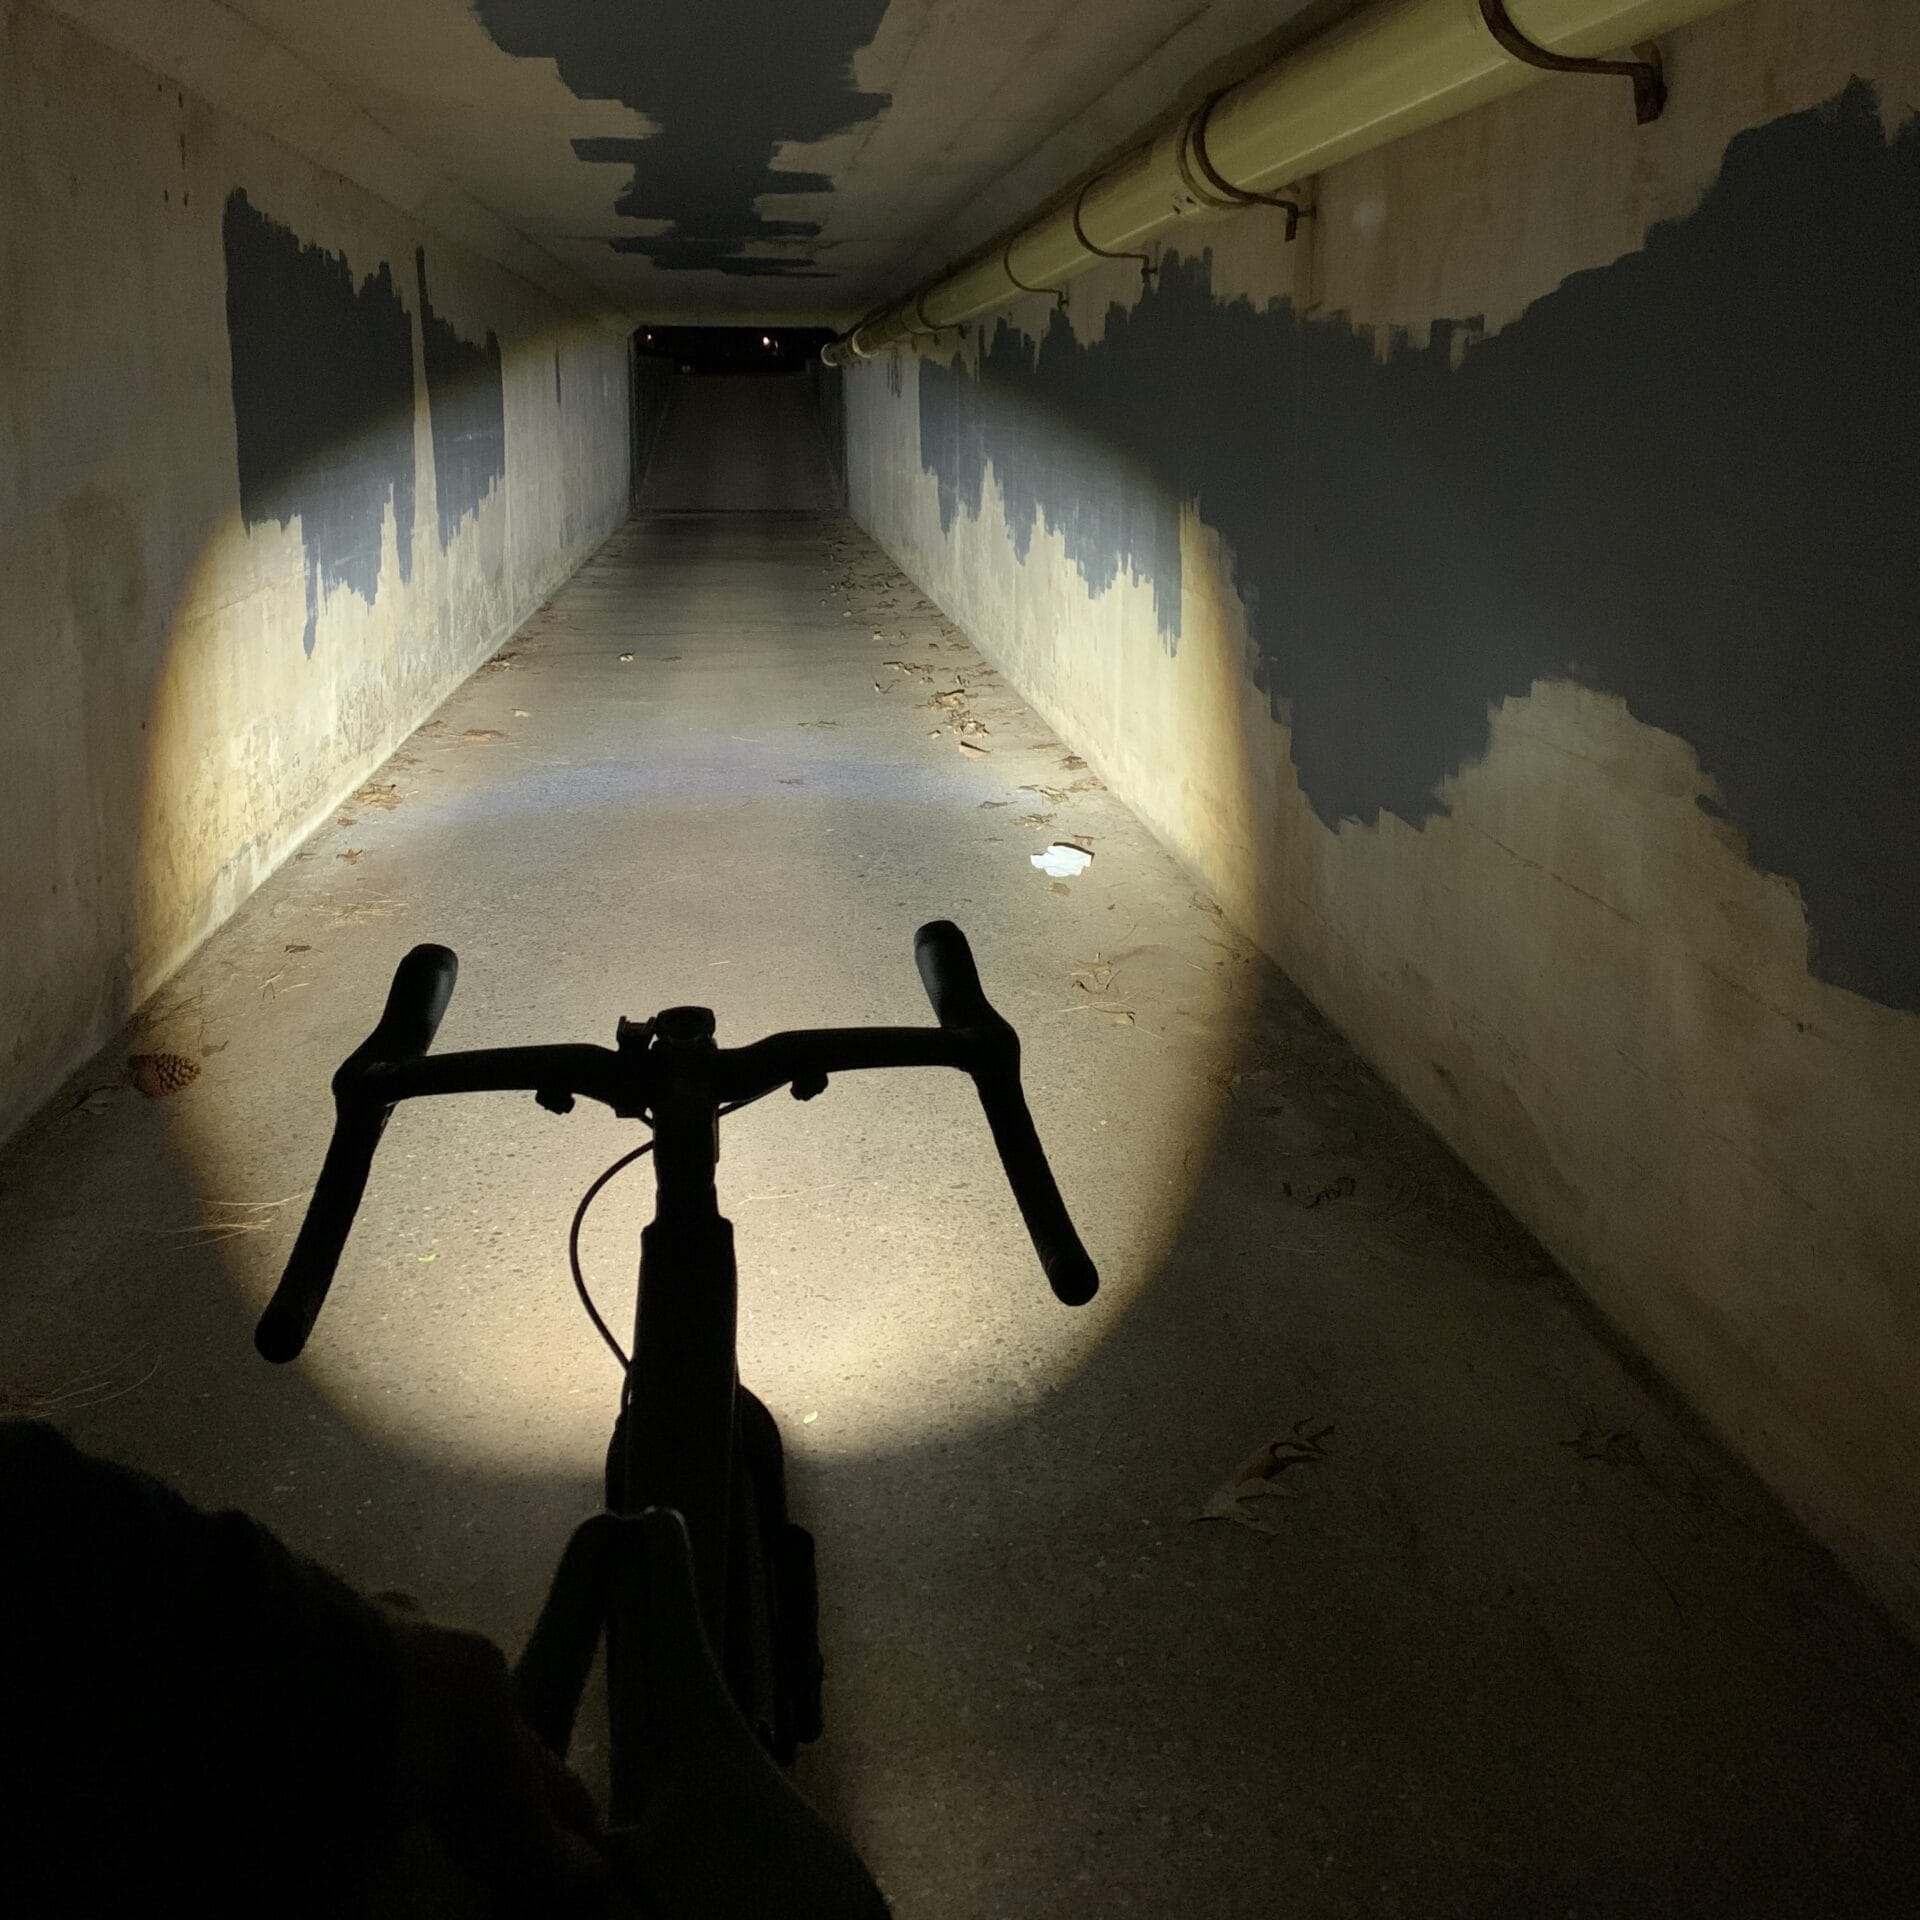
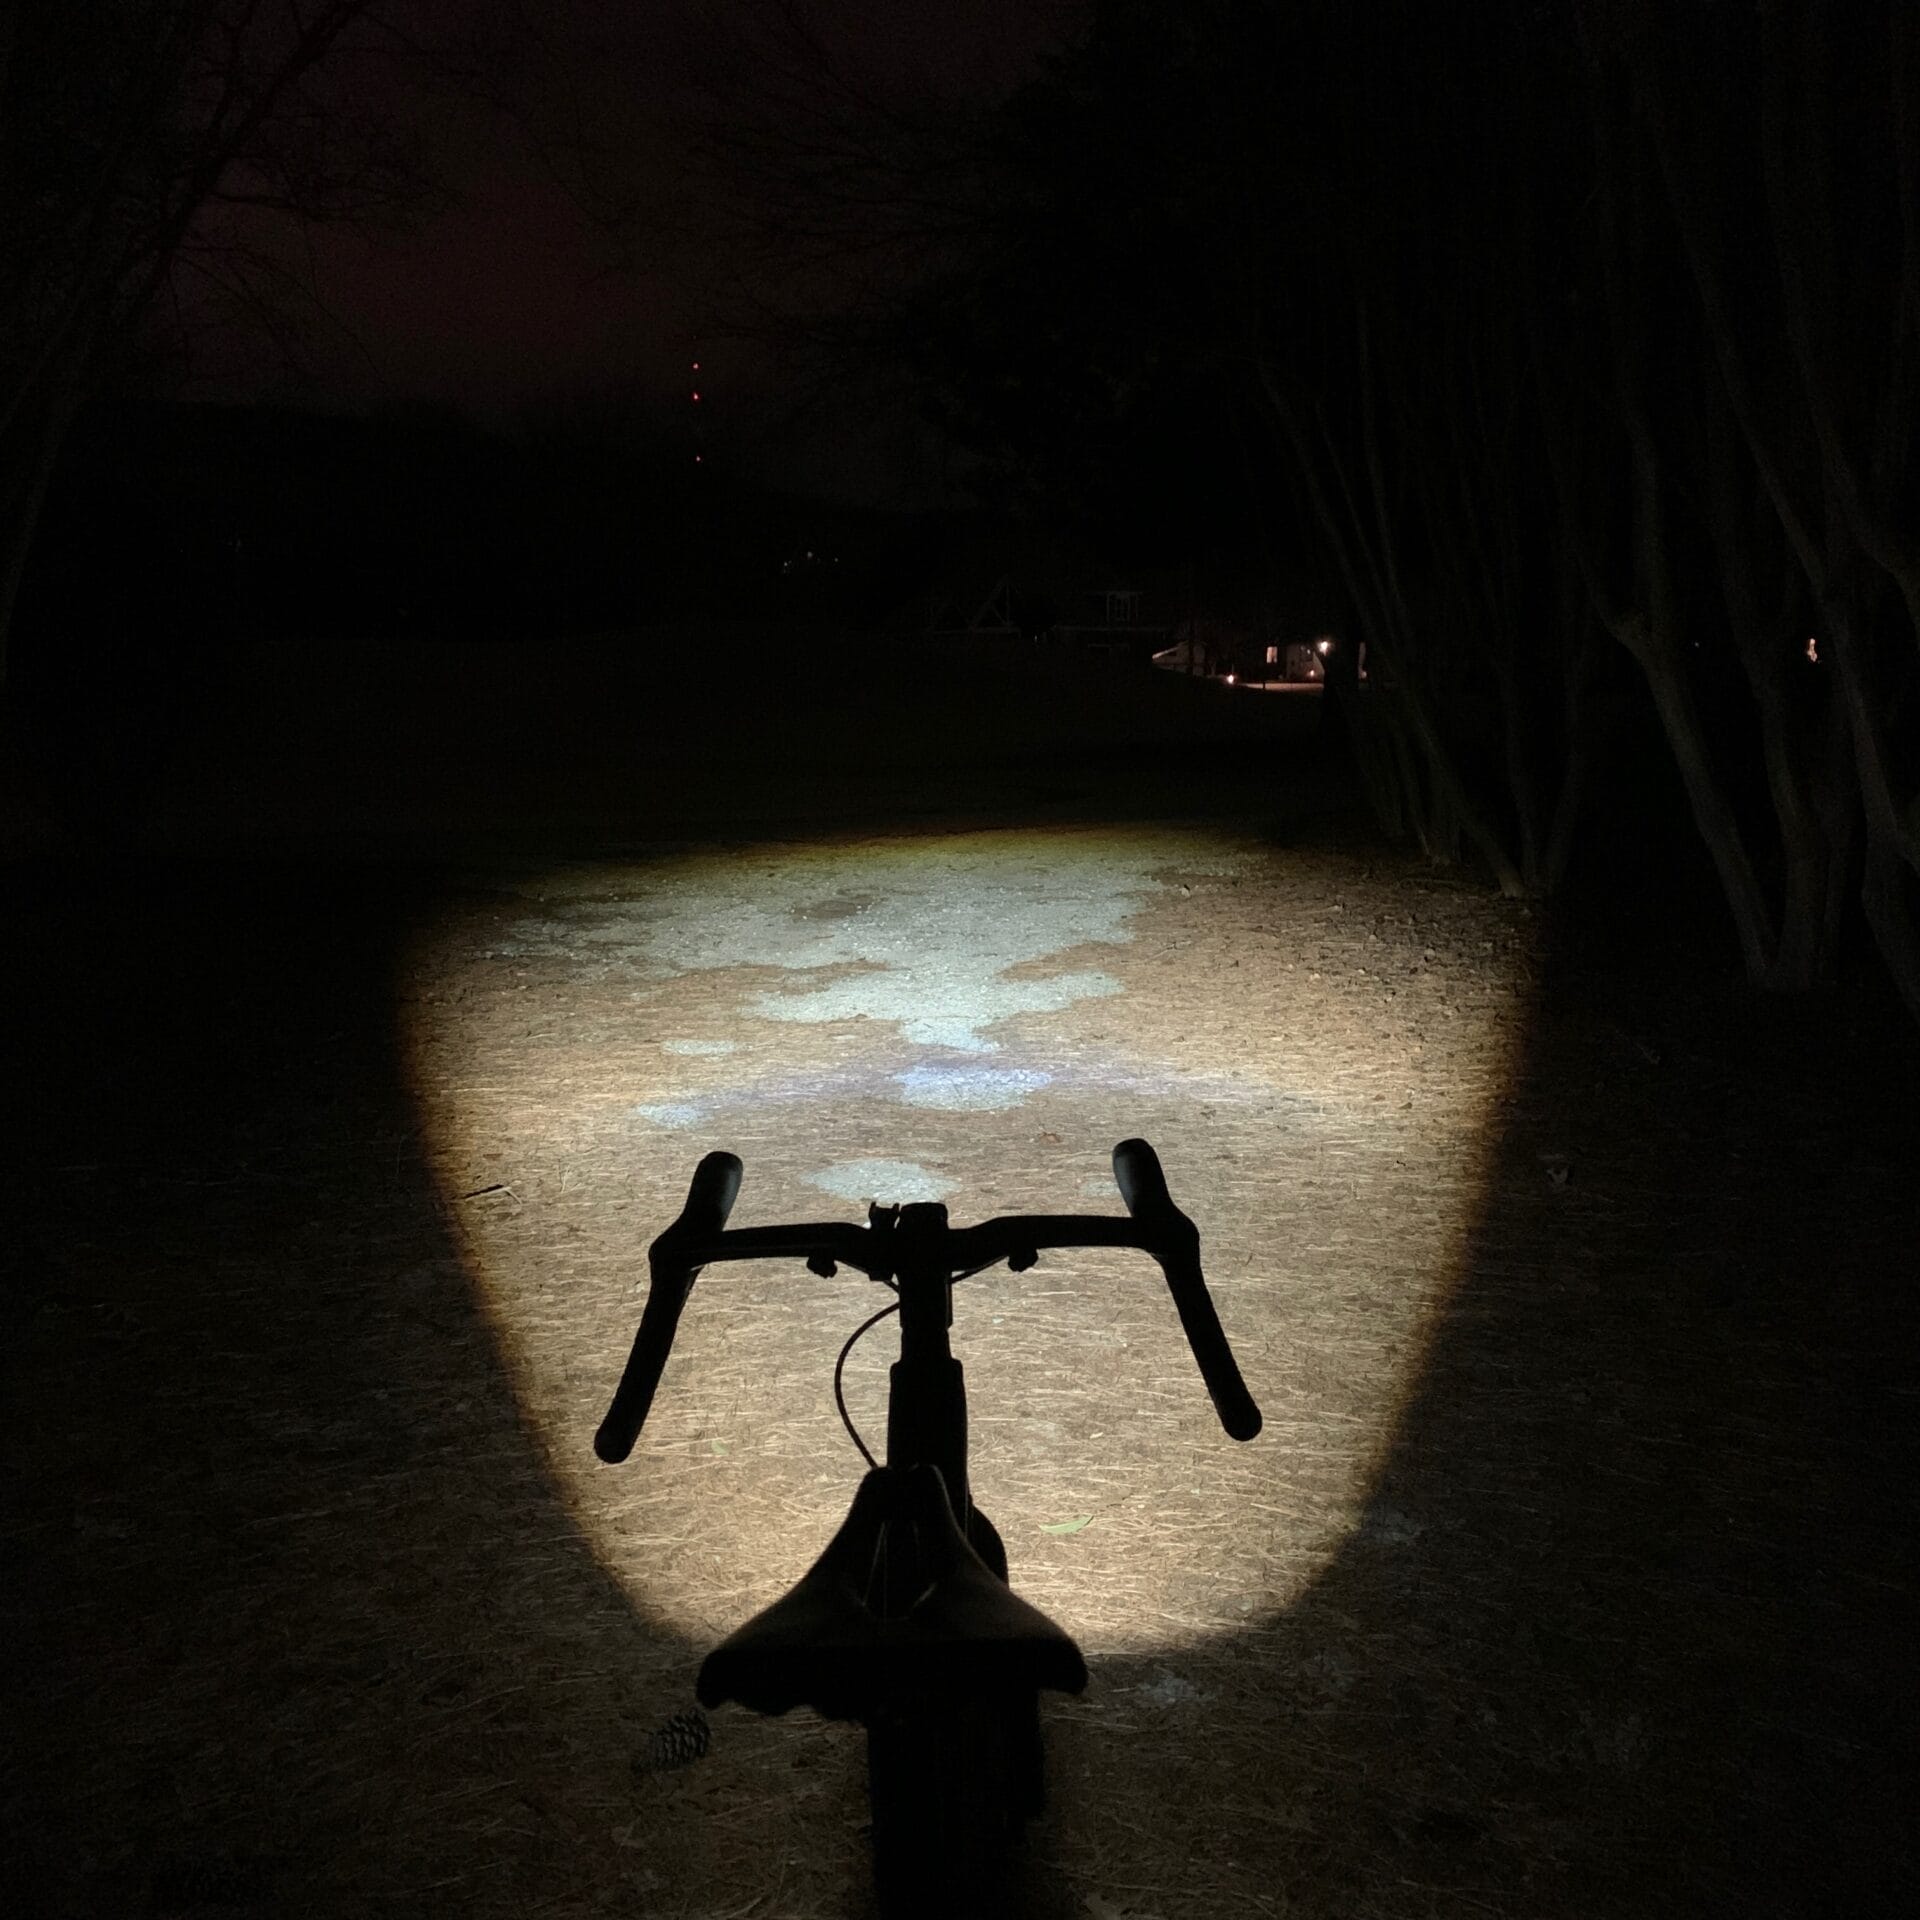
This pattern provides sharp cut-offs along the edges and gives you light where you need it. The light beam closest to the light is about four feet wide and flares about to about forty feet at about sixty feet away. This part of the light beam is the same for low-beam and high-beam.
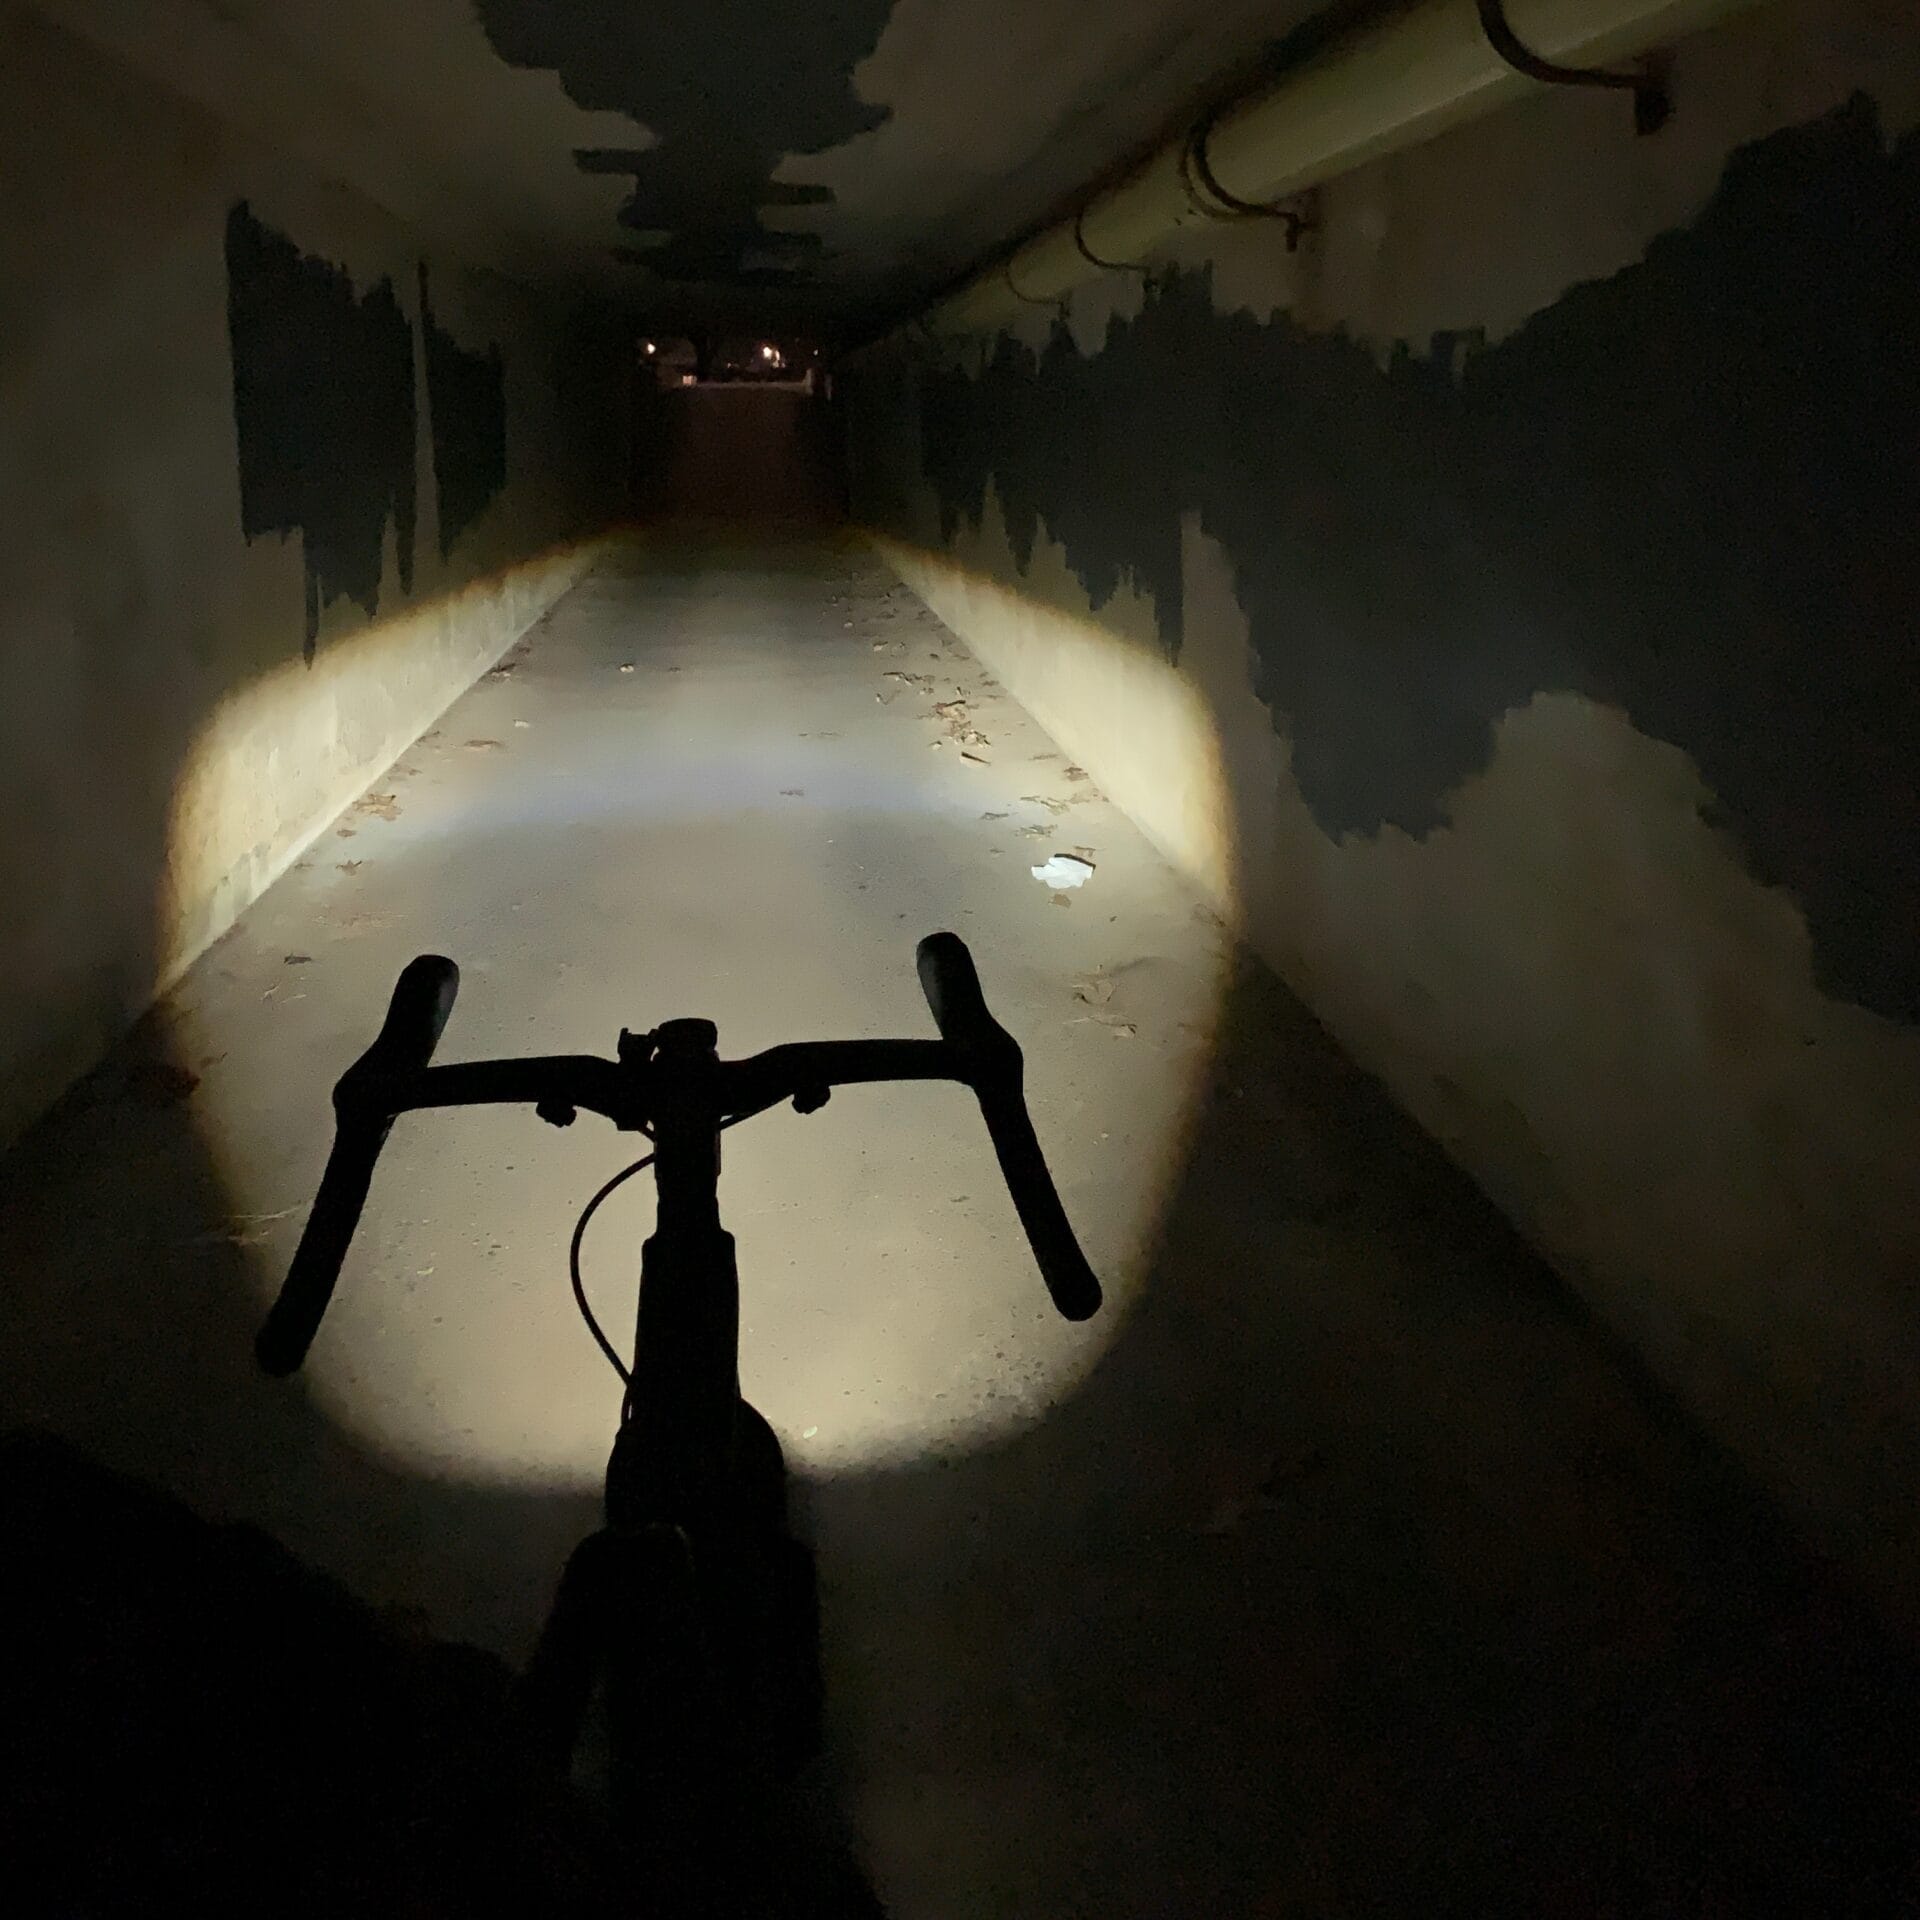
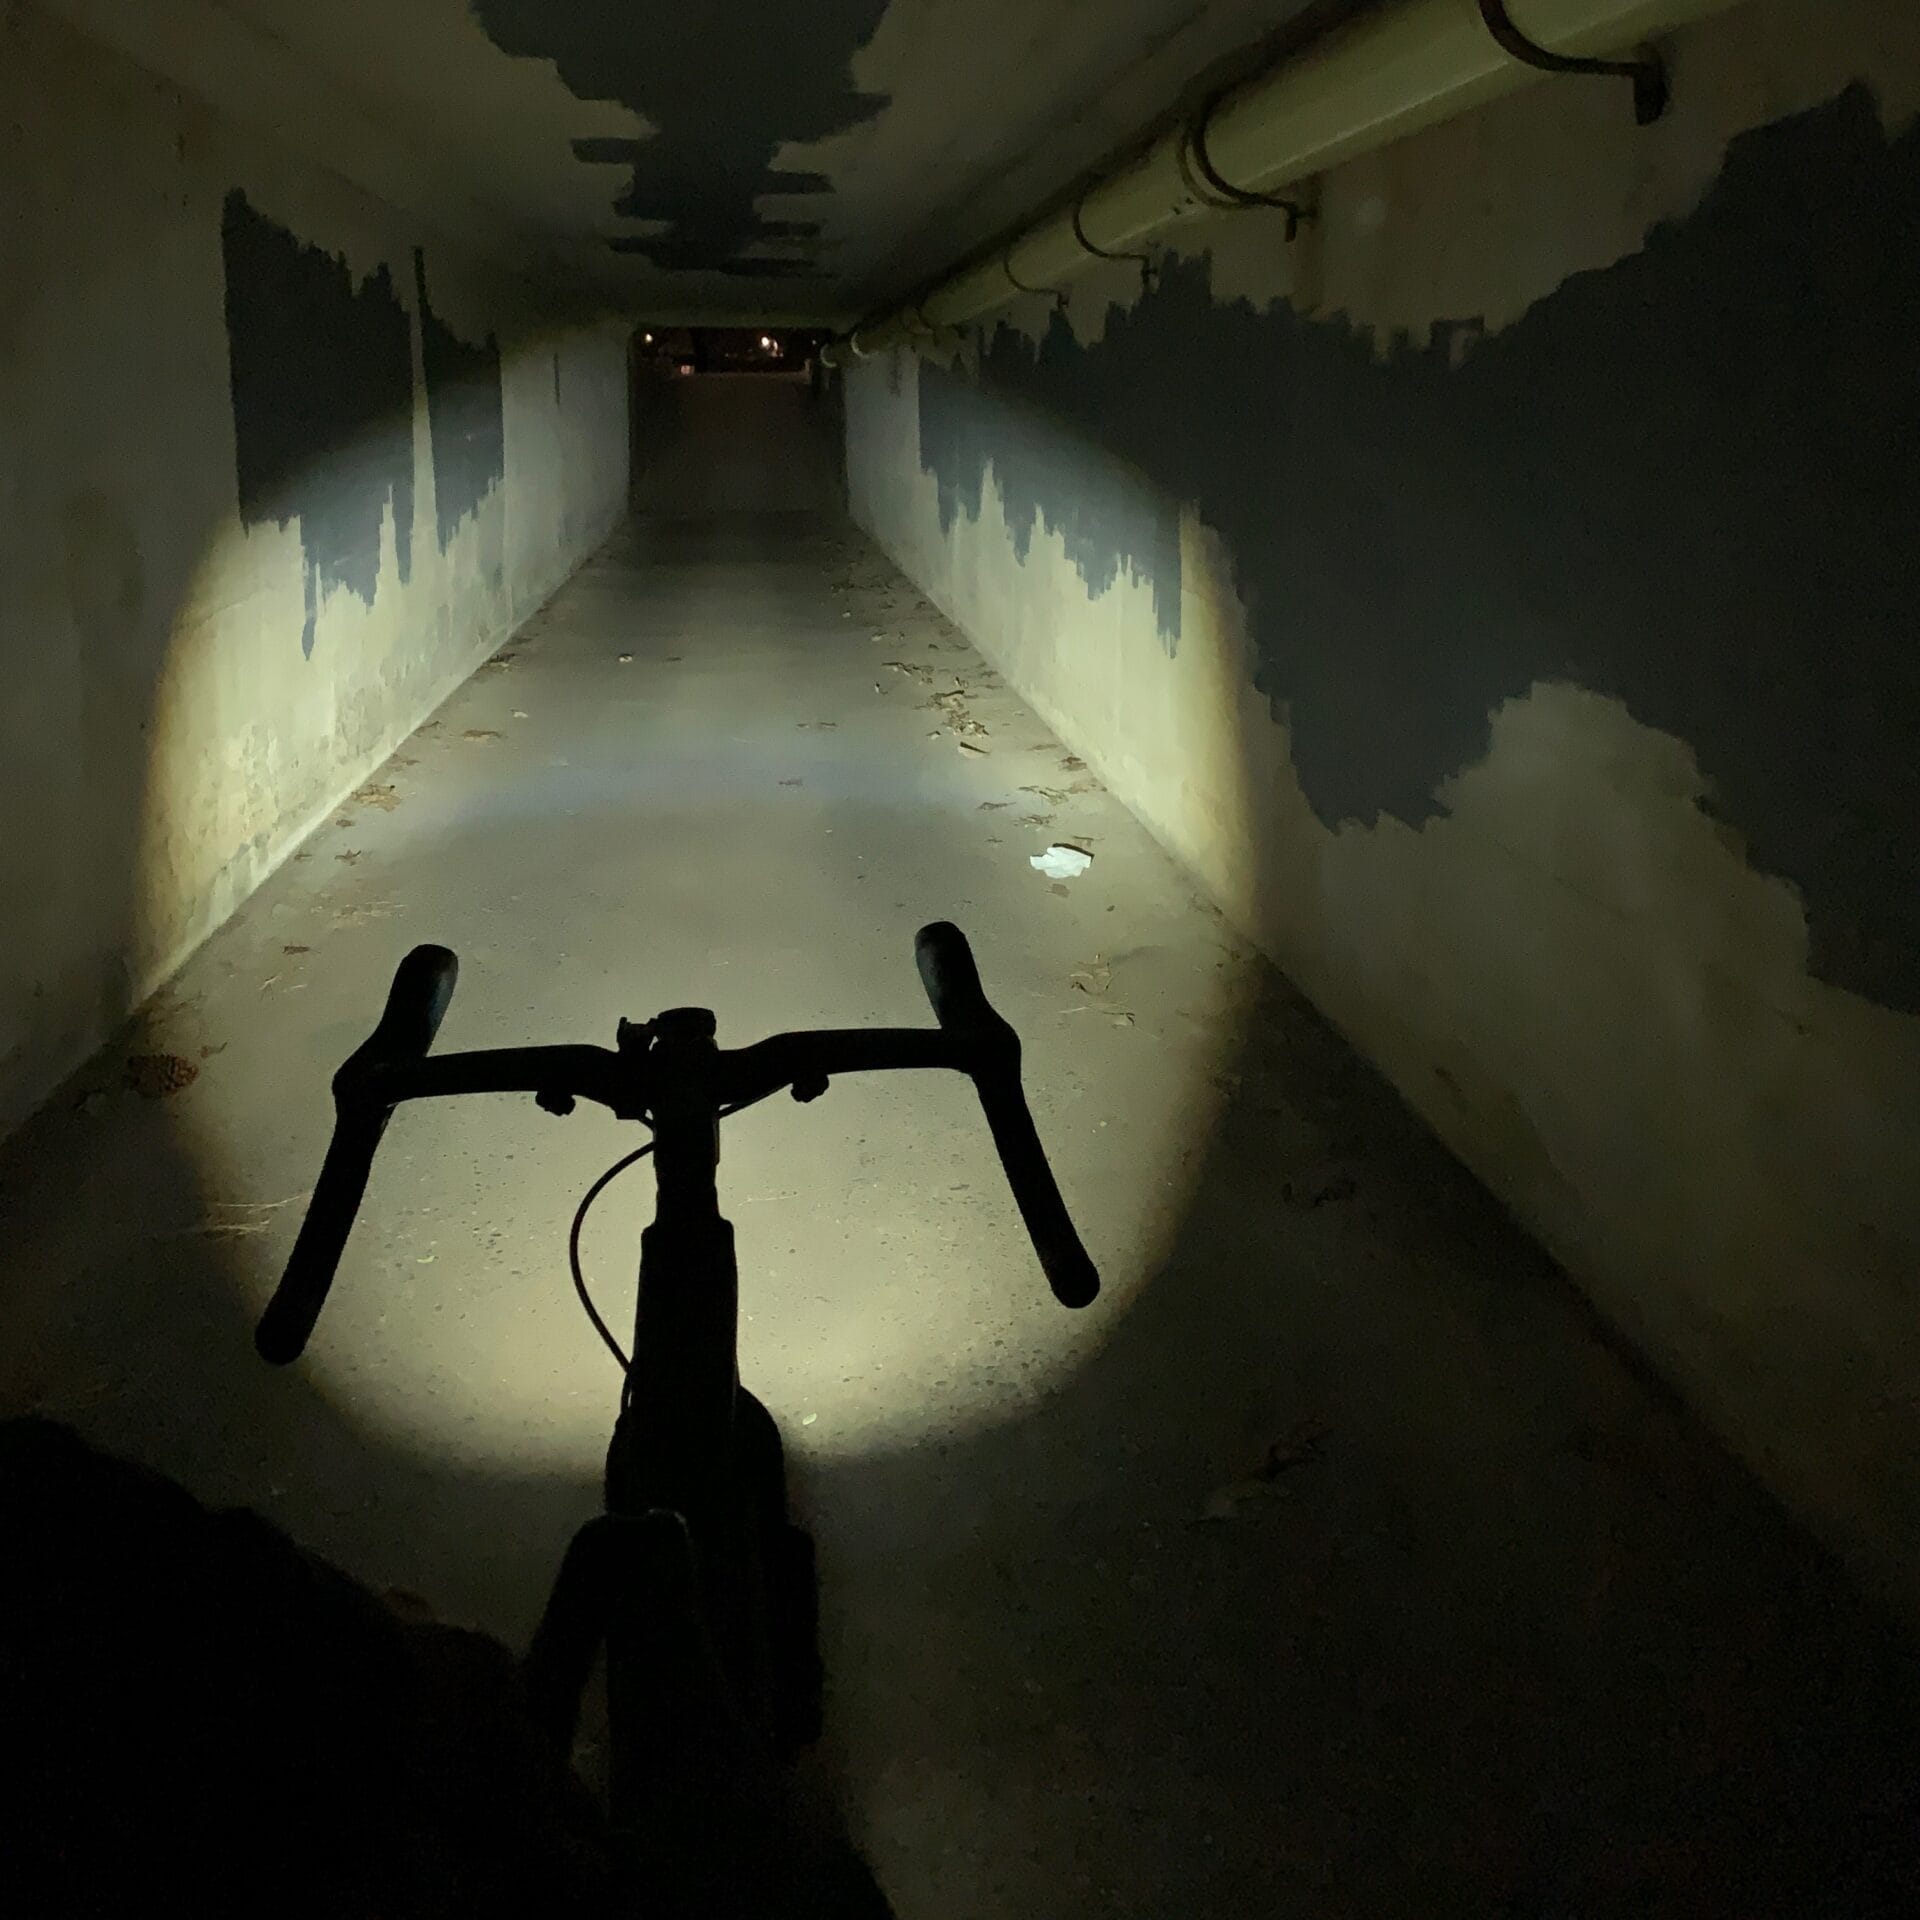
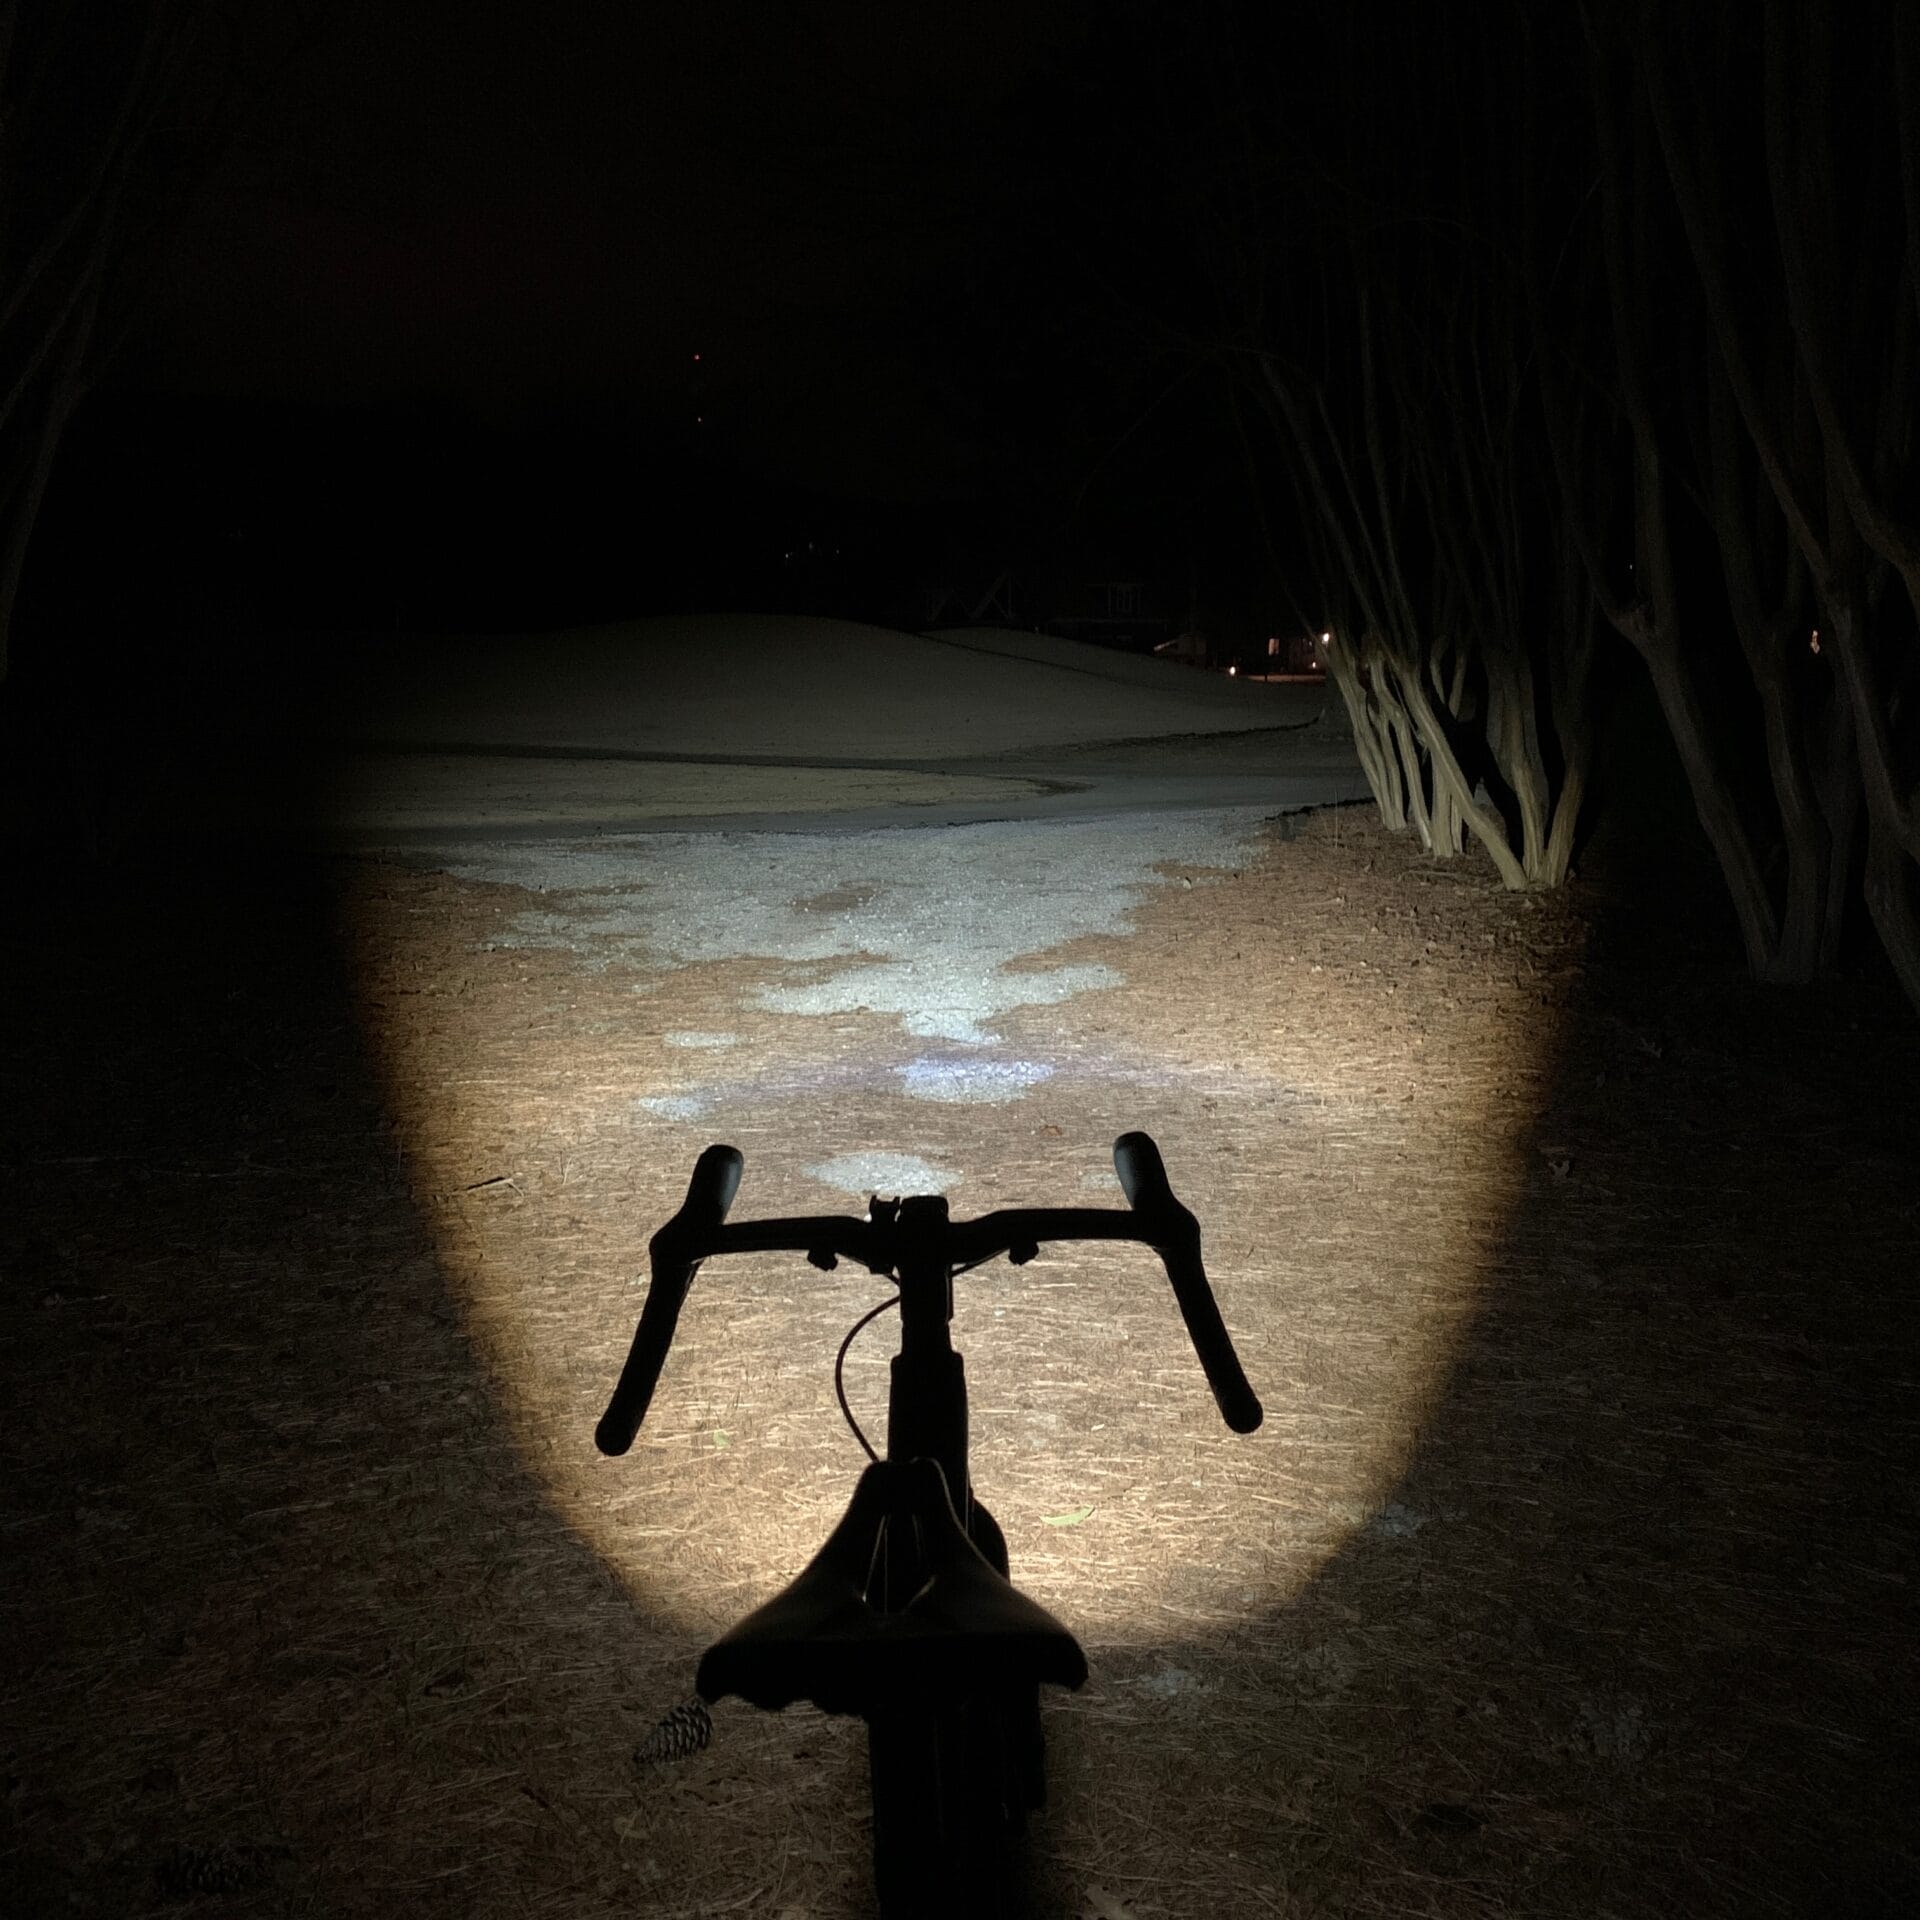
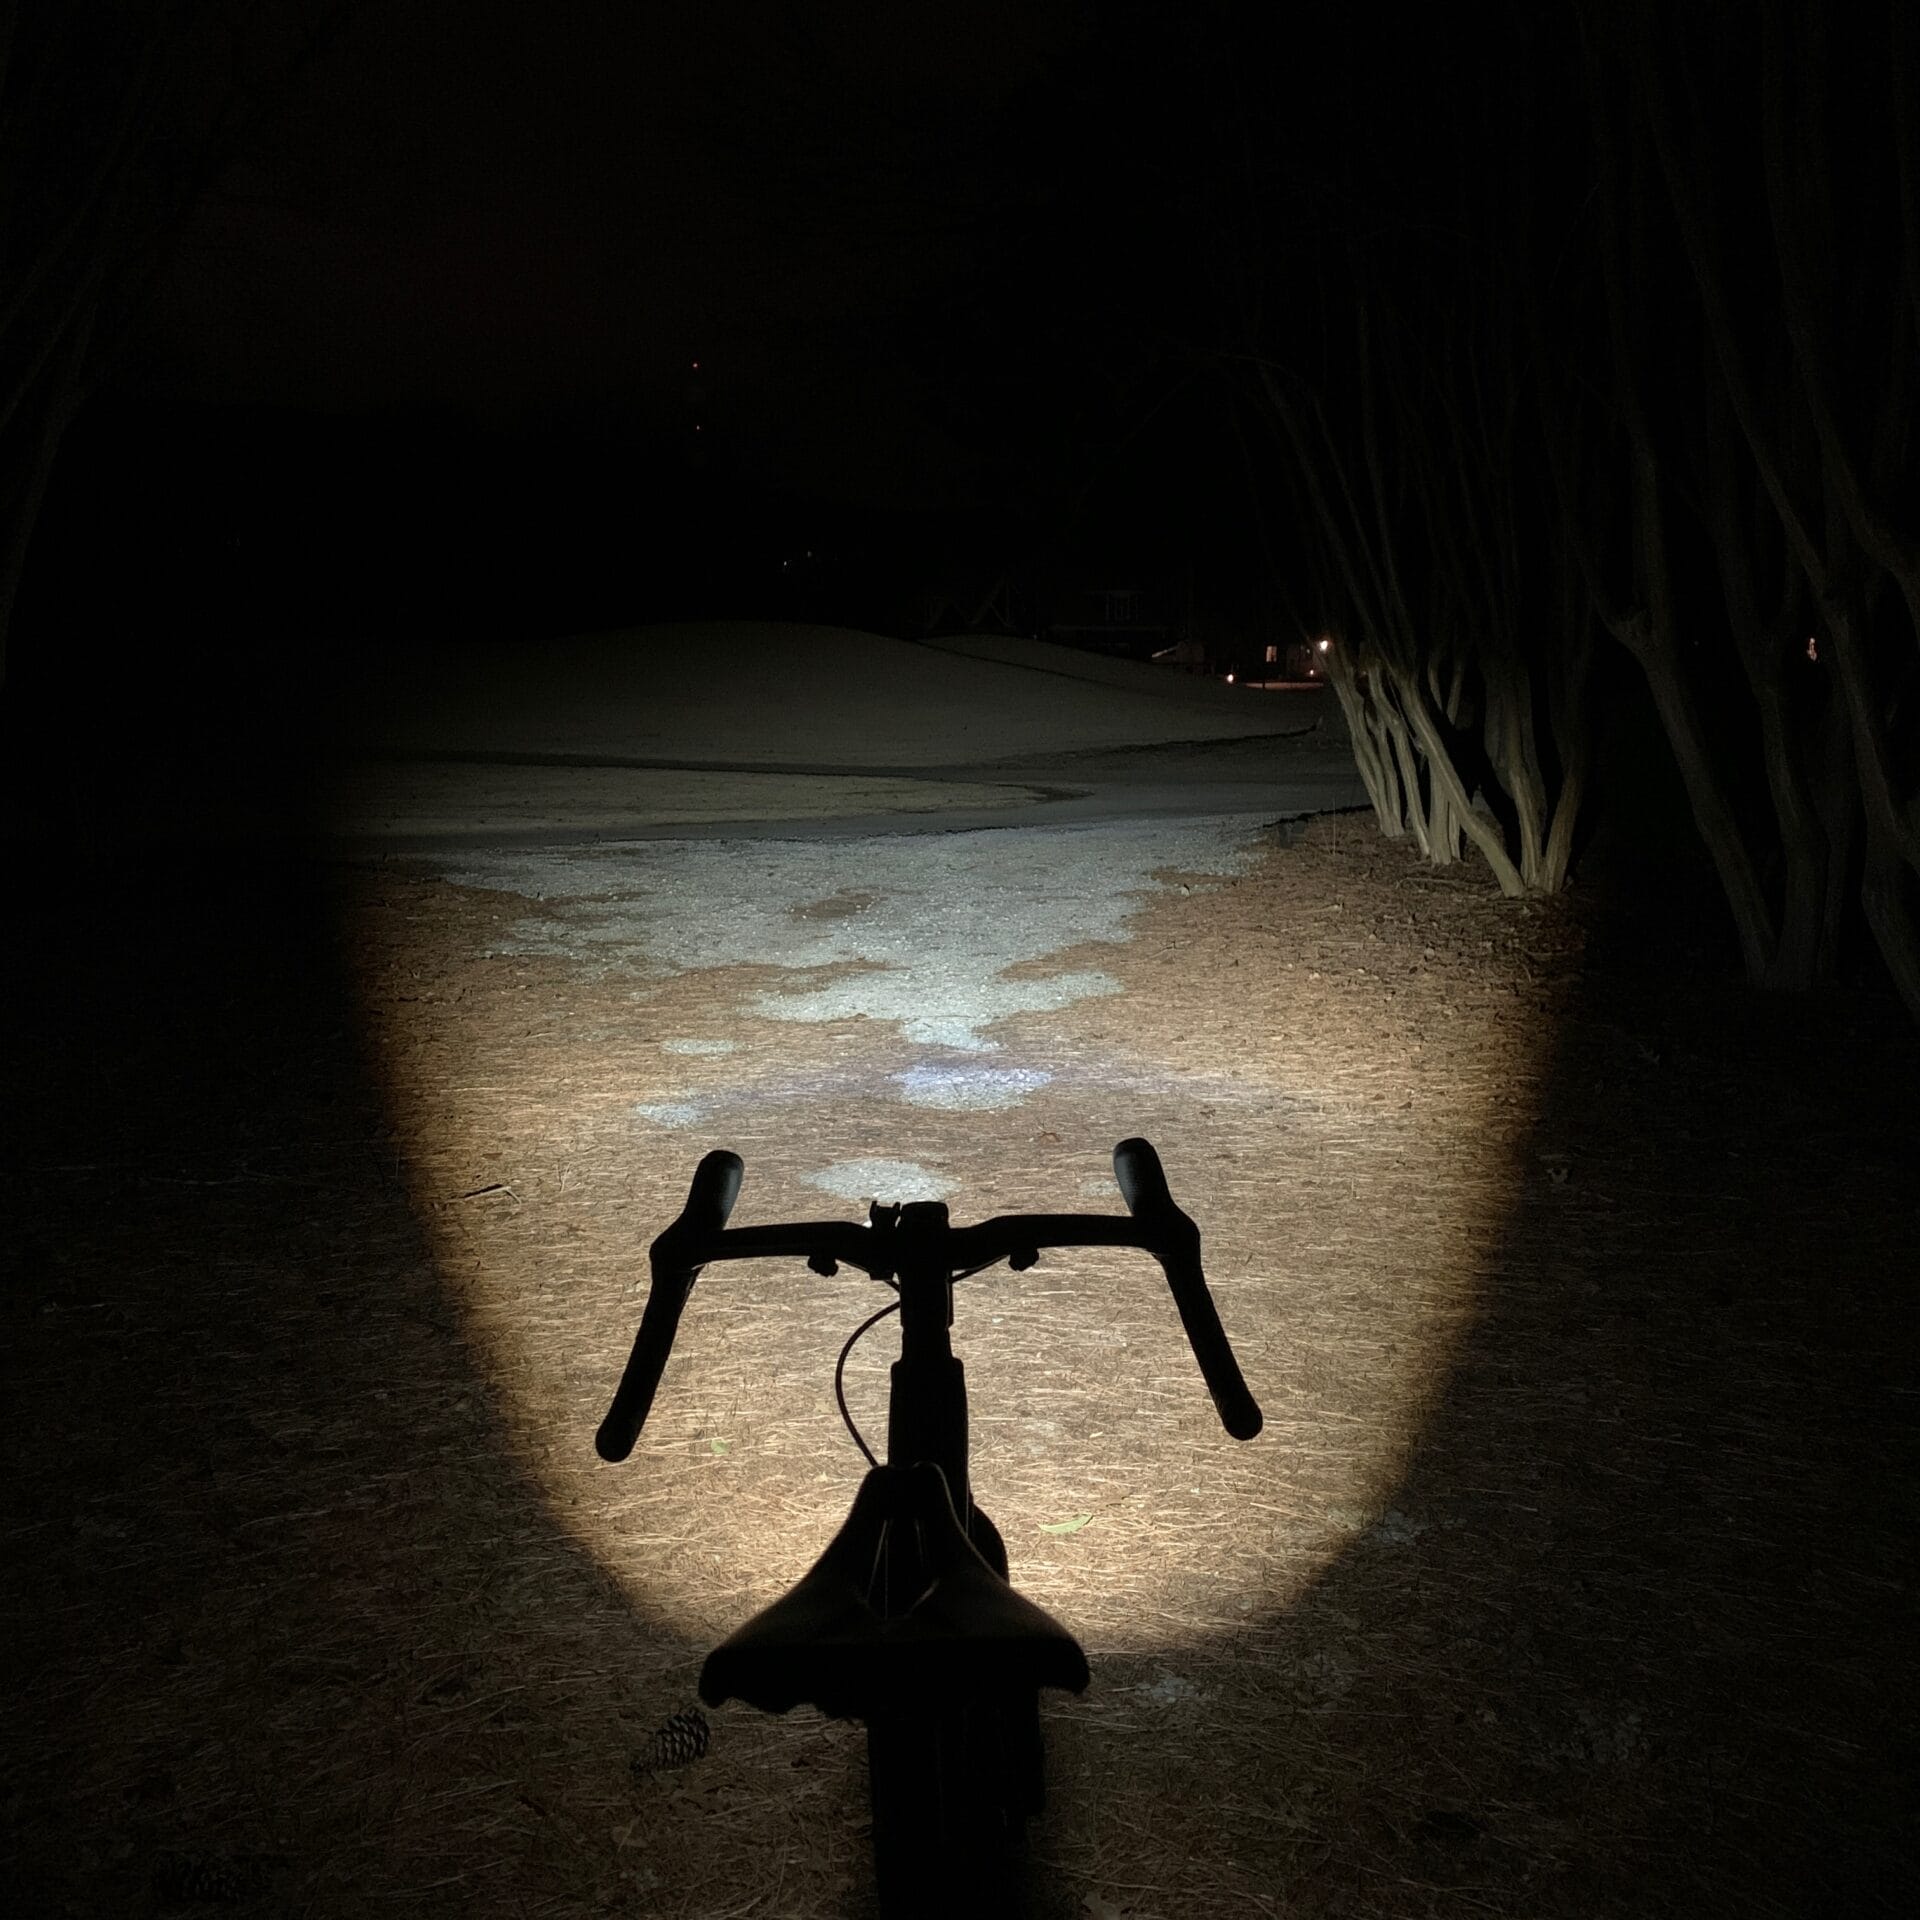
Once you flip the light into high-beam, the field of view is expanded significantly from the low-beam cut-off line and above. It is hard to quantify the exact range that the light shines that provides you useful illumination, but objects 100 feet away are quite visible.
For road cycling, it is important to have a very bright light with a concentrated beam in front of you since typically road cycling involves higher speeds than off-road cycling. The light pattern of the Magicshine EVO 1700 excels at giving bright light close to you where you really need it and a plenty of light far enough ahead of you to make you aware of oncoming obstacles.


Things I Would Change
I think one of the most disappointing things about the light, though nothing to do with the light performance, is not being able to access all the light modes from the button on the light. This is probably a simple fix with a firmware update.
I don’t like that you don’t have full functionality of the light without the remote or the app. Mainly if you forget you remote, or maybe you just don’t want the remote at all.
The battery level indicator is too broad, specifically the green level (100-21%). I think a flashing green light should be added after the solid green and the ranges should be changed. The ranges could be as follows: solid green – 100-75%, flashing green – 74-50%, solid red – 49-25%, and flashing red – 24-1%.
This will give a little move confidence of the actual battery level.
Though the out-front mount is secure, I prefer mounts ones made from aluminum. I would say it does not need to be included. I think nowadays, if someone is choosing this type of light, they most likely have an out-front mount. I think Magicshine could have the out-front mount as an addition option for a small up-charge.
I would recommend a redesign of the quick release button. I would prefer it to be aluminum like the housing of the light, but I would like a two-way action button to release it from the adaptor. I have not had any issues with the light disengaging from the mount, but it does come off easily when you press the button.
If there was a safety button that had to be hold down first to then release the light, that would avoid any chances of accidentally removing the light. Specifically, when you are using the button on the light to change between light modes.
There aren’t any side amber lights on the light. I have seen them on other lights, and I think it gives you extra side visibility.

Final Thoughts
This light is designed for urban and on-road riding, and it is clearly advertised as such, but of course, I tested it in off-road riding too. I tested it in the rain and fair-weather too. I’ve also tested it on smooth roads, but more importantly I tested it on some rough gravel roads too.
Stating the obvious, if you mainly do off-road single-track mountain bike riding and you are looking for a primary light, this isn’t the light for you. Magicshine has plenty of other light that are specifically designed for this.
But, if you are looking for an additional light (assuming you have a bar mounted light and possibly a helmet mounted light) for mountain bike riding, this would be a good option to throw some more lumens at the trail.
The reason this light isn’t good for trail riding is because of its narrow light beam. When turning, the light doesn’t shine around the corner well and it makes it difficult to see upcoming obstacles.
Using the light within its design parameters and the way I mainly tested it (as a primary light), I am exceptionally pleased. I really light how the light if focused right in front of you. Very little of the light is wasted to the sides where you don’t need it.

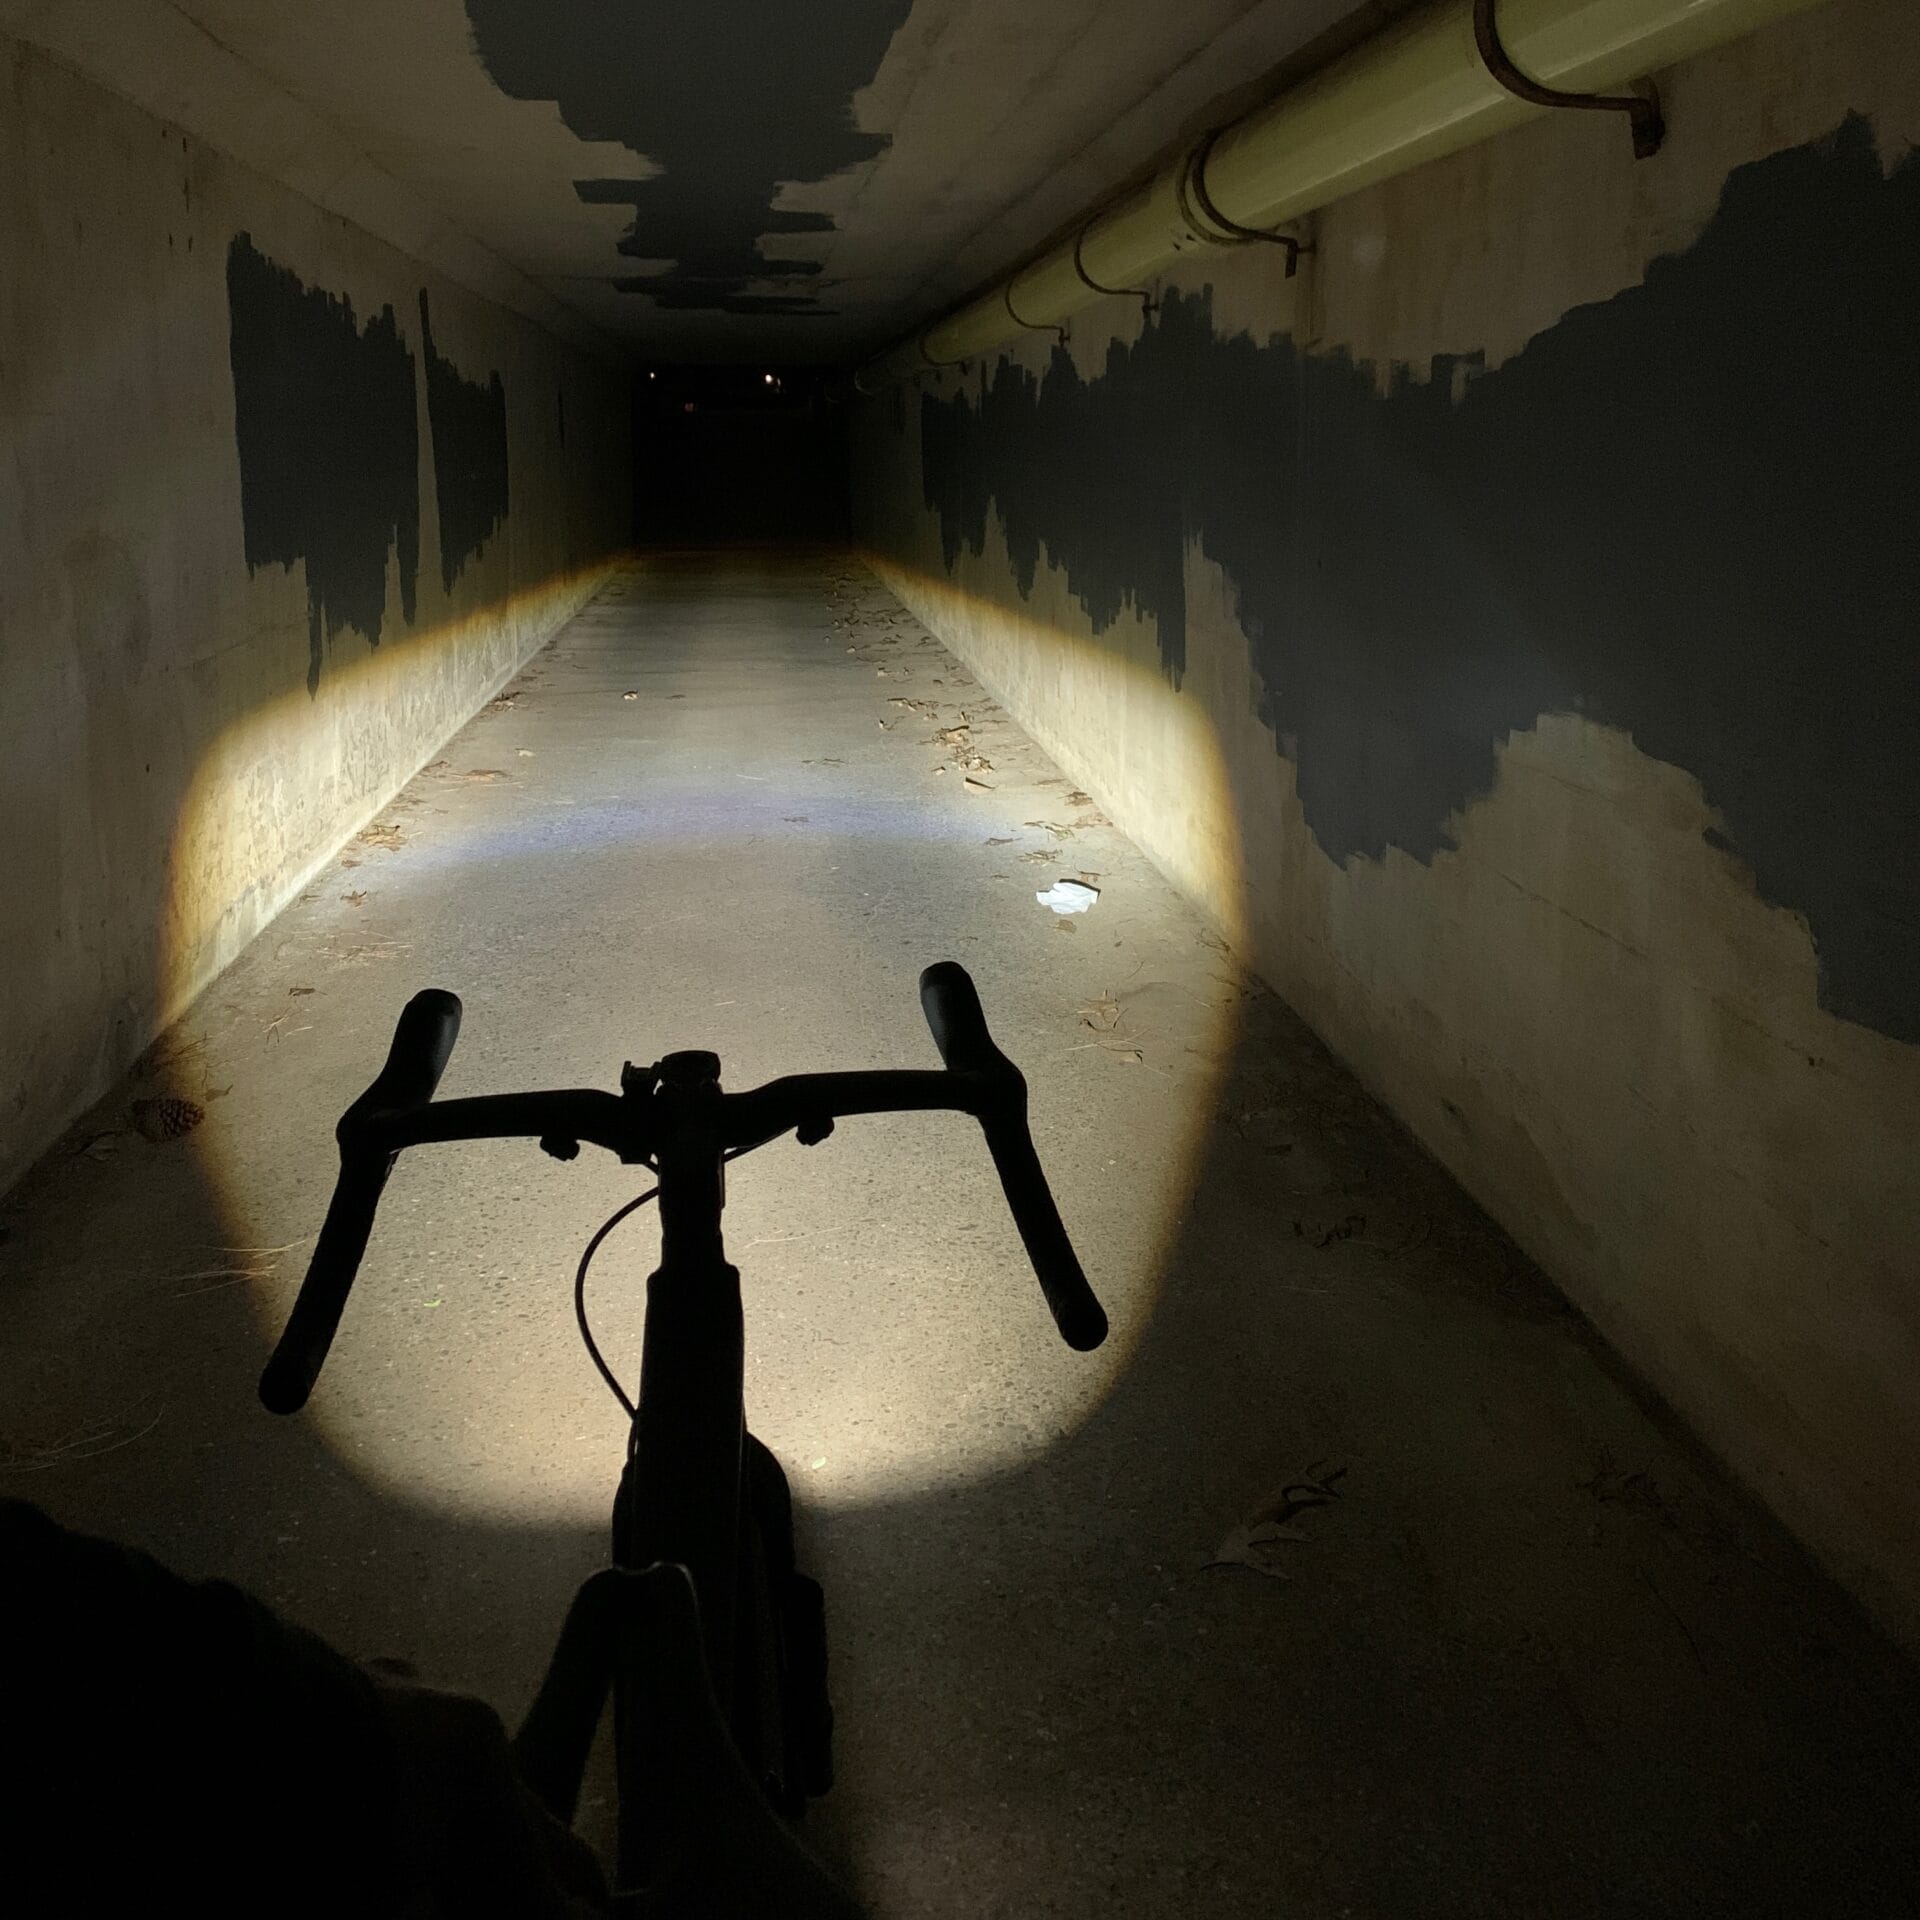
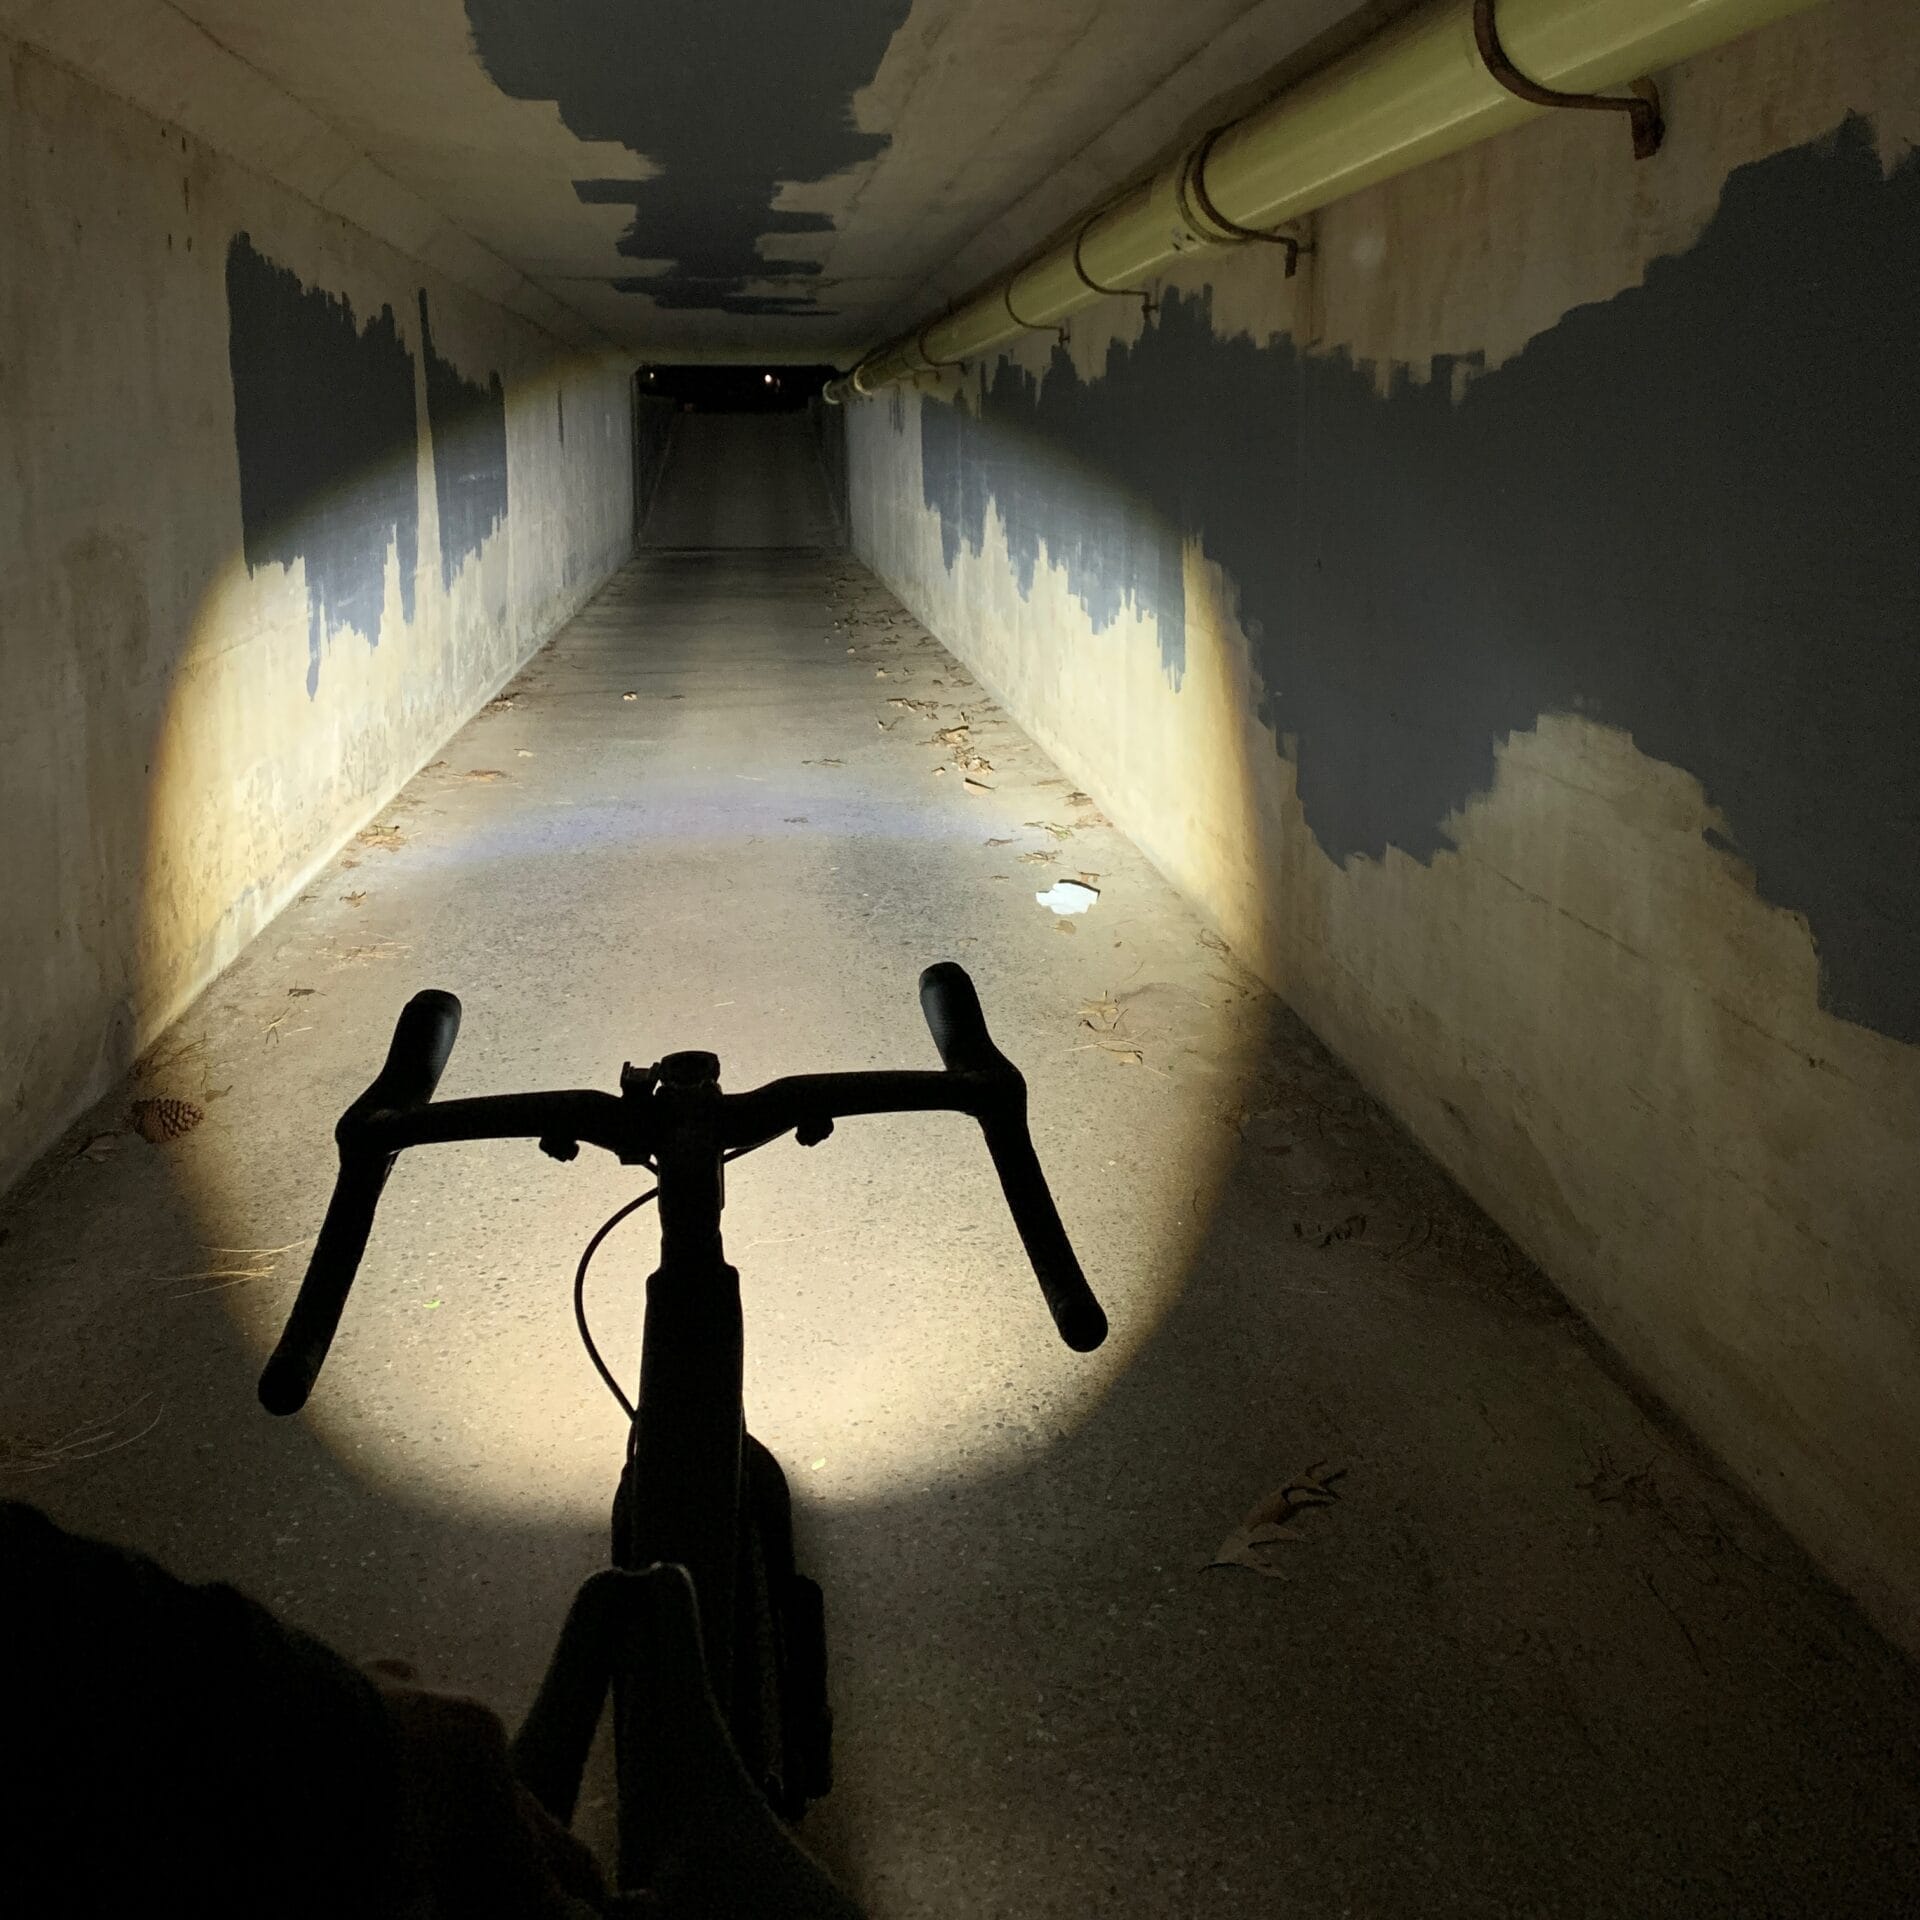
I really like the two High/Low Beam light modes. When there is oncoming traffic, either pedestrian, cyclist, or automobile, you can quickly change the light into low beam, so you don’t blind the other person. The cut-off lines are very sharp, probably she sharpest of any other light I’ve used before.
The light provides plenty of light and honestly, there isn’t much I would change or ask differently of this light. As far as lighting goes, it is really good. Though, it does have many other good features too.
I love the mounting system. It is quick and easy to use and is very secure, even on bumpy gravel roads. Using the GoPro mount keeps from cluttering your bars and allows you to maintain access to your entire handlebar.
The wireless remote is a neat feature. It makes adjusting between light settings fast and easy. It does take up some real estate on the bars. If riding flat bars, it’s not a big deal, but on drop bars it can get in the way.
This light isn’t for every situation or style of riding, but like I mentioned, it would make a good additional light for trail riding. As a primary light, it is great for urban and road riding.
If you are looking for a light with a sharp cut off that won’t blind on coming people, this is a light for you. If you are looking for a light from a company with a long history of making high quality bright lights, this light for you. The light is very easy to use and gives you many light option settings.
The light’s firmware can be updated through the app which ensures it can be optimized in the future.
Thank you for reading! If you think I’ve missed anything, or would like to know more, leave a comment below. Make sure to check out my other reviews and give me a follow of my other social media platforms to stay up to date on my current adventures.


SUPPORT JAYLO CYCLING
Did you find this post useful? If you have any questions, feel free to leave a comment below. If you have any suggestions of reviews or things you would like to see in the future contact me. My reviews are thorough and often take a significant amount of time to produce.
Please consider checking out my Instagram, YouTube, and Facebook accounts to show me support there. If you feel generous and have the ability, consider buying me a coffee to help support this site. Thank you for taking the time to check out my website and don’t forget to Subscribe to my newsletter too.


4 thoughts on “Magicshine EVO 1700 Outstanding Bike Light Packed with Massive Lumens”
Very nice review. I was interested in this light for a while and after reading your in-depth report of it’s performance I am now a user. Incredible package of a light for gravel and road riding. I ride early morning mixed gravel and road. 4am/5am rides before everyone is out and busy. This light does what it was purposed for. I am looking into their off road light and will share my thoughts if interested. Thank you for the wonderful article. Keep um coming!
Andrew, Thank you for reading my review and your kind words. I’m glad you enjoy the light. Stay safe out there. Let me know what you think of their off road light. I hope to be reviewing a newly released 1300 lumen light from them soon.
Great review Jason
Looking to get this light, it’s always great when one can see the beam patterns in actual conditions. I have several lights I bought and the beam patterns disappoint once out on the road or trail, your pictures clearly show the capabilities of the light, so kudos to you.
One really needs 2 lights, a Hi-Lo beam like this one, ideal for urban, bike path and maybe light trail riding, and a trail only light which makes more light, but clearly would be too dazzling to bike, car and pedestrians in the beam.
Ed, Thank you for the kind words and thank you for reading. This light really packs a punch. It is well made and puts the light where you need it. For urban riding, I don’t think you will be disappointed.