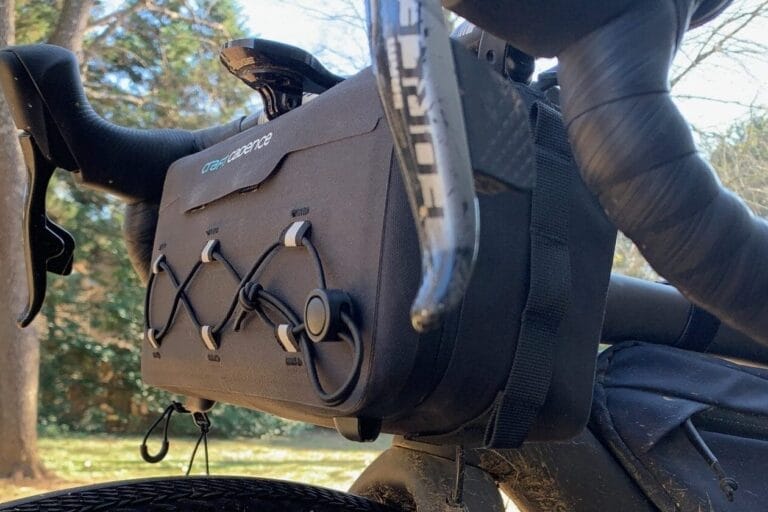
Craft Cadence Handlebar Bag
It is waterproof!
I could end this review here with just saying that, but there are some other interesting and useful things about this bag that are worth mentioning. So, I will go on.
The Craft Cadence Handlebar Bag uses fully welded seams to attach the side panels to the front and rear panels. If the bag is properly closed, don’t expect any water to enter the bag. It isn’t a dry bag, so it’s not meant for submersion, but for normal cycling in wet weather, your contents will stay dry.
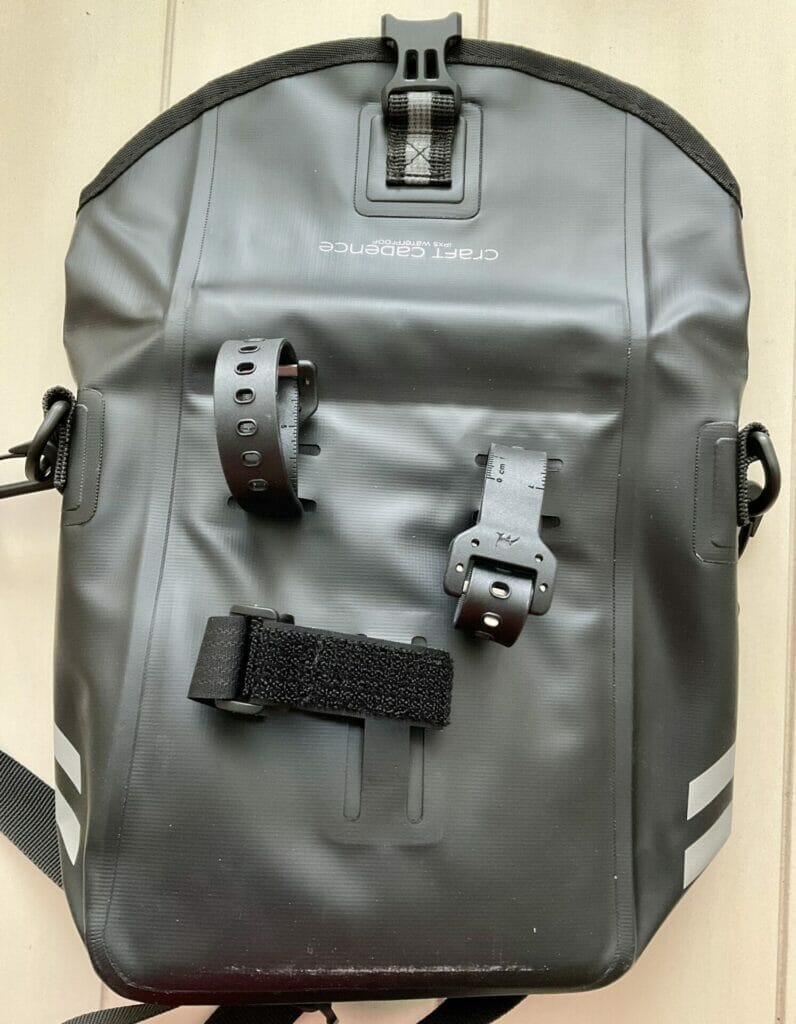
The handlebar bag attaches to the handlebars using two rubber ski straps. A Velcro strap near the base of the bag is used to connect the bag to the frame, cables, or steer tube (this depends on the style of the bike you are attaching it to).
Once detached from the bike, you can carry the bag either across your body or over your shoulder. The provided shoulder strap provides plenty of adjustability in length to provide a comfortable carrying position for most users.
If you are looking for a compact waterproof handlebar bag, this bag from Craft Cadence is a great option.


Handlebar Bag Design
This handlebar bag is designed for commuters riding folding bikes and specifically bikes with Brompton style handlebars.
This style of bike has a long vertical steer tube, and the bars attach directly to them without using a stem. Thus, the handlebar bag would rest against the steer tube and bars and firmly attaches to the bike.
With that in mind, the most secure fit will be on a folding bike with Brompton style bars. A standard handlebar and stem setup will work fine, this is what I use in this review, but the bag will bounce around more than if using the Brompton style bars (unfortunately, I wasn’t able to test it on my folding bike).


Using a typical bike with a stem will result in the bag flopping around a bit. The bag can still firmly attach to your handlebars, but it is not really possible to firmly secure the bottom of the bag.
This isn’t to say that it won’t work, it works perfectly fine, but it will bounce around a little. I have been using the bag on my commuter e-bike with no issues, even riding on bumpy, unevenly paved surfaces.
It should be noted, if you have internally routed cables or hoses in your handlebar and stem you won’t be able to attach the Velcro strap at all and the bag will be quite bouncy. With my commuter bike, I can attach the Velcro strap to the cables, which reduces the bounciness.
Construction
The bag is made from 500D Tarpaulin and uses fully welded seams.
The bag is constructed using 3 main panels, one “side” panel the wraps around the sides and bottom, and a front and rear panel. This gives the handlebar bag a rectangular box like shape, but reduces the number of seams, specifically in the corner of the bag.
With the flap open, the handlebar bag reaches 356 mm (14 in), but the practical usable interior height is about 200 mm (7.87 in). When the flap is closed the sides have a taper to them, therefore the top width is 270 mm (10.63 in) and the bottom is 180 mm (7.09 in).


The depth of the bag is 95 mm (3.74 in). Just note that these measurements are design values, and that the bag isn’t rigid. The bag material doesn’t stretch, but the bag will “reshape” itself to fit items slightly wider and deeper.
That considered, if waterproofness is important, make sure your contents are less than the 20 mm tall to ensure there is plenty of overlapping material when the flap is folded over and clipped down.
According to Craft Cadence, the bag provides 3-3.5 liters of capacity.
On the rear panel of the bag there are three attachment points. The material has oval cut-outs which creates a loop for the straps to slide through. To cover and seal these holes, a piece of the 500D Tarpaulin is welded to the inside of the bag.
Initial Thoughts
Upon first examining the bag, I noticed the high quality in the stitching of the trim pieces that finish off the edge of the opening. I could see the that the seams welded together nicely. I tugged on the joints and I could tell they weren’t going to fail.
The shape and style of the bag is quite nice. It is very simple, not too flashy (assuming you get the black model and not the yellow one) and offers good storage capacity.
The handlebar bag feels light and comes in at 370.1 g (13.03 oz), this includes the shoulder strap, ski straps, and the Velcro strap.
The shoulder strap is a convenient feature that makes the bag easy to carry around once is off the bag. I can see this being a feature that a lot of people will like, specifically commuters that lock the bike up in public locations.

The bag comes with a loop on the front of the bag that allows the user to hook a blinky light onto the front. This is a nice feature since the bag takes up a lot of space on the bars and would make attaching a blinky light to the bars difficult.
The handlebar bag closure system is quite sturdy and once it is clipped down, the bag is going to stay closed. The bag can easily be opened with one hand, though closing it requires two hands.
Installation
The handlebar bag uses two 180 mm (~7 in) “ski style” straps to attach the bag to the handlebars and one 180 mm (~7 in) Velcro strap to attach the bottom part of the bag to the bike.
Installing the handlebar bag consists of looping the ski strap through the loop on the back side of the bag, looping the strap around the bars, and then inserting the ski strap into the strap loop. Once the strap is through the loop, pull snugly and hook the prong into one of the ski straps holes to lock it down.
The Strap is long enough to wrap back around and back into the bag loop, so the end doesn’t flap around or disengage from the prong.
Use the lower Velcro strap to attach the lower portion of the bag to the frame or cable housing. This will keep the handlebar bag from bouncing around while riding the bike.


Items to Note
First thing to note, this handlebar bag isn’t fast to install. Also, if you have a bunch of stuff in the bag and the bag is heavy, it will be a little tricky to attach to the handlebars. I have found it best to start with the lower Velcro strap when installing or removing the bag, then installing the two ski straps around the handlebars.
If you are looking for something that quickly and easily attaches/detaches from the bike, this might not be what you want, but, keep in mind, other handlebar bags similar to this one can cost up to 4x more.
This is not to say that installing the bag is slow or difficult, it just isn’t the fastest system on the market. I would estimate that it takes about 30 seconds to install. So, if you are stopping multiple times, the times can add up.
Bag in Action
Let’s Ride!
I took the bag out on a somewhat bumpy bike path to test out how the bike handles with a loaded up-front bag on not so smoot terrain. Though the bag did bounce forward a bit (as mentioned above, the bag was specifically designed for Brompton style handlebars), at no point did I feel out of control.
Also, the loaded bag didn’t make the bike feel unstable and making turns was unaffected by the extra weight up front. Of course, when you are off the bike or leaning the bike on its kickstand, the extra weight can swing the bars sideways, but this will happen with any style handlebar bag.
On my test ride, I filled the handlebar bag with the Craft Cadence Essentials Case, GoPro Hero 8, an external battery, a spare tube, a tire lever, and my cell phone. Even with all that in the bag there was still a little bit of space left over.
I’m not exactly sure what the weight limit rating for the bag is, but it is strong enough to carry a large DSLR. And anyways, you wouldn’t want to carry very heavy loads on the handlebars because it could make handling the bike difficult and unstable while turning.


Final Thoughts
Since my first test ride, I have continually used the bag on my 21 km (~13 mile) commute to work. The added storage allows me to separate my small contents from my pannier backpack, which is used to carry my laptop.
I enjoy the extra added storage the Craft Cadence Handlebar Bag provides. It is lightweight, durable, and quite stylish. I think it makes a great addition for commuters, road, and gravel cyclists. I would recommend this bag and it is definitely worth considering if you are in the market for a handlebar bag.
Also pictured here is the Craft Cadence Top Tube Bag.


This bag under review was provided by the kind folks at Craft Cadence. I would like to thank Craft Cadence for giving me the opportunity to review this item. This review is based on my own opinions and was not influenced by the provider of this item.
Check out their website for the full line of waterproof gear at CraftCadence.com
Support JayLo Cycling
Did you find this post useful? If you have any questions, feel free to leave a comment below. If you have any suggestions of reviews or things you would like to see in the future contact me. My reviews are thorough and often take a significant amount of time to produce. Please consider checking out my Instagram, YouTube, and Facebook accounts to show me support there. If you feel generous and have the ability, consider buying me a coffee to help support this site.
If you are in the market for these items, consider using my affiliate links on this page. Jason Lopez is a participant in the Amazon Services LLC Associates Program, an affiliate advertising program designed to provide means for sites to earn advertising fees by advertising and linking to Amazon.com. Thus, I can earn from qualifying purchases at no extra cost to you, but your purchases do help support this site.