The Magicshine Hori 1300
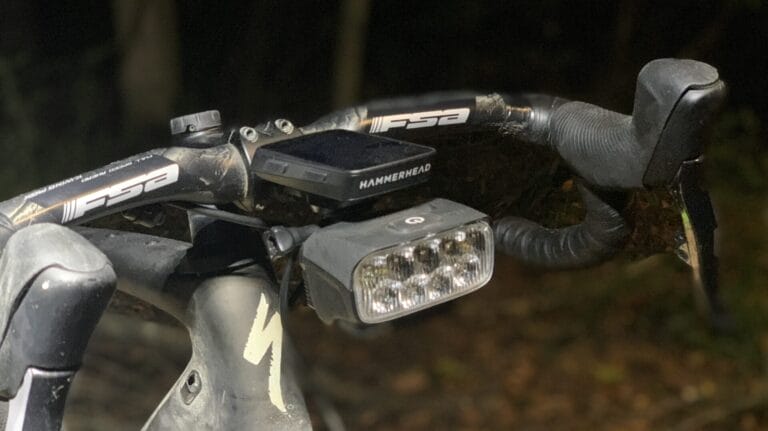
Magicshine has been making waves in the Garmin quarter-turn style mounting light market with the Hori-series, and the Hori 1300 steps it up a notch from the Hori 900 I reviewed earlier. This is a deep dive into the Magicshine Hori 1300, which packs a dual-beam punch with more power for those nights when you need to cut through the dark a little harder. If you're after something more compact and visibility-focused, the Hori 900 is still a solid pick, but the 1300 brings extra lumens to the party without sacrificing that sleek profile.
I'm hooked on this mounting style—it's clever and hassle-free—but it comes with its quirks, which I'll unpack along with some smart fixes. The real draw here is how it tackles visibility and adjustability head-on, making it feel like a natural extension of your cockpit setup.
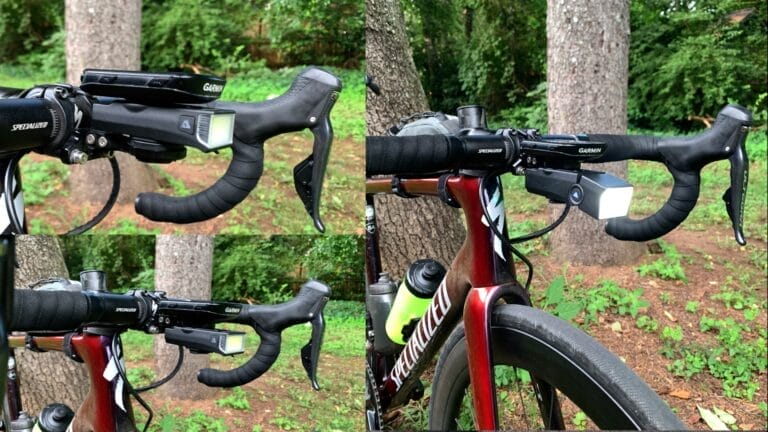
This light shines (pun intended) because it taps into the ubiquitous Garmin quarter-turn system that's been a staple for years. Got an out-front mount for your Garmin or cycling computer? You're golden—no extra hardware required. It slots right in, top or bottom, though I'd still suggest getting an adapter for the best results (more on that below).
This Magicshine Hori 1300 was purchased recently during Prime Day on Amazon. Since then, the price has been reduced, mainly because the 1300S was released. If you are interested in the 1300S, these two lights are essentially the same, but the S version has additional smart features. The light data below will be similar for both since they have the same battery and specs.

Unboxing
Cracking open the Magicshine Hori 1300 feels like unwrapping a well-thought-out kit for the road warrior. Inside, you've got the core light body, a detachable Garmin Base (male quarter-turn), a Garmin and Wahoo mount (female quarter-turn base), a decorative cover, a GoPro adapter, USB-A to USB-C charging cable, torx key, and the User Manual.
The base and mount secure with a screw straight into the light body, backed by a strip of 3M tape for that extra grip. They're fully swappable, so you can flip them to the top or bottom based on your mount setup. Mine shipped with the Garmin mount on top and the base on the top side—standard factory configuration, but it's a quick reversal if needed.
Like its sibling, the Hori 1300 skips the out-front mount and remote in the base package. Smart move by Magicshine; most riders already have mounts dialed in, so bundling it as an optional add-on keeps the price lean. I griped about this in my Allty 1200U review, and hey, maybe they're tuning in—who knows? The mount's great if you need it, but I appreciate the choice to skip the fluff.
The remote? It's a game-changer for mode-hopping, but not essential for basics. There is no choice for opting out with the Magicshine Hori 1300.


Warranty
Magicshine sticks to a solid 2-year warranty on bike lights like the Hori 1300, stretching to 2.5 years if you buy from an authorized dealer. Hang onto your order number and proof of purchase for claims. Batteries and accessories get a 1-year cover—standard stuff, but it gives peace of mind on the trail.
Price
The standalone Magicshine Hori 1300 launched around $79.99 USD, now hovering closer to $69.99 USD for a steal. That’s with the out-front mount and the remote.
That shakes out to about $0.05/lumen at the current pricing—bang-for-buck territory that rivals beefier lights like the Evo 1700. It's positioned as a step-up from the Hori 900 without breaking the bank and a High Beam mode.


The Light
The Magicshine Hori 1300's body is forged from aluminum with composite plastic accents and a grippy rubber side button—built tough but light on the bars. Under the hood, two LEDs: an LED light strip for light low beam modes and a beefy single central LED for the High Beam.
The Low Beam rocks a cut-off lens to keep oncoming traffic happy—no blinding glares here, but a click of the button, blast the high beam in the darkest locations. It's all about controlled power that lights your path without the drama.
Specs
- Max Output: 1300 Lumens
- Light Source: High-power LEDs
- Runtime: 1.5-9.5 hours
- Charge time: 2 hours (5 V 2 A)
- Battery: 3.7 V 3200 mAh
- Charge Port: USB-C
- Water Penetration: IPX6
- Weight (mass): 3.33 oz (151 g)
- Size: 60x57x37 mm
Light Modes
Out of the box, the Magicshine Hori 1300 offers 6 modes, but the app lets you tweak them to your liking. Breakdown: Low Beam (High, Medium, Low), High Beam, and Flash (Day Flash, Night Flash). The Remote unlocks the full flash suite of light modes, whereas the button only lets you use the solid modes (assuming light modes weren’t changed within the app).
Charging/Discharging
USB-C with a rubber flap seals out the wet stuff, charging in about 2 hours at 5V/2A. The bumped-up 3200 mAh battery keeps it compact yet enduring, with runtimes spanning 1.5 to 9.5 hours depending on mode. Real-world tests below, but on paper, it's a longevity decent.

Light Interface and Magicshine App
Ships in Lockout Mode—hit the button, and a red flash confirms it. Exit the by holding the button for 3 seconds. Power on with a one-second hold, cycle modes with quick presses, and double-click to flip between High Beam and Low Beam.
Battery vibes via the button LED: Green (100-21%), Red (20-11%), Flashing Red (10-1%). Tap it off-cycle for a quick check.
For pro-level tweaks, fire up the Magicshine App—pairing's a breeze, and you can dial brightness in 1% steps, remix modes, and save presets. It's overkill for casuals, but unlocks SOS and firmware updates. App manual has the details.
Full details on downloading and connecting to the device and more can be found on the Magicshine App User Manual.
The remote steals the show, though: smaller redesign, USB-C rechargeable (bye, coin cells), and it syncs battery status for the light and itself. Control multiples if you're stacking lights—efficiency win.

Remote Control
Remote perks over button-only: Square button for brightness shifts, double-square for flashes. Circle scrolls modes; double-circle toggles Main + DRL to DRL solo. Pairing's idiot-proof—manual covers it.
FTR LightSync Control
The Magicshine Hori 1300 supports FTR for unified control. One press rules them all—front and rear in sync.
Mounting
Unlike the Hori 900, the Magicshine Hori 1300 is only intended to be installed via the GoPro/Garmin quarter-turn mount (even though MS has pictures of it installed on top of the out-front mount but say otherwise). This light comes with the quarter-turn on the top, with the intention of it being installed with the adapter for perfect beam adjustability. This is still a very easy installation once your out-front mount and adapter are installed.
Just a quick turn of the light and it is installed. With the light installed, adjust the light while in low beam to set the angle of the light so the light cutoff aimed as not to blind oncoming traffic. With the high beam setting, the light will give you full visibility for dark settings.
Key caveat: The beam is directional, so the light must be installed in the upright orientation. If installed upside-down, the the cut-off is flipped to the wrong direction.


Initial Thoughts
With having reviewed the Hori 900 already and this light being so similar, my initial thoughts are basically expecting it to be the Hori 900 but brighter. It is slightly heavier, but nothing too noticeable. It is slightly larger, but it is still a compact light, and with similar mounting as the 900, I’m expecting all the positives to be carried over.
I assume that these lights were designed at the same time, and they probably have pretty much the same internals. The main benefit of this light is the dedicated high beam. This light essentially has the Hori 900 main light with an additional LED and lens to focus light higher up to provide more visibility.
This Magicshine Hori 1300 does not have the DRL light. I don’t see that as being a huge deal since the light can be set to low and it still has plenty of battery life for daily use.


Light Performance
Procedure/Setup
The light intensity is being measured with an Extech SDL400 light meter and datalogger. The lights and the light sensor are attached to various tripods that I already own and are held 1 m apart from each other. The datalogger is started, and the light is turned on and shone directly onto the sensor.
The test is conducted in a completely dark room with a fan running to ensure air is circulating over the light. The test runs continuously until the battery dies. The light is then recharged and retested for each steady light mode. For the flash mode, testing lasts about 1-2 hours.
Typically, flash modes are only for user visibility, so I’m not very concerned with the light intensity reduction over time as much as the steady mode.
For the full test setup and the benefits for this test setup, check out Light Intensity Test Setup with Extech SDL400.
Testing
I tested each constant Main Light mode and the High Beam for intensity and duration. I also tested Night Flash mode for about 2 hours to see how the light performs over a short period of time. Then the Magicshine Hori 1300 is compared to a few other lights with similar claimed lumen ratings.
Also, I am plotting the data as perceived light as a percentage and is:
Perceived Light (%) = 100 x sqrt(Measured Light (%)/100)
where Measured Light (%) is the Current Lux/Maximum Lux x 100. For the perceived light calculation, the max lux is used for all light modes. For comparing multiple lights, the max lux from the lights being compared is used. In other words, the perceived light comparison is relative to the brightest light being compared.

Test Results
Starting out with the runtime values, the times from my test do not match the claimed runtimes values. The Mid and Low mode are way longer than the claimed values, and the functional light output of the High Beam High and the Low Beam High modes are way under than the claimed values.
Read the section of the FL-1 rating in my review on the Outbound Lighting Evo Trail. The claimed runtimes are based of a percentage of light output drop, so actual runtimes may not actually match actual tests.
The runtime for the High Beam is claimed to be 2 hours, though the light did shut off a little after 2.75 hours, the lux dropped from about 4000 to about 800 at around the 1.75-hour mark. The LB High followed the High Beam output for most of the cycle but didn’t have the large drop of until the 2-hour mark but had a claimed runtime of 2.5 hours.
Both high modes perform mediocre compared to some other high-end lights. It seems that the high modes are being maxed out to get higher lumen rating but then burning too much battery to get the right runtime. Also, at the end of the run, the light continues to run at a low output state for a significant amount of time.
I think a better engineered light with different internal could even this out, that is, if the goal is to make a constant light output instead of just shooting for a high lumen claim.

Click image to open interactive chart

Looking at the combined perceived light output, the drop in intensity doesn’t seem as bad. For the HB High, the light drops about 10% within the first 15% and continues to drop to about 25% of full intensity within the first hour. After that there is barely 45 mins left before the light drops to about 35%. The LB High has a 30% initial drop before dropping down to 35%.
Though the light output at 35% is still sufficient to light the way, one will need to slow down significantly to ride safely. The 35% light output is close to what the LB Low output is. The LB Mid and Low outputs are a bit more constant each with about 15% decline over the cycle.

Click image to open interactive chart

The following table has calculated statistics from each light mode test. Since the test setup had the lux meter sensor 1 m away from the light, it made the math quite easy. For Candela (cd):
Candela (cd) = Lux (lx) x (Distance)^2
where Distance is the distance between the light source and the Lux sensor.
The 10% cutoff value comes from the ANSI/PLATO FL-1 testing standard. It is used to determine the total runtime of a flashlight. When the light output hits 10% output of the light output measured 30 seconds after the light is turned on. The 30 second wait time allows for the LED and drivers to thermally stabilize.
The retention is the average output divided by the peak value. This tells how much of the peak value is retained over the average output of each test. Thus, a higher retention will give a steadier output with smaller drops over the test. Low retention value means a company is likely seeking to get a high lumen rating and isn’t worried about light performance.
The Magicshine Hori 1300 does a good job in the Mid and Low modes. In the High and High Beam modes, not so much. The light does pretty well up until about 1:45-2:00 but then makes a huge drop. Since the light stays on above the 10% cutoff, it is able to hit the runtime values. But, the last hour of light is essentially the Low mode output.
From the table, significant differences can be seen in peak intensities, total light delivery (lux*hr) is relatively stable across all light modes ranging from 9,344 to 11624 lux*hr. The Mid mode has the highest amount of accumulated exposure, indicating the best balance between brightness and runtime. Whereas the high modes produce greater peak intensities but experienced large step-downs in output, resulting in less light delivered overall.
| Ligh Mode | ANSI 30s (lx) | 10% Cutoff Threshold (lx) | Lux at Cutoff (lx) | Avg Output (lx) | Retention (%) | Exposure (lx·h) | Cd/Lm | Throw (m) |
|---|---|---|---|---|---|---|---|---|
| High Beam | 7584 | 758 | 853 | 3243 | 43% | 9344 | 5.85 | 174.4 |
| High | 6776 | 678 | 852 | 3392 | 50% | 10319 | 5.26 | 165.4 |
| Mid | 3293 | 329 | 818 | 2111 | 64% | 11624 | 2.53 | 114.8 |
| Low | 1651 | 165 | 855 | 1112 | 67% | 11067 | 1.27 | 81.2 |
Interestingly, since most companies have adopted to use ANSI/PLATO FL-1, expectations for light output and runtimes need to be tapered. But I think if a company is reporting a runtime for a light, it should be easily validated and achieved. Anything less than what is reported is unacceptable.
The Magicshine Hori 1300 hit all expected runtimes and surpassed them by at least 20%. The Hori 1300 does a good job for Mid and Low Modes with the average lux outputs coming close to the peak values.
| Light Mode | Expected Runtime | Recorded Runtime | % Difference |
|---|---|---|---|
| High Beam | 2:00:00 | 2:52:53 | 44.10% |
| High | 2:30:00 | 3:02:31 | 21.70% |
| Mid | 3:30:00 | 5:30:23 | 57.30% |
| Low | 6:30:00 | 9:56:51 | 53.00% |
Limitations of this Test
The lux meter test doesn’t consider the beam spread or throw of the light. Thus, a light with a compact beam could perform very well in the light intensity testing, but not be very useful for cycling. Fortunately, this light has been designed for cycling and provides good lighting for cycling.
Beam Spread and Throw
Measuring the theoretical spread and throw from the table above or the values given from the manufacturer is a bit tricky, but I have set up three locations that I feel give a good feel for how the beam spread and throw for light I test are. First, is about 10 ft away from a wall, then in a tunnel, and lastly, in a field.
Projecting the light at a wall this close is a good way to see the actual beam pattern. This also shows any hot spots. And with lights light the Magicshine Hori 1300, one can easily see the cutoff line. The tunnel shows how much of the spread is going upwards on the roof of the tunnel. The field images, are what to expect when riding in unlit areas.
The Magicshine Hori 1300 had a hard cutoff line that will keep the light from shining into the eyes of oncoming traffic. This is done using glass on the front of the light. If riding in a dark area, and more light spread is needed, the Hori had the High Beam Mode to give more visibility.
In the tunnel, the light shines all the way to the end on all modes and with the cutoff line not too much light is wasted shining upwards. I noticed that the Mid mode felts just slightly brighter than the High. I would probably just use Mid to get extended runtime while riding.
In the field, the beam spread shows up quite well. Not too much of the light shines to the side and it puts the light forward where it is most needed for road riding. The beam throw is quite pronounced when going from Low to Mid. Once in High and High Beam the mound up ahead is just brighter. At that distance, this light provides plenty of light for high riding speeds.


Adapters
Magicshine included a GoPro-to-quarter-turn adapter—crucial for underside mounting when your computer's angle might skew the beam. Some pople often set up their out-front mounts to tilt the screens, so direct attachment can throw off that cut-off line. Undermounting is really the only option for this case and the provided mount seems a bit cheap.
Garmin or KOM outfront mounts have male quarter-turn underneath, which will require a slightly different adapter configuration. Options abound—male-to-male, female-to-male, whatever fits your need.


Things I Would Change
Battery indicator is still too vague. I really which this was updated already. A flashing green tier should be added and tightening of the ranges: solid green 100-75%, flash green 74-50%, solid red 49-25%, flash red 24-1%. Riders deserve granularity.
The GoPro adapter is functional but feels like it'll snap eventually. I would swap it to an aluminum one for longevity.
Ditch the USB-A cables already. USB-C to USB-C or bust; these short, flimsy calbes add little value and most people probably just toss them or never use them.


Final Thoughts
The Hori 1300 is Magicshine’s first dual-mount Garmin style light (along with the Hori 900) and is following suit with other lights from Ravemen and KOM Cycling. This style of light has many benefits, typically being lightweight and easy to install, but they aren’t by all means the perfect light.
Knowing the limitation of this style light is important when picking out the right light for the style of riding one is doing. In fact, I think most people should have a variety of lights depending on different conditions and needs.
Commuting and riding slower speeds, one doesn’t need as bright of a light. Trail riding doesn’t require a cut-off beam. Gravel is a bit similar to road, but sometimes one is quite rural and will need a brighter light. A light with dual beam (high/low beam) is ideal for this.
The Hori 1300 has an impressive light pattern and light intensity performance when comparing it to other similar lights. And from the lux testing performed above it performs similarly to other Magicshine lights. I think for its size and weight it is a pretty good light.
I really light the beam patterns Magicshine has been producing lately. The Hori has a similar pattern to their EVO light with the V-shape the sends the light forwards where it is most needed for road cycling.
Is this the best light?
Hardly. I’m not impressed with the High and High Beam performance based on the claims. Based on the useable light output, they don’t hit the claimed runtimes by the point it makes a significant drop in light output.
My assessment of this light is slightly based on using the EVO 1700 Pro. I think the EVO is one of the best lights for road cycling (based on beam pattern, price, and light performance). The EVO is slightly more expensive, but not my too much. Also, the EVO doesn’t have the fast quarter-turn installation.
With the mentioned adapters, the light can be adjusted perfectly for each bike. Paired with the remote and having an app for customization makes this a solid light. If you are looking for a low-profile lightweight light that is easy to install, this should be a light to consider.


Author Conflicts
I purchased the Magicshine Hori 1300 on Amazon during Prime Days and got a good deal at the time. No compensation from Magicshine—just my honest take to help you decide if it’s your next light.
Support JayLo Cycling
Did you find this post useful? Drop a comment with questions or future review ideas—my dives take time, but they’re worth it. Hit up my Instagram, YouTube, and Facebook for more. Feeling generous? Buy me a coffee to fuel the site. Thanks for reading—subscribe to the newsletter and keep rolling!